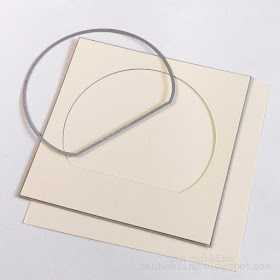
I cut a 5 1/2" x 5 1/2" square out of Ranger's Mixed Media cardstock. Die-cut your globe piece, about 1/2" from the top. You are going to use the negative part for your card. I die-cut another piece the same but the card size is slightly larger, so there's about 1/8" mat. (I've used a piece of thin chipboard so you can see the two pieces more clearly). The two layers create a deeper recess inside the globe. Cut out another solid square, 5 13/16" x 5 13/16", this is the backing to your globe. Center and glue all three pieces together.
Die-cut all those wonderful little pieces from Ranger's Mixed Media Cardstock. I die-cut a few extra pieces of snow. Glue the windows, and house parts to the main house pieces. Tweezers help with holding the smaller pieces. I've used Distress Collage Matte Medium to adhere my pieces.
The Snowglobe base was embossed with Sizzix's Birch Texture Fade Embossing Folder.
All of the pieces were adhered with Distress Collage Matte Medium.
After everything was glued down, I applied a thin layer of white gesso to the entire surface. It not only gives a good white base (when painting, your colour goes on cleaner) but also the brush marks give a nice texture. Plus, if you have any glue showing, the gesso will cover it.
I chose blue/green tones for my card, but any colour scheme would work. I painted my darkest colour first, Chipped Sapphire Distress Paint, with inside the globe a little darker. I use very little paint, you still want the detail to show. It doesn't look very good at this stage, don't worry!
Next came Tumbled Glass, then Evergreen Bough and Brushed Pewter Distress paints. These were all dry brushed (most of the paint is wiped off the brush, leaving a slight amount left on), one at a time and dried in-between. You just want to lightly brush a trace amount of colour, it's amazing how little you need and still get colour on your piece. Sometimes you might want to reapply a darker colour again, just repeat.
When you are happy with your final colour, dry brush Picket Fence Distress paint to highlight.
Add a bit of snow by splattering white paint with a Tim Holtz Splatter brush. I die-cut the globe on a piece of scrap paper and laid the negative paper on top so the splatters just reached the inside of the globe. A bit of Rock Candy Clear Glitter was added to the tree tops and roof tops. To finish my card, I die-cut pieces from the Festive Greens Thinlits Die set out of white cardstock. These pieces were highlighted with Clear Rock Candy Glitter and Glossy Accents. Silver Stickles were applied in little dots to the berry die-cut. The thin silver trim on my card, is Silver Deco Sheets (TH93219) that I cut. These Deco sheets are like Tim's Glitter Design Tape, very thin but with a backing, so they can be cut into any shape or trimmed into strips like I did and apply like a sticker. A bow from Idea-ology Metallic Trimmings(TH93646) and a painted Christmas Typed Token Finding (TH93629) complete my embellishments. My finished card front was adhered to a white cardstock card base.
Here's another look at my finished card:
There's still some holiday inspiration to come, and in case you've missed any of the previous weeks, don't forget to check Tim's blog for the weekly recap, or his Instagram, Facebook, and Twitter for more inspiration!
A big THANK YOU to Tim, Mario and Paula for letting me be a part of this creative journey! I feel very honoured to be a part of your team!
Until next time,
Jan


This is beautiful Jan! Thanks for all the inspiration!
ReplyDeleteWow! Wow! Wow! So gorgeous!
ReplyDeleteGorgeous! I’ve been so inspired by all of your lovely projects!
ReplyDeleteGorgeous, love the colourway. Tracy x
ReplyDelete
ReplyDeleteYour projects are always perfection Jan. I would have freaked out after the first layer of paint, but you seem to find your vision with pretty stunning results. The paper mask is a really good tip for spattering! Cheers my dear
Wow wow wow! This looks stupendous! ❤️❤️
ReplyDeleteJan, my mouth is open.I just GOT to try your technique. Thank you for the inspiration!
ReplyDeleteThis is stunning, Jan. I love the monotone look. Very inspiring!
ReplyDeleteWow! An impressive use of that die set! The colors are so beautiful, and your design is outstanding!
ReplyDeleteBeautiful!
ReplyDeleteJan, this is superb! I have just made a white on white one but now I want to do one like this, it is very atmospheric and so inspiring!
ReplyDeleteGorgeous!!!
ReplyDeleteWow, this is really beautiful and inspiring!
ReplyDeleteWow! This card is simply stunning.
ReplyDeleteThis is such a lovely card. I love every detail. Thank you for sharing the process.
ReplyDeleteJust a wonderful interpretation of this product - very much of an inspiration for me. Thanks ever so much.
ReplyDeleteAbsolutely stunning!
ReplyDelete