Hello crafting friends! Today I'm sharing another project I created for the Tim Holtz Idea-ology booth at Creativation 2019. This is my Mr. Tinkham's Trunk Vignette box.
I love using Idea-ology's Vignette boxes and this new Divided (TH93794)one gives you some different options. The dividers inside all can be removed. I decided to just remove the larger bottom one so I had a bigger area above the two smaller dividers.

My first step was alter the outside and inside of my vignette box. I covered the outside back with Wallflower patterned paper (TH93110), tearing a bit away from the corner, exposing the wood. I then added in a few pieces from the Idea-ology Journal Card pkg(TH93957). There are 4 different sizes of cards in this package, 25 of each size. That's 100 cards in the one package! You can see one on each side here, they were adhered wrapping them around the edge of the box. I didn't apply the adhesive right to the edge in some areas, so I could curl up the edges. I also used a couple of the new Classic Label Stickers (TH93959) here. In this package there are 4 different colours; blue, red, black and pink. The papered box was distressed with Distress inks and Oxide inks. Ranger's Opaque Crackle Paste was applied randomly and let dry. I then used Distress crayons (Gathered Twig, Vintage Photo, and Weathered Wood) and a bit of water to moisten, to darken and age the crackle. Some places, I picked off some crackle.
In this small divided side, I filled it with a small painted Vignette Frame(TH93694). I used a piece of Keepsakes Ephemera(TH93958)inside the frame. This old advert gave me the idea for my Vignette box theme. This and the other pieces of ephemera were distressed with Distress Oxide inks.
On this side I painted one of the new Deco Frame Adornments (TH93792) with red and a touch of green Distress Paint. Mr. Tinkham's photo is one of the new small Found Relatives photos(TH93798). I cut it down to fit behind the adornment frame. My little book is actually made using a book cover piece from Layers Remnants(TH93956), cut up pieces of old book paper the same size, for the inside and a piece of heavy cardstock for the back. Using my Tim Holtz stapler, I stapled the inner pages together in the middle (it won't show). I used a piece of Designer Tape for the book's spine. Tiny Text Remnant Rubs(TH93695) were added to a lightly sanded Classic Label Sticker. A price sticker (Keepsakes Ephemera TH93958) was placed in a Memo Pin (TH92833). For my Filmstrip Ribbon(TH92820), I cut down one of the photo postcards from the Layers Remnants (TH93956) to fit behind the acrylic. I find if you heat the ribbon slightly with your heat gun, while holding it with tweezers, you can make it hold that shape. Be careful, don't overheat! I use Ranger's heat tool, it's not a direct heat like some embossing heat guns. The memo pin pokes through this to hold it securely into the wood. There's also a Pen Nib (TH92909) in the back.
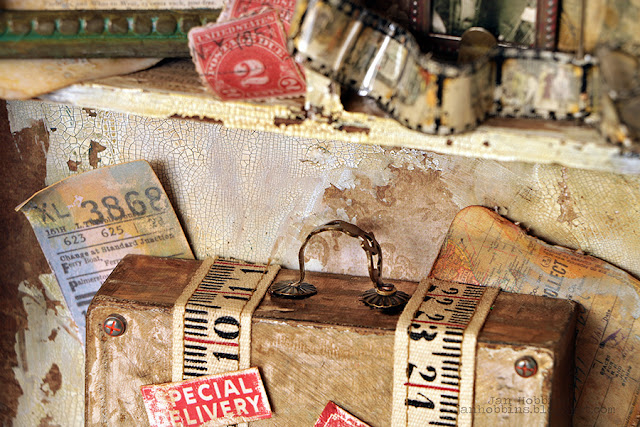
For the largest divided opening, I created a travelling trunk. My "trunk" is actually a Vignette Box (3.875 x 2.75 fromVignette Set TH93782). I covered the outside of the box with Mushroom Metallic Kraft Cardstock (TH93784). This was sanded, a little heavier in some areas and the edges. To darken the sanded areas, rub in Distress crayons or/and ink. I've cut two strips of the new Ruler Ribbon(TH93955) and adhered these to the front. Distressed Keepsakes Ephemera labels were added. Red paint was added to four Hardware Heads (TH93788) which were adhered to each corner.
For my trunk "handle" I used a Clock Hand (TH93693). I bent it around a dowel to get the curved shape, then using small pliers bend the ends out. For the one end with the hole, I inserted a Fluted Fastener (TH93273) with it's brad and the other side, I just stuck the end of the clock hand into the center of the fastener. Both of these ends were adhered with Collage Medium to the trunk.
The wheels of the trunk were two Mini Pulley Wheels (TH93580) which were coloured with a combination of Candied Apple, Ripe Persimmon, Black, and Vintage Photo distress paint/crayons.
Before adhering the trunk, I added in ephemera, and labels, distressed with Oxide inks to the back of the box. I used Collage Medium to adhere the trunk. That completes my project.
Here's another look at my finished Vignette Box! I have a few more projects from the booth to share,...but that's another day!
Thank you to all of you who took part in the Creativation blog hop and all the wonderful comments! Congratulations to Mel Roberts-Hareld, Kathy Tucker, Tiffany Hopkins and Dana M; the blog hop winners!
Thanks for stopping by,
Jan


