LIGHT THE WAY CARD - TIM HOLTZ SIZZIX CHAPTER 3 RELEASE

 Hello everyone! Today I’m sharing a card I created for the Tim Holtz Sizzix Halloween YouTube Live launch.  I decided to give this Colorize Candlelight Thinlits set more of an autumn look, mostly because I couldn’t resist making fall leaves!


Love these new sets!

Oak Leaf Impresslits 665374
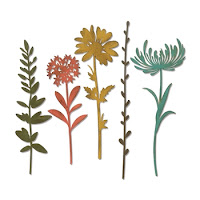
Candlelight Colorize 665552 


I used Distress Mixed Media Heavystock papers coloured with various fall colour combinations.  These were created with Distress sprays, Distress Oxide sprays and Distress Halloween Mica Stains.

My candles were die-cut with coloured Mixed Media Heavystock and the lantern from Distress Metallic Kraftstock. Sizzix has great videos to assist you with constructing all the Colorize die sets. 


For my lantern, I cut out a piece of acrylic, tinted it with alcohol ink, and adhered it behind the die-cut. I then applied a small amount of the new Halloween Distress Crypt Grit Paste. 


I’ve also used this new 3D Foliage Embossing Folder.  Mixed Media Heavystock was used to emboss a piece, then trimmed slightly small than the Lace Baseboard Frame TH93786. This was coloured very lightly with Antique Linen Distress Oxide Spray. I just wanted a light touch of color.

Foliage 3D Embossing Folder 665252


Brown Distress Crayon was used on my Lace Baseboard Frame TH93786 in all the grooves to highlight the lace texture.  The leaves were cut out with the Oak leaf Impresslit.  Love the way this die embosses and die-cuts the leaf!  I know you are wondering what size my card is... I thought I had written it down somewhere, but in all my scrappy mess, I can't seem to find it.  It's a large one!  I don't really make specific sizes of cards, I just cut the card base to fit my design.  I also like to layer with a few mats of cardstock to give dimension to my cards. The background paper is from the Tim Holtz Abandoned paper pack, machine stitched around the edge.  I've also added in some tinted Mummy Cloth and a Quote Chip TH94045.


Here's another look at my finished card!  Love the Candlestick and Lantern set, I can see this as a Christmas card too, just change the leaves to winter foliage.

Thanks so much for visiting, I have more to share. 
 I will be taking a short break, a very long wait to finally see our granddaughter (and of course her mom and dad) on Vancouver Island.  It's been over a year, she went from a tiny baby to a walking, talking, toddler!  If only we could see our older son and daughter soon also, I would be a happy momma. One is in New York and the other in Australia.  Unfortunately it could be awhile.

Until next time.

Jan


9

FLOWER FIELD VIGNETTE BOX - TIM HOLTZ SIZZIX CHAPTER 2 RELEASE

 Hello crafting friends! Still trying to catch up! This is my last project from Sizzix Chapter 2.


I've created this 3D Shadow Vignette Box using two of the new Chapter 2 Thinlits sets.


Here's a look at the back of my Vignette Box.  The ovals are all created with the 
new Stacked Oval Framelits set(665368).

Stacked Oval Tiles 665368

Flower Field 665369


The flowers were die-cut from the Flower Field Thinlits set.


The Oval set has 25 dies, 5 of each size (5 sets).  You can cut out quite a few at a time!  These were all die-cut from Mixed Media Heavystock.  For the ones with flowers inside, I die-cut a Flower Field piece from the Heavystock and then cut out my ovals from that piece. You will get fragments of the flower pieces which I just adhered to my ovals. My Vignette box (largest of set TH93279, 3.875 x 5.5 x 1.5 ) was covered with Mixed Media Heavystock also, on the outside.  The oval die-cuts were glued on randomly as shown in my photos.  On the top of the box, I used a piece of the die-cut oval negative piece from my heavy stock sheet.


Once all your die-cuts are arranged and adhered on the outside of the Mixed Media covered Vignette box, paint the entire outside with a dark colour.  I've used Distress Ground Espresso paint for my first layer.  After this has dried, dry brush your next chosen colour and let dry, and so on( I think I used Forest Green, Peeled Paint, and Speckled Egg).  I usually use about 3 or 4 different colours.  You don't use very much on your brush for the dry brushing, wipe off the excess your brush.  This gives your painted surface, depth and texture.  Ranger Ink is going to be retiring some of the Distress paints, so if there's certain ones you like, I would try and stock up!


Cover the inside with patterned paper (edges inked) and Mini Foundations were adhered (Collage Medium)  to the bottom.  A bit of paint was added to the foundations.


Die-cut the Flower Field die (I die-cut two) with Distress Watercolour Cardstock (I used the flat side) and apply colour  to your die-cut.  I smoosh different colours of Distress Ink pads on my Glass Media Mat and use a watercolour brush to dilute the colour, then paint. This die does not cut on the bottom, giving you the choice of how much paper you want there. To get the dimensional look, I cut a narrow piece of die-cut, applied adhesive foam and adhered in front of another narrow piece in the middle of my box.


I cut out two pieces of Distress Kraft Heavystock to fit inside the Vignette box.  Using the largest Oval Framelit,  I die-cut the centre of one, and then the next oval size down, in the center of the other Kraft piece.  I then applied Oxide Sprays, Distress Sprays, and finally Distress Crackle Paste with the Tim Holtz Crackle Stencil was applied randomly.  Once that had dried, I used a Distress Crayon to to apply in the cracks.  It's handy to have these finished before you adhere your flower field pieces, so you can determine what is going to show in the cutout ovals.


When I cut up my Flower Field pieces and adhered them in-between with adhesive foam, they are staggered so they aren't covering up the layer behind too much.


Here's another look at the different levels.


To finish off my Vignette box, I added a Mini Hardware knob (TH94123) with a bit of Velvet Trim TH94113 on top, and a Phrase sticker from the Metallic Sticker book TH94134.

I have a few more Tim Holtz projects I will be posting, I'm a little behind!  

Until next time,

Jan


5

BLOOM PILLOW - TIM HOLTZ SIZZIX CHAPTER 3 RELEASE


Hello everyone! I'm sharing a project created for the Tim Holtz Sizzix Chapter 3 release.


I made this pillow featuring the new Potted #2 Bigz die and various older wildflower dies. This die is taller than the original Potted Bigz die to accommodate the taller flower dies.  I enjoy using felt when creating die-cut flowers, and these pots are  a great addition to use with them.


The Potted#2 Bigz Die 665438 


For my flowers, I've used a combination of Tim Holtz Stems; Wildflower Stems #1 664163, Wildflower Stems #2 - 664164, Wildflower Stems #3 - 665221 and Large Stems 664170, Large Stems #2 - 665222.  The more intricate ones are a little harder to cut out of felt, they can fall apart easy, even with the adhesive backing, so I've tried to use more solid flowers.  I've used Sizzix felt for all the flowers, so many colours!


Before I die-cut my flowers, I apply Heat'n Bond Iron-on Adhesive paper to the back of my felt.  This gives the die-cuts a sharper cut, plus you just have to iron your flowers to your background.  The really narrow pieces are a little trickier to keep in one piece, some I had to sew after to make sure they held together.


For the pots, I sewed the main piece on three sides, over top of my flower stems. These were also stitched, so that the pot was a little loose at the top.  The top is left open.  I stitched the pot rims top and bottom, leaving the sides. The ends were stitched to the pot sides.  The fabric on the smaller pot is Tim Holtz Birch Planks (Yuletide).


The word 'Bloom' was die-cut using the Alphanumeric Stretch Upper set and Tim Holtz Abandoned Fabric.  Because these letters are super skinny, I was worried they would fray, so I slowly and carefully stitched them after they were ironed on.


Various leaves from the flowers were die-cut and placed at the bottom of the pots.  I hand stitched lines with embroidery floss, to 'ground' my pots.  The crackled potted 2, is made from Sizzix Surfacez Tan Texture roll.  This was stamped with Stampers Anonymous Cracks & Specks CMS186 and archival ink.
I've heat set this after stamping to make it permanent, then wet the texture paper to soften it.  This paper is so versatile and durable, it can be stamped, sewn, embossed and even washed.


The other Potted 2 is also die-cut with the Sizzix Texture paper, it was also wet, but while wet, worked with my hands to soften and crinkle it.


I also hand stitched  a flight path for my Idea-ology Butterfly (TH93785) which was tacked in the middle with a couple of stitches.  I've used Tim Holtz fabric for my pillow cover (Memorandum & Abandoned), and a cotton cream coloured background in the center.

I'm so behind in sharing, I have a few posts to catch up on, so I will try and get everything done, before Halloween is released!  Did I just write that? Halloween already?!  I don't know where this year has gone, before you know it Summer will be over.

Until next time,

Jan


3
Back to Top