A Vintage Tag

Hi everyone, today I am sharing a tag I created.


I love this new Tim Holtz Lace Texture Fade Embossing Folder from Sizzix.  It's the perfect background for the vintage lady paper dolls (Tim Holtz TH93555).


I sometimes make a slit on the crease of my embossing folders (taking care to leave the edges attached), to allow my tag to extend past, as shown here in this photo.  After my tag was embossed, I applied Distress Oxide ink (Fossilized Amber) to the entire  tag, then spritzed with water.  Once this was dry, I inked with Vintage Photo, the raised areas.


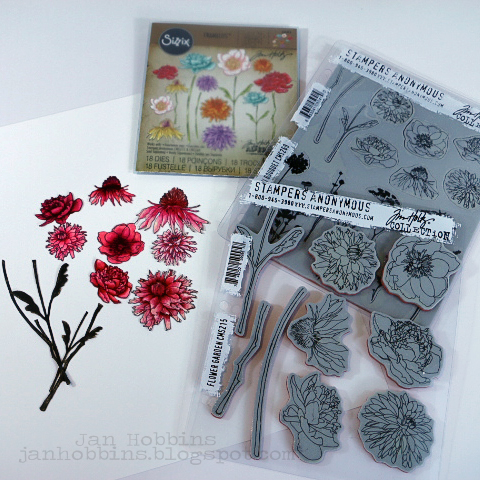
To embellish my tag, I added in the Tim Holtz coloured (with markers) paper dolls, metal corners, metal word band, Designer tape, charmed metal finding with a gum drop inside (tinted with alcohol ink), and ephemera snippets.  My flowers were die-cut using Sizzix's Tim Holtz Small Tattered Florals Thinlits set and patterned paper from Tim Holtz Memoranda, held together with Hex Fastener brads.  The little white flowers (Tim Holtz Bouquet Findings) were dipped in Ranger's Mica Spray (Buttercup) that was sprayed on my craft mat.  

Thanks so much for stopping by,

until next time,

Jan 

SaveSave
6

Celebrate with Floral DIY Card

Hi everyone!  I have a card to share with you today.


After spending a fair bit of time in our local greenhouses these past weeks, all those beautiful flowers inspired me to create a floral card.  


I used the Tim Holtz Mini Bouquet and Flower Garden stamps with the matching Sizzix Flower Garden & Mini Bouquet Framelits set to create my floral images.  The flowers were stamped on the flat side of Ranger's watercolour paper with black archival ink.  I coloured the images with waterbased markers and a water brush.  I usually dab my colour from my markers onto my craft mat and pick the colour up with my water brush to paint onto my stamped image. 


After my images were coloured, I die-cut them with the matching framelits dies. It's so nice when there are matching dies, isn't it?  For the stems, I just die-cut them out of Tim Holtz Kraft Black cardstock, then sanded.  


The oval mat was die-cut from Sizzix's Tim Holtz Stitched Oval Thinlits die.  I used Sizzix's new Satin Sheen paper sheets for my oval and for the pink mat on my card front.

Instead of using an entire sheet of glitter paper for a mat, I just adhered this Glitter Tape from Tim Holtz around the edges.  Once all my mats were adhered (some with pop-dots for added dimension), I adhered my stamped flowers.


My Celebrate was die-cut from the Tim Holtz Thin Sentiment Words Thinlits set.  I used the negative die-cut, trimmed it and adhered it onto a piece of black cardstock that was cut slightly larger.


For the inside, I used the same Sentiment set and die-cut my inside mat.  I adhered a pink satin sheen paper behind, cutting it slightly larger than the patterned paper.


This is how my finished inside looks.


Here's another look at my finished card! 

Thanks for stopping by, have a great weekend!

Jan

2

DIY Card with Sizzix

Hello there!  I have a card tutorial up on the Sizzix blog today, hope you join me there!


Have a great weekend everyone and Happy Mother's Day to all of the moms out there!


Jan


1
Back to Top