
Hello friends! Today is the much anticipated exclusive Tim Holtz STAMPtember YouTube live day! I've created this Christmas Banner for the Simon Says Stamptember exclusive Tim Holtz set.

There is a limited supply of this set, which usually sells out fast!


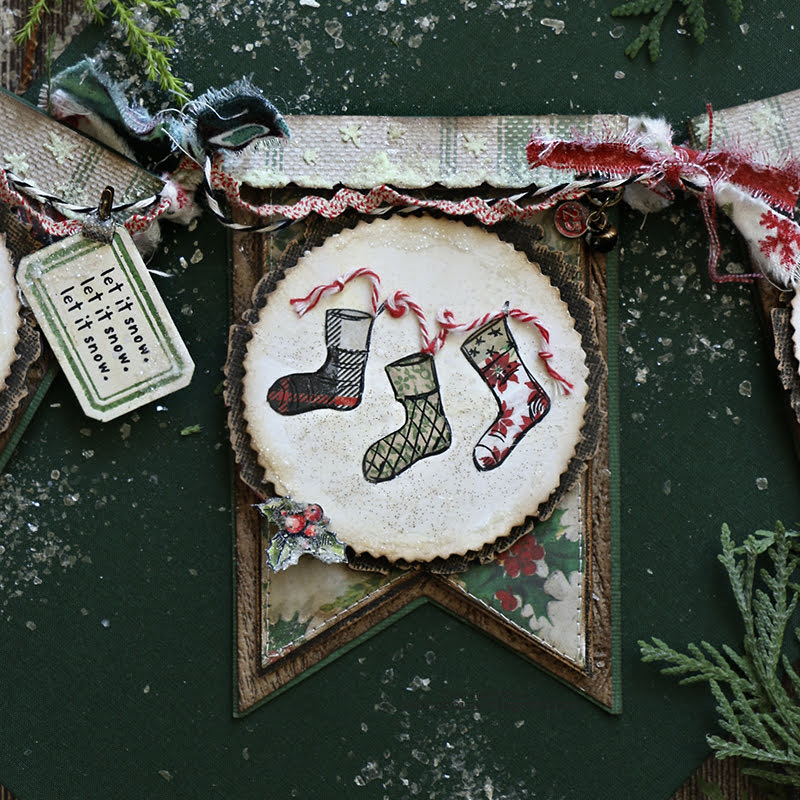
When I decided to make a banner, I wasn't quite sure what I was going to create, so I started by stamping my main images on Ranger Ink Watercolour Cardstock (flat side) that had been lightly tinted with Distress Oxides Lost Shadow and Antique Linen. For a few extra dots, Lost Shadow ink sprayed with water on my mat, and the paper dipped on to my ink splotches. I left enough room to die-cut circles around each image. I've used Sizzix Stitched Circles 662229. I decided later to tear/snip off the smooth edge, as I wanted the piece underneath to show more. Ink the edges.


Before glueing on these pieces, do any inking or this Santa one, I applied the Sparkle Texture Paste to my Santa Bag (with a brush). I also took a brown or black felt pen and went along the edges carefully to removed the white edges. On the parts of your stamped image that aren't covered with paper, colour with ink, crayons, watercolours, or glitter, whatever you want!

For my main banner pieces, I die-cut these shapes from a discontinued Sizzix Framelets Plus Die set (660836). It's a huge set made for larger machines, but I use the smaller dies. If you don't have a banner die set, this shape is easy to cut out with a trimmer or craft knife. I've cut out a black cardstock mat slightly larger than my patterned paper and machine stitched the two together. I love banners that have lots of layers, they just seem to look better to me. So I just kept adding more layers, lol!

Forgot to take a photo earlier, but this embossed layer is a slightly larger size and is Kraft Heavystock embossed with the 3D Woodgrain Texture Fade Embossing Folder (555297). I inked the folder with Ground Espresso Archival ink before I inserted my paper. Ink the edges after embossing. Then adhere your matted patterned paper layer on top of this.

And because I still love this discontinued Bigz Tree Ring Die and Embossing Set (662429), I added this next. I die-cut black chipboard, then Tim Holtz Black cardstock, which was embossed then lightly sanded. Glue the two together. Your stamped images on the circles are adhered on top of this. I've added some dots and dashes of Glossy Accents and Rock Candy Glitter on my stamped images and circles for extra Christmasy goodness. If you don't have any of these dies, check your stash for any larger shape dies you have, I'm sure you will find something you can use!

Now I had to come up with how am I going to connect these altogether, there are a lot o different ideas out there. I decided to add a piece of dark green cardstock (another layer!) but cut this piece longer so the top folds over about 1/2 inch and a fabric strip (I've used a piece of Tim Holtz Flannel Etcetera fabric torn in a 1/2" strip) goes under it and across each banner. I left enough to tie a knot in-between each banner piece, connecting them.

This trim piece is die-cut from Tim Holtz Sizzix Decorative Trims Thinlits set 665435 and Backdrops Patterned paper. I applied stars with the included stencil and the Distress Glow Paste. I also added Glow Paste with a palette knife along the edge. Distress Rock Candy Glitter was applied immediately while the paste was wet, and I let it air dry. Some glittery glow at night! Once these pieces were dry, ink the edges.

These trim pieces are adhered on top of the folded over piece to hide any fabric poking out and I used dimensional pop dots so it stands out. I've tied some extra ribbon and string loosely to hanging from each banner.

I've also added in small embellishments, some are stamped with the small included stamps (sentiments, mittens, holly, etc.) Some of these are die-cut out with various small dies - Sizzix Collector Set 665926, Specimen set 665930, Postale set 665927 and Vintage Labels set 665929 are full of lots of little tags, labels, etc. Idea-ology metal embellishments are also added. A close up of each banner is below.


Thanks so much for visiting me here! I unfortunately received my package too late to send my make to Tim for the live, and I was really pressed for time to get this done! If I've missed anything that I didn't include here, let me know! Hope those of you who wanted this set, managed to order it! Happy stamping!
I am trying to get my Halloween tutorials done while it's still the making season, sorry to those of you waiting. I've been dealing with sciatica since the summer, it's getting a lot better but sitting at the computer seems to aggravate it and has to be done a little at a time.
Until next time,
Jan


