ADORNED CARD - SIZZIX CHAPTER 2

Hi everyone, I'm back today with another card created for the Tim Holtz Sizzix Chapter 2 Release.  This card features the new Adorned Thinlits (664176) set.  If you missed Tim's live Facebook chat for this release, he has the replay video on his blog here.


 Using Tim's Metallic Confections Kraft Stock (TH93784), I die-cut a couple of each of the flourishes.  Cut out a piece of the same metallic cardstock cut to your desired  size and sand this randomly. Adhere the flourishes with Collage Medium.  I started with full flourish pieces, and then cut up pieces to fill in empty spaces.  Once these were secure, I also sanded the raised flourishes.  A Hickory Smoke Distress Crayon was rubbed into this background to highlight the raised areas and sanded paper.


I love dies that you can use for backgrounds or just something to add into a cluster, a feature die, or even just adding texture.  I find myself using these dies the most.


Once my background was finished, I die-cut a frame from the Stacked Baroque Thinlits set (662693) and Tim Holtz Woodgrain cardstock (TDA57826)  that had been coloured with Distress Spray Stain and Oxide Inks. Paper from the Wallflower Collection was added behind the frame.  More of the Adorned swirls were die-cut with Black Soot Kraft Cardstock (lightly sanded and a bit of green Distress Paint added) Large Wildflowers stems #2(664164) were die-cut from Mixed Media Cardstock that had been coloured with Distress Oxides Inks and Black Soot Kraft Cardstock.  To finish off my cluster, I added in a piece of ephemera, a Stencil Chip "4"(TH93954), a metal bow adornment (TH93686) and a Clippings Sticker(TH93583) "My Sweetheart". This finished card front was adhered with foam dots on black cardstock, then the card base (Wildflower patterned paper).  That completes my card!

I will be sharing the rest of my projects soon! Thanks so much for visiting me here, I really appreciate it!  

Have a great day,

Jan
1

RUSTY INTRICATE LACE CARD - SIZZIX CHAPTER 2

Hello everyone!  This week, Tim Holtz shared live, his new Sizzix Chapter 2 release, which you can still watch here. I'm sharing today, one of the cards I created with this release.


My rusty card using the Intricate Lace Die.


This die is gorgeous and full of detail.  I decided try something different, knowing I would lose some of that detail, but I still like to think it looks ok.  At Christmas, I saw some garlands made totally out of metal that were all rusty, so different looking; loved them!  When I sat down to use this die, I started out by die-cutting it with Mixed Media Cardstock, intending to colour and antique with Oxide inks.  Then I remembered the rusty metal garlands, and so then....


It looks like I embossed the die-cut cardstock with rusty embossing powder, which would probably be a lot easier, but I actually used Tim Holtz Distress Grit-Paste. I love the look of Grit-Paste when it's been painted!  A wonderful thing about this Thinlits die, is that you determine how large your borders are going to be, there is no cutting edge all the way around.  If you want your die-cut piece wider or longer, you can use a longer piece of paper, and do a second cut close to the previous die-cut edge.  I left a larger border all the way around than you see here, I cut it down with a craft knife after I applied the Grit-Paste. I taped down the edges of the die-cut, so it wouldn't move when the paste was applied and these edges were cut off after.
I tried not to apply the Grit-Paste too heavy, or if I did in some areas, it was partly scraped off. The die-cut was all filled in, but when you lift it off the glass, the paste came off the larger open areas and I used a Craft Pick to poke out the smaller areas (some of the really tiny areas, I just left).  Set this aside to air dry. It's a bit tricky and messy, but I think worth it!  I die-cut Tim Holtz Skeleton Leaves (Sizzix 663094) in Mixed Medium cardstock and treated them the same way with the Grit-Paste, but I didn't apply the paste quite so thick.


Once the Grit-Paste had dried, I painted my pieces with Espresso Distress Paint first, dry, then randomly Ripe Persimmon, Fossilized Amber and Rusty Hinge.  My Mixed Media cardstock flowers were coloured with Distress Oxide Ink and are die-cut from Sizzix's Large Funky Florals Thinlits set (664158). The centers were Fluted Fasteners(92373) and a Hardware Head(93788) in the middle.
Ruler Ribbon (TH93955) was adhered across the bottom, a Black Metallic Quotation Sticker (TH93559) on top of that.  I created a cluster with the Funky Florals and Skeleton Leaves in the corner.  This Intricate Lace Layer was adhered with dimensional foam strips(on the edge) to a mat of Mixed Media cardstock, then Metallic Cardstock and finally my cardstock base.

Here's another look at my card!  One thing about using dies, that I love, is how versatile they are. It's amazing how different they can look, just by changing up the materials used.  After watching the samples from Tim's video, I'm sure you will all agree!  

Thank you so much for visiting, there's more projects to be shared soon!

Jan


4

PINCUSHION VIGNETTE BOX - TIM HOLTZ CREATIVATION 2019

Hello crafting friends!  It's been awhile since I've shared here, a few things here at home have taken me out of the craft room.  Hopefully I can get back into it, it always seem to take me awhile to get my mojo back!  Here is another project created for the Tim Holtz Idea-ology Booth at Creativation 2019.


This is my vignette box/pincushion piece.  


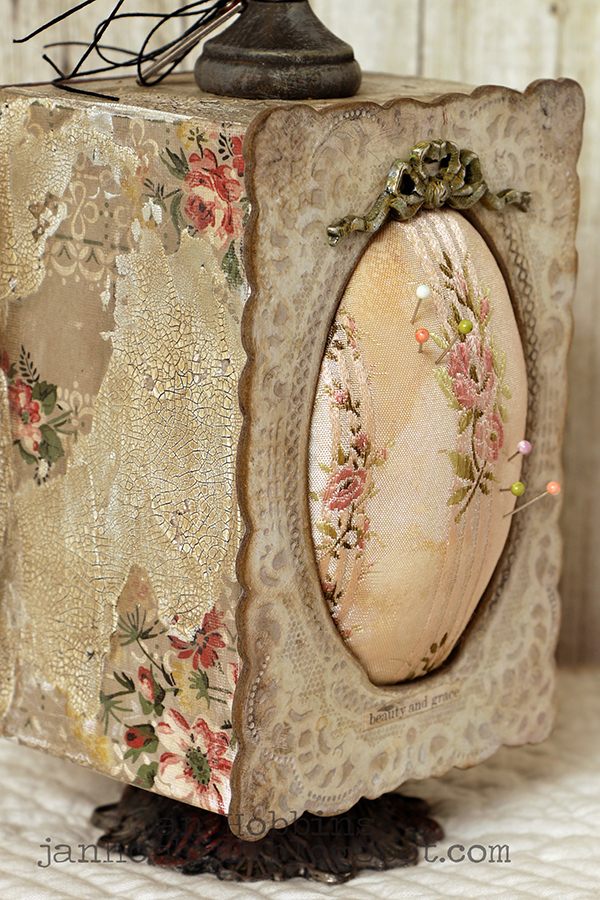
Turn it around and this is the pincushion side of the Vignette box.


I adhered two vignette boxes(TH93782 - 3.875" x 5.5") back to back to create the wider structure.  It was then covered with Worn Wallpaper (TH93692), treated with Distress Oxide in areas to age the paper.  I then used Ranger's Opaque Crackle in random areas.  After this dried, I rubbed in Frayed Burlap, Vintage Photo, Weathered Wood Distress Crayons into the cracks, adding a bit of water to the crayons as I went along.  


Before adhering my Vignette Frame (TH93694) to the outside of the box, I finished off the inside with Tim Holtz paper that had been distressed and crackle paste randomly applied.  Next I embellished the inside with Tim Holtz Ephemera, a vintage spool, coloured Bouquet Findings(TH93569), a Photo Booth Photo (TH93799) a Classic Label Sticker (TH93959) a Thimble(TH93791) made into a pincushion with a scrap of velvet ribbon, a Mini Pin (TH93790), a piece of the Ruler Pieces Findings (TH93565), and a small amount of Spanish moss.  My Vignette Frame was painted first with Black Soot Distress Paint, then lightly dry brushed  with Frayed Burlap, and Barn Door paint.  This is then adhered to the outside of the Vignette box.  


Apply a bit of Ranger's Crackle Paste to the corners and edge of the frame, overlapping onto the paper covered sides.  Colour the dried paste the same way.


For the Pincushion side, the frame is Lace Baseboard Frame (TH93786). This was coloured with a combination of Frayed Burlap, and Antique Linen Distress Crayons and Oxide Inks. Now the pincushion! I used a hard piece of mat board or you could use a thin piece of wood (like the Vignette Panels) slightly larger than the oval opening of the Lace Baseboard Frame (TH93786).  Keep in mind that this piece has to be smaller than the Vignette Box, it will fit just inside.  My pincushion was made with a piece of wide French ribbon (I've been hoarding this piece for a long time!) that I slightly stained with Oxide inks.  Take your piece of fabric or ribbon that is slightly larger than your board, a small amount of stuffing, place it in the middle underneath, wrap your fabric over the edge and staple in the middle of each side once.  If you need to add more or take away any stuffing do so now.  If you're not sure, just hold it under the frame to judge it.  I then used a hot glue gun to permanently adhere the fabric to the board, using small dots of glue and working back and forth between the different sides to keep it even.  Glue gun this to the back of the frame.   I did check first to see if the pincushion board still fit inside the box after the fabric was attached.  Adhere a Ribbon Adornment to the top of the pincushion on the frame(TH93686)


Adhere the frame to the box with Multi Matte Medium or Collage Medium. You can see in this photo how the frame extends past the box and is flat against it.  I used elastic bands on each end to hold this tight while the glue dried.


To finish off this project, I painted a Vignette Finial (TH93573) with Black Soot Distress Paint first, then dry brushed with Frayed Burlap.  I added a small amount of Grit Paste(TDA53422) on one side and after it dried, painted it with Distress Paint(I think I used Espresso, maybe Forest Moss, a touch of Barn Door).  I adhered this to the top with Matte Medium.  The string is Tim Holtz Eclectic Elements black Craft Thread and a Story Stick(TH93680) was tied onto this.
My Vignette Base (TH93709), the larger one, was also painted, then a big of Grit Paste applied and painted in the same way as the Finial.  This is adhered to the box with Matte Medium also.  I was worried that because the box was wider, the top of the base was too small and it might wobble or not be strong enough so I adhered a large Gadget Gear(TH93297) first on the bottom of the box, then the base to that.  It seemed to give more weight and strength to the bottom of the box.


Here's another look at my finished pincushion vignette box, hopefully I've remembered everything, it seems like such a long time ago that I made this!

I have one more project left to share from the Idea-ology booth, plus a few pieces from the Tim Holtz Sizzix Chapter 2 release.  Tim has a new blog post with a video showcasing these new dies and samples for inspiration!

Thanks so much for visiting, hope you stop by again!

Jan


4
Back to Top