Super-sized Tag Tutorial

Hi there!  I have a super-sized tag on the blog today. 


 It's been sitting in my neglected craft room for weeks now, so hopefully I can remember what I did or used!  I've been painting on a larger scale this month... no, nothing creative unfortunately.  I decided that while my husband was away on a Phoenix golf trip, I would paint our hallway which I have been meaning to do for a very long time.  That of course, led to also painting the front entrance, two walls in the kitchen, and then our upstairs bathroom.  I was contemplating our spare bedroom after that (I was in a painting mood wasn't I?), but my mom received a call that her name came up for an apartment she has been waiting for at a senior's complex (2 years waiting) and now everything here is on hold.  She really doesn't want to move, we have heard every excuse... the apartment is too small for all her things, everyone is old there (my mom is 92!) and will she still be able to have her glass of wine every night, lol.  It has been a worry for us, her living alone in the house, but she still is determined to do everything for herself.  We had got her one of those emergency necklaces, which is great, but unfortunately she hit it by accident in the middle of the night, twice.  The first time, she didn't hear the fireman and ambulance arrive, so was rudely awakened by a large group of nice young men with flashlights peering into her windows.  It's a wonder she didn't have a heart attack!  The second time, I received a call from the service, saying the alarm went off and they couldn't get a response from her on the speaker.  I arrived the same time as the ambulance, so I went in after ringing the doorbell with everyone behind me, calling her name, the dog was barking, turning the lights on....she was fast asleep, didn't hear a thing.  So now she sleeps with at least one hearing aid in.  So the next month, I will be, along with my sisters, packing up, and getting rid of 57 years worth of stuff (that's how long she's been in the same home).  The house was put up for sale this week, and incredibly it was sold yesterday! Whew, now if we could just convince my father-in-law to also move into an apartment.(that's a whole other story!) This retirement of mine isn't off to a great start, is it?  Hopefully I will be able to spend some de-stressing time in the craft room!  I've chattered enough, you're hear to see how I created my tag!


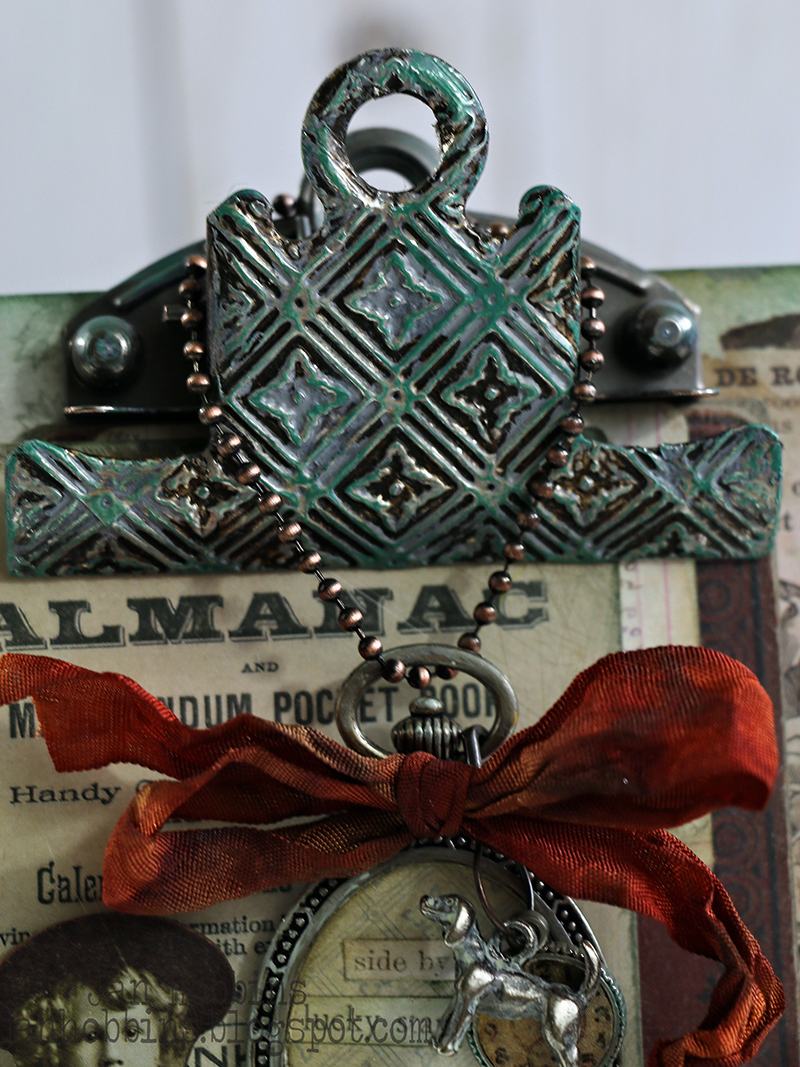
I used the medium size of Tim's Etcetera Tag boards (6 1/2 x 12").  These are nice thick boards in the shape of a tag, perfect for altering.  I covered mine with this paper from BoBunny, using Matte Medium.  Love the dragon fly!


Sorry, I got carried away and didn't take any other photos of my process.  I covered my entire board with 2 coats of transparent gesso.  I still wanted my paper to show through, but I knew I was using different mediums and didn't want them to soak through the paper.   I lightly inked the tag with Dot Fade (THS006) and Distress ink.  I applied texture paste with the Tim Holtz Ringer (THS056) Splatters (THS009) and Dot Fade (THS006).  For the colouring, I used Distress Oxide Inks and Distress Crayons, and a bit of Picket Fence White Distress Paint.  Alternate the mediums, adding a Distress Sprayer filled with water and a heat gun.


I die-cut a piece of cardstock with Sizzix's Tim Holtz Mixed Media 2 Thinlits die(661185). I tore along the inside edge of the piece of paper.  The paper was inked after, but all your colouring could be done before die-cutting.


The top of the paper was trimmed to fit the top of my tag.  I added in my Distress Oxide inks, alternating the colours and spraying with my Distress Sprayer.  The torn edges were manipulated while wet.

I layered a few pieces of patterned paper underneath, one of them I die-cut the edge using Tim Holtz Mixed Media (660220) thinlits die.  I tore away parts, leaving enough to show underneath the green piece.  The edge of this piece was sprayed with Dyan Reaveley's Dylusions Mica Spray (Ranger47971) in Vibrant Turquoise.  These come in a package of three different colours (Crushed Grape, Vibrant Turquoise and Bubblegum Pink) and add a pearlescent finish to your paper.  When the sprays dry, the mica really stands out, love these sprays!  There are also sets from Tim Holtz, Dina Wakley, and Wendi Vecchi for Ranger Ink.  I haven't applied it in this photo, but you can see in the tag photo.


I love how the Distress Oxides look on printed vellum.  I die-cut my flowers with Tim's Tattered Floral Bigz Die (656640) and Small Tattered Florals Thinlits (661806) and a piece of his Wallflower Printed Vellum paper. Inking and spritzing with water to give this distressed look.  A Tim Holtz hitch and brad for the centers and a charm added to the big one.  The other embellishments that were added are his metal stars (painted) and ephemera in this corner.


Keeping with my dragonfly theme, I made this one from cardstock and Tim's Dragonfly Bigz die (659579) that also comes with it's own texture fade.  The paper was inked before die-cutting, but I went over the raised areas for more dimension.  I also applied embossing powder (Ranger's Ice Resin Copper Iced Enamel) with a Ranger Embossing Pen.  Using the pen, you can apply the embossing fluid in very specific areas or small areas(like the dots).  When heating this enamel, I quickly applied by dipping the dragonfly while hot, into metallic micro beads, so just a few stuck randomly.


I finished off my tag using words from Tim Holtz Quote Chips (TH93563) and Metallic Quotation Stickers (TH93559), plus dyed ribbon.

Thanks so much for dropping by!

Until next time,

Jan


5

Creativation 2017 Tim Holtz Projects


Hi everyone!  Today I have just a few projects from Creativation (CHA) that were designed for the Tim Holtz booth that I haven't shared yet.  


These Mini Clipboard Structures (TH93278) from Tim Holtz are a great surface for a small project.  I altered mine with papers and embellishments from the new 2017 collection and a few older ones.


I really wanted to alter the clip part and decided to use one of my favourite ranger products, the adhesive-backed Metal Foil Tape Sheets.  These sheets can be coloured with Alcohol Ink, Archival ink or acrylic paint, but the best things about these sheets, they can be embossed with any embossing folder.  I used Sizzix's Tim Holtz Diamond folder (an older one-660243) and painted a layer of Black Soot, Evergreen Bough, Fossilized Amber Distress paint, wiping off parts in-between each layer.  The clip can be easily removed to alter.  I cut out my foil piece with a bit to spare, and then once adhered, trimmed with scissors, then lightly sanded the edges. You can also go back and add more paint to the edges, once you have finished adhering.  In the bottom of my clip board, I used a piece of foil also.  This was die-cut with the word Note 2 Self from the Tim Holtz Thinlits set, Daily Words, Block and torn along the inside before adhering to my covered board. 


How cute are these paper doll cutouts?  They were slightly tinted with ink.  


The new Tim items I used are his new Memoranda Paper Stash (TH93550),  the red board is from the Salvaged Baseboards Pkg. (TH93556), the cute little child and dog from Paper Dolls (TH93555), Stars (TH93562) little word phrases from Clippings Stickers (TH93583), Layers Paperie (TH93553) and the dog charm is from Treasures Adornments Findings (TH93572)Vintage Design Tape (TH93353).  My oval frame is a Watch Cameo Metal Finding (TH93264) and the small circle is a Charmed Finding (TH93266) and the Ball chain (TH92675).


This was originally a card, but was placed in a frame for the booth. The Sizzix Thinlits dies used were; Small Tattered Florals, Garden Greens, Lace, Doily 2 and Tiny Tattered Florals.


The lace thinlits die was cut out from coloured (Distress Stain Spray) Tim Holtz Textile Surfaces paper, and my dyed crinkle ribbon threaded through.  The words were Clippings Stickers, Silver Metallic Alpha Stickers(TH93561), and Quote Chips (TH93563).  I also used the bird charm from Treasures Adornments Findings (TH93572)and Postal Design tape around the edge.


My last project was this Happy Birthday card using the new Cityscape Commute Thinlits set.  This set has trucks, cars, planes, and even a helicopter.  I used the Metal Foil Tape sheets adhered to cardstock to die-cut my shapes.  The texture on my cardstock was brought out more when inked and sanded.   I made a pocket in front for a gift card using cardstock and the Denim Textile Surfaces. that little notch was die-cut from an alphabet letter "0"placed on the edge. My Happy Birthday was die-cut from Celebration Words Script thinlits die and mixed media cardstock that had been inked with an ombre look(light to dark blue colours). Paper is Etcetera Papery Stash (TH93551), Metallic Quotations Stickers 93559, index Clips Fasteners TH93574,  Snippets Ephemera TH93564, and Paper String TH93044 and the heart charm from Treasures Adornments Findings (TH93572).


That's it for my projects!  I'm sure you can't wait to play with all of these new releases, hopefully they are arriving soon at your local scrapbook store!  I know Urban Scrapbook has them all on order, should be coming in soon!


Thanks for stopping by,

Have a great day - Jan


SaveSave
5

Shake Up Some Fun with Crazy Dogs Pocket Card!


Hello there!  Shaker Cards are still all the rage in the world of card making and chances are you've created a few yourself.   Or if you've been meaning to give shaker cards a try but didn't know where to start, join me and let's get shaken'!


I've used Sizzix's Lindsey Serata Mini Shaker Pocket Thinlits Set to create my Shaker pocket gift card holder.  I needed something to put a gift card in for an upcoming birthday, and the recipient is a dog lover so how could I not add in one of those Tim Holtz Crazy Dogs!


For those of you who like videos, Lyndsey Serata has a great tutorial with some tips and tricks when making the shaker pocket.


Cut out two squares from the larger square die and one of the smaller square.  The larger ones will be your pocket and the smaller one is the back of the shaker box.  Die-cut three of the small tabs (these are used to make your pocket).


For the front of the shaker box, die-cut the smaller square with the smaller circle die inside.  I tape the circle with washi tape(removes easy) to make sure it doesn't move.  If you use the magnetic plate it usually stays in place, unless you bump it like I usually do!  My Sizzix Sandwich for die-cutting thin dies, is Magnetic Platform, Standard Cutting pad, Paper, Die (cutting side down), and Cutting Pad.


This is the back and front of your shaker box.


Die-cut an acrylic circle using the larger circle die.  Adhere this to the back of your square with the circle cut out. Next, you need to use foam to create that space in-between your layers. I used a foam sheet and applied an adhesive sheet to both sides.  This was then die-cut with the small circle inside the larger circle die, creating a ring.


In Lindsey's video, she suggests cutting the ring in half, making it easier to line up.  It really does! I didn't stretch my foam quite enough but it was easy to add in a small piece.  Your circle is ready for your shaker elements.  I've used beads, sequins, Prills, anything that is flat enough for the spacing.  Don't overfill!  Once you have your elements in place, remove the adhesive from your ring and adhere the square you have die-cut for the back.


Take the three tabs and fold each one in half along the crease.  Apply adhesive to the outside on both sides. Line up your two large squares, good side facing out, and adhere the tabs in between on three sides, leaving the top open.


I stamped my Crazy Dog stamp three times for layering, and then coloured them with markers. One of them was used for the eyes, nose and collar, one for just the head and the third, I used the entire stamped image. These pieces were die-cut using the Crazy Dog Thinlits set.


I adhered my pieces with small foam dots for added dimension.


I added a Happy Birthday rub-on onto my acrylic.  Adhere this shaker box to the front of your pocket.


I decided to add a piece of twine on the same side as my dog stamp, which should be placed before you adhere your dog to the front of your pocket (it's not on yet in this photo).


I stamped using pieces from my Crazy Dogs Set, on a small piece of plain white tissue, then lightly sprayed the tissue with Distress Spray. I used decorative edges scissors to trim my paper.  This was tucked into my pocket along with my gift card.


Here's another look at my Shaker Pocket Card!


Thanks for stopping by,


Jan


4

Oxide Inks on Black

Hi there!  I could hardly wait to try out my new Tim Holtz Distress Oxide inks on black cardstock. They certainly didn't disappoint, love how they look! Of course you can't let those scraps go to waste, can you?


Just warning you, if you visit me often, you might be seeing a lot of the new Tim Holtz Small Tattered Florals Thinlits die set in use.  I seem to be using this set on everything, those little flowers are perfect.


I used a new Tim Holtz "Ornate" (THS076) stencil in the corner. The Oxide colours I used for this tag are Vintage Photo, Broken China, and Iced Spruce. The splatters were created by applying ink to my craft mat, spritzing with water and then flicking it onto my paper.  Don't you hate to cover up background you have created?  Sometimes, I really try and put the least amount over top, just so I can still see my favourite parts of the paper.


 I applied Oxide inks to my black cardstock, then alternating drying and spritzing with my Ranger Distress Sprayer to get those variations of distressed colour.  I then used this cardstock to die-cut my flowers and branches.


How how yummy those inks are on the black!


I finished off my tag; made with Sizzix Tag &Bookplate die (656938) by adding ribbon, and Idea-ology Metallic Quotation Stickers (TH93559).  Can't wait to try a different combination of colours!

Some of you have heard, mostly my wonderful Urban Scrapbook followers and customers, that I have retired from working at the store.  It was a tough decision, it's a place that is full of creativity, laughter, the customers are all fantastic, and a joy to work at.  I would have been there 12 years this spring!  Boy, time flies!  Working retail is a demanding job, I've been doing it for a verrrrrrry long time.  It's the standing for 8 hours, sometimes as long as 12 that is really hard, and lucky me, I've inherited my mother's bad veins.   So, this means I'm going to have more time to create, hopefully.  I am still on Sizzix's Design Team, so I will be posting here and on their blog (I had a post yesterday).  I was looking after Urban's blog and mine, which can be a little hard to juggle, so now I can post more here.  Can you believe this, I've already posted two days in a row!  I'm sure I'll be frequenting the store often, I need my fix of supplies and of course to see the Urban girls too! 
  I want to thank all of the Urban customers for their kind words, cards, gifts and well wishes too, it meant a lot to me!  I hope you visit me here!

Thanks for stopping by,

Jan


8
Back to Top