GHOST TOWN VIGNETTE TRAY - TIM HOLTZ SIZZIX CHAPTER 3 RELEASE

Hello everyone! Today I'm sharing another project that I created for Tim Holtz Sizzix Chapter 3 Facebook live.  Here's a link to his blog post which features the facebook video and also a link to all the amazing designers.  For this project, I decided to create something with bold colours, instead of my usual vintage and distressed look.  I'm going to show you how I created this background with Tim Holtz Alcohol Inks.


My Sizzix Chapter 3 dies that I used are Bat Crazy and Ghost Town:


Also a Tim Holtz Cobweb Thinlits die (662375) which unfortunately has been retired.  There is still a corner cobweb die in the Mixed Media Halloween Thinlits set (661588) which is still available to purchase.  


I created my background with Tim Holtz Alcohol Ink , 8x10 Yupo Paper(non-porous synthetic paper) from Ranger Ink(tac63346), Alcohol Blending Solution (TIM9800), and various alcohol ink colours in the purple, yellow, and orange colours, plus Pitch Black.


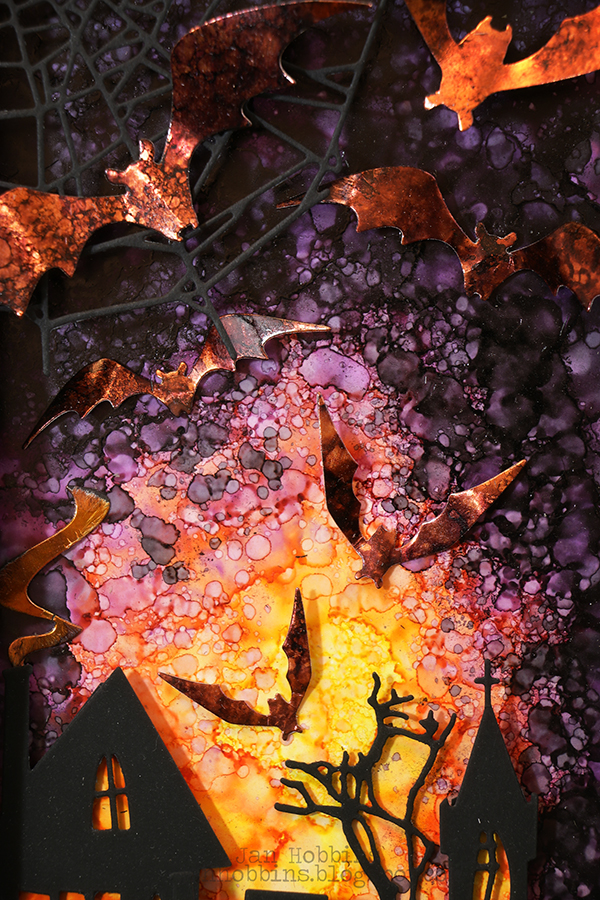
To create the background, start with your lightest colours first (yellows).  I knew I wanted the yellows  near the bottom of my tray, behind the houses. 


 I added a few dots of the lightest yellow ink to my alcohol ink applicator and tapped this onto my Yupo paper.  Building on that, add in some dots of alcohol blending solution, then some darker yellow.  You are going to work into oranges and then the purple tones, and finally adding black to the purples near the top. The colours applied on top will eliminate the bottom colour, instead of blending together and creating muddy colours.  I liked the marbled look, so I didn't use a lot of blending solution and I tapped lightly. If you find that you have too much blending solution or ink on your applicator, just tap some off onto a piece of paper towel. Just experiment and have fun! If you would like more info or inspiration, Ranger Ink has some great Alcohol Ink Videos here.
  

My Ghost Town was die cut from Tim's Matte Black Alcohol Ink Cardstock(TAC65487).  Love this cardstock, it's a rich, velvety, matte, intense black.  How's that for descriptive adjectives! lol!  I also used solid pieces of yellow/orange coloured Yupo cardstock behind my houses.  These were hand-cut slightly smaller than the black silhouettes, then pop-dotted behind.  This way I could overlap them,  the middle one built up higher, and the houses and background behind didn't show through the windows. The tree is also in this set.  I die-cut a bunch of them in plain black cardstock, crumpled them and adhered to the inside bottom of my tray. A Halloween Quote Chip was added on the bottom.


My bats were die-cut from Tim Holtz Metallic Jewels Kraft Stock(th93781), then Black/purple Alcohol ink lightly tapped on top.  Love all the different sizes and shapes in this set of bats! Some were adhered to my die-cut cobweb in the corner.  The Vignette Tray was painted black, but I also used Woodgrain cardstock on the outer sides.  This was Sprayed with Black Soot Distress Spray Stain, then highlighted with purples.


I don't like leaving the back of a project unfinished, is that weird?  Even if you don't see it, I think it's kind of cool that there's another designed part of your project hidden from view.  I took a purple piece of Metallic Kraft stock, cut out three bats.  The piece was sanded, quite deep in some places and adhered to the back of my tray.  I replaced the bat cutouts with a different colour of Metallic cardstock and sanded my back again.  I applied Distress Ink(I think I used Rusty Hinge and Vintage Photo,... I think) on top.

Hope this inspires you to get out those Alcohol Inks and create some fabulous Halloween backgrounds for these new Halloween dies!  I have more projects to share for Tim Holtz Chapter 3 Sizzix, hope you visit again!

Until next time,

Jan


6

FRIGHTFUL THINGS - TIM HOLTZ SIZZIX CHAPTER 3 RELEASE

Hi everyone!  It's been awhile, hasn't it?  I've been busy enjoying what sunshine and warm weather we have managed to get this cooler spring and summer.  In the many rainy moments, days, weeks, I've also been busy creating for Tim Holtz's Sizzix Chapter 3 release.  I was thrilled to be asked to create some samples for this Halloween and Christmas release.  If you missed Tim's Facebook Live, you can visit his blog here for the link. He not only revealed his new dies, but shared over 70 amazing projects created by his designers!  He also has links to all their blogs, where you're most likely to find a tutorial or feature on some of these projects, so make sure you check it out!


Today I'm sharing the first project I created, this Etcetera Halloween tag!


I love creating Halloween Vignettes and all the new dies are perfect for adding that personal and whimsical touch.  I used these two on my tag. How can you resist those ghosts?!  This window frame can be used all year round too.
Frightful Things
Window Frame
Speaking of ghosts, I went for a glossy, slightly dimensional look.  Here's how I created them.


I first die-cut my ghosts from Tim Holtz Watercolour cardstock.  This cardstock has texture on one side and smooth on the other.  The smooth is great for stamping, but I used the texture side.  After they were die-cut, I applied a small amount of Distress OxideInk.  It was applied to my mat, then spritzed with water.  I lightly dipped my ghosts, just enough for a few small splatters and dots.


These were embossed with clear embossing powder several times. You can also use extra thick embossing powder (remember Utee?)  I always keep my clear powder in a small plastic container, so easy for dipping and very little spillage.  When heating your embossing powder, you can dip the piece immediately once it's all melted, into more embossing powder (it will stick to the hot die-cut) eliminating another application of embossing ink.  I always use my craft tweezers to hold my small pieces, no burnt fingers!

The extra layers of clear embossing give the die-cut more dimension.  I even dipped the die-cut into my Oxide ink between a few layers and then used heat again, before adding another layer of powder.  Experiment for your own look! 


The other pieces were die-cut with regular cardstock, watercolour paper, and Tim Holtz Substrate Paper.(TH93291- has been retired but some places still have some left or Sizzix has leather paper still)  This paper has a soft suede feel to it, die-cuts like butter, and the Oxide inks look so good on it. I used it with the pumpkin, broom and cat.  For more dimension on the skeleton head and bones, I die-cut it out of watercolour paper, and also adhesive back craft foam sheet.  The black cardstock was cut out so that it was behind the skull eyes and mouth and slightly longer so the bones could be attached, then adhered behind the foam piece.  The watercolour cardstock on top.


This Window Frame is a Bigz die, so it can be die-cut with thicker material.  I used chipboard. This die also has a background piece if you choose to use. Instead of paper I used an Ephemera piece and also a piece of Mica sheet, not too thick; the layers can be peeled apart. (bought from Amazon).  A couple of corners were snipped out with scissors.


The window was painted with black gesso, then Ranger Crackle Texture paste randomly applied.  Once dry, I accented the cracks with Distress Crayons.


Idea-ology Halloween Worn Wallpaper covered my Etcetera Tag and slightly sanded on the edges.


I used Etcetera Trim that was gessoed with Black, then also crackled for my small shelf.


Arrange your die-cut pieces on your tag.  I glued down a small bit of moss before adhered the pieces to my shelf.  "Frightful Things" was die-cut from this Label Alphanumeric Set (664177). This is one of my favourites, the letters are only 3/8" tall!


A piece of dyed mummy cloth completes my tag.  Thanks so much for stopping by, there's so much more to share, so hope you come back!

Make sure you check out everyone's amazing projects, you saw only half of them on the Facebook live! I can't wait to see what else everyone created in the coming months.  A big thank you to Tim, Mario and Paula, for asking me to create!

See you soon,

Jan


9
Back to Top