HALLOWEEN VIGNETTE TRAY - TIM HOLTZ IDEA-OLOGY RELEASE 2019

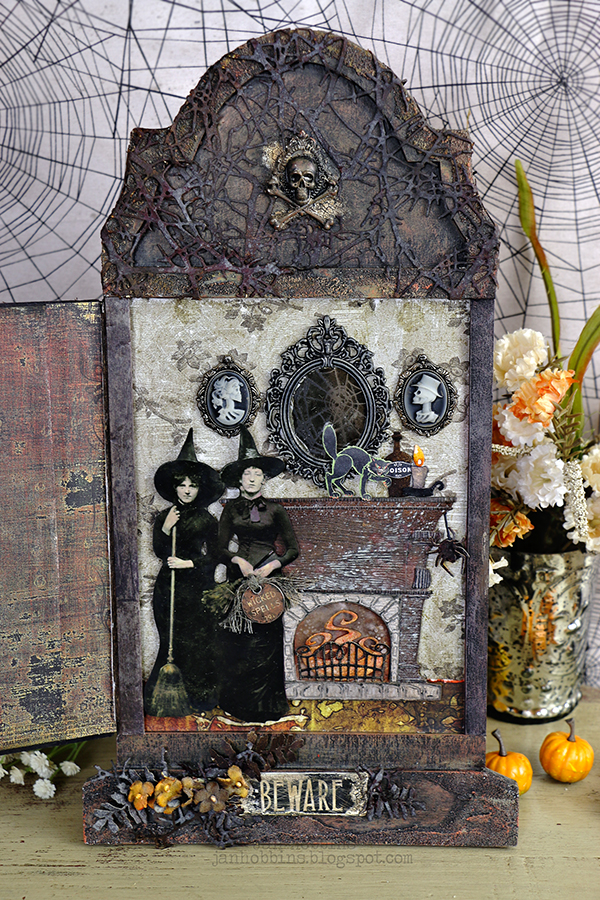
Hello everyone!  I still have a few Tim Holtz Halloween Ideaology projects to share and today I have this Halloween vignette tray.  I think poor Dorothy didn't know what she got herself into when she married Mr. Aughinbaugh, the pharmacist.


How many ways can you use the new Tim Holtz Creepy Eyes(TH94984)?  I don't know why, but I thought of flowers right away!


The trinket tin opens up to reveal some deadly potions.


I've used the larger 6 x 12" Vignette tray for my structure.  The inside was covered in a piece from the Abandoned Paper Stash (TH93962).  Don't you love this pattern?  I had to use two pieces to cover the tray, but I placed the seam where I knew the top of my tin was, so it was not noticeable.


I lightly stained my wood tray with Distress Paint that was diluted, so it was more like a wash.  I think I used a combination of Peacock Feathers and Faded Jeans.  If you want a darker stain, had in some Distress Spray stain to your mix of paints, then add a bit of water.  


I used tiny nails(TH93668 Vignette Hardware) to nail my tin to the tray.  If they poke through just nail to the side and flatten, you can cover the back with paper. This secures it as it will probably be opened often.  Paint the insides edges of the lid top and bottom.  


Cover the lid and bottom of the tin with Abandoned patterned paper.  I then used Ranger's Crackle Texture Paste as shown in the photo.  Set this aside to air dry, then tint with Distress Crayons.


I built a little shelf for my creepy eye floral display using Etcetera Pinked Trims (THETC-009).  This was painted, crackled, and distressed with Distress crayons.


I gave my Halloween Paper Doll couple (TH93973) a ghostly appearance.  These paper doll collections get better and better, thanks to Paula's daily hunt for photos!  These were placed inside and with the gentleman coming out past the Halloween Baseboard Frame (TH93986).  A piece of Abandoned paper was used behind the frame also.


I added a tiny bit of Picket Fence white Distress paint to a small amount of Collage Medium, blended the two and then applied with my finger to my paper dolls.  I used a swirly motion as it gives an uneven look, and you don't need much.  If applied lightly, you can also go over and add more!  Just a note here; small bunch of dyed black flowers(TH93569 Bouquet Findings) was added on top of the brides's bouquet after the photo was taken.


For my Creepy Eyes(TH93984) flowers, I used Mixed Media Heavystock paper, coloured with Distress Oxides, and Abandoned patterned paper  that was die-cut with Tim Holtz Sizzix Large Funky Florals  and the leaves from Funky Foliage.  I added in some cut up die-cut pieces of the Tangled Twigs Sizzix die, and Mummy Cloth (TH93982). I also added in some tinted Bouquet Findings (TH93569) and a bit of Spanish moss.


A metal Corner Adornment (TH93979) accented with green Distress Paint was adhered to the bottom corner of my Baseboard Frame.  I attached a Spider Adornment (TH93985) to the corner of the metal embellishment.  The pearl was coloured with Distress Alcohol Ink.


Don't the flower centers look like eyelashes on my creepy eyes?  The whites of the eyes were slightly tinted with alcohol ink.  One of the girls who also created for Tim, it might have been Zoe, popped out the iris, tinted the white area, and replaced the iris.  I thought this was a great idea! I added in some Clippings Stickers from the Curiosities Sticker Book(TH93969) to my pinked ledge and outside and inside of my tin.  Love these little stickers, they add little subtle phrases that can add a story to your project.


For the inside of my Trinket Tin (TH93976), I added in ephemera from the Halloween Ephemera Pack(TH93963), Halloween Snippets Ephemera(TH93983), glass apothecary vials(TH93302 and TH92899),  a skull (TH93968), bones (TH93964) and Clippings stickers(TH93969).  The vials were coated with clear Rock Candy paint(TDC31888) after the ephemera was adhered.  My cardstock frame on the tin bottom was die-cut with Sizzix Trinket Frames Bigz die.


Here's another look at my finished Halloween Vignette Tray.  Thanks so much for visiting me here!

Until next time,

Jan


1

BEHIND THE HAUNTED DOOR - TIM HOLTZ HALLOWEEN IDEA-OLOGY RELEASE 2019


Hello crafting friends! Sorry for the delay with my, "Part 2, Behind the Haunted Door".  Here's a photo of the inside of my door.


 Just when I think I'm catching up, something happens. I had some crafting deadlines that took over most of my time and then last week my mom(she's 94) had a mini stroke, her fifth, that we know of.  We always spend at least 12 - 14 hours in emergency, then she's sent home after all the same tests she has every time, show nothing.  This time we got home around 4:30am, which I think is harder on her than the actual stroke.  Who am I kidding, it even takes me a few days to get over the stress and lack of sleep!  At least she doesn't get as stressed as she used to, she's so busy watching all the action in the emergency ward, and getting all that special attention! All is well, and she's back to her usual self.

Now, let's get back to some halloween crafting!  Part 2 of the Haunted Door. 

I kept everything quite flat on the inside, as there is not much depth once the door closes.  If you wish to fill your inside with more dimensional product, you will have to build up the edges more.


I used Tim Holtz Halloween Worn Wallpaper (TH93974) for the background.  This was applied in two pieces for the width, but once you have your embellishments inside, the seam mostly is covered up.  
I also added a small piece of patterned paper from the Abandoned Paper Stash (TH93962) at the bottom, to look like carpet.  Love this paper, there's so many amazing patterns that could be used for anything, not just Halloween.  


Once you have your background paper adhered, you will need to build up the sides and also create your door with chipboard.  I had a piece of black chipboard that I used but plain would work also (just paint the edges that are exposed, black).  I cut 2 thin strips about 1/2"wide, with my craft knife the length of the space between the tombstone top and bottom.  Adhere these on either side with Collage Medium or Matte Medium.  To attach your door (details in previous post in creating the front) I used  a strip (about 1 - 1 1/4") of Tim Holtz Substrate Paper (TH93291) which unfortunately has been retired.  Sizzix makes a leather paper (661146 and 661149)which is similar.  This tough paper can be sewn, washed, die-cut, inked, folded, stamped, you name it!  It works great for hinges, as it can withstand the opening and closing without tearing. I make a fold 1/2" in, just like you would crease a card except, I creased two lines right next to each other, to give it a wider crease.  This helps your door lie flat.  Adhere the 1/2" side to your built up edge and the other to your door.  I wanted to have a bit more hinge width on the door section to support it better.  Once this has dried, adhere your patterned paper (I've marked which paper I used in the photo above) cut to fit the door and up to the crease, covering that hinge side. Colour in the exposed crease with black paint or ink.  Cut out two more 1/2" strips of chipboard and paint the one exposed side with black paint, then dry brush with similar colours as the tombstone.  These are adhered, once dried, to both sides.


This is the reason, I made the crease in the hinge a bit wider, it has to close over the added strip.  This is just my way of adding a hinge, without purchasing metal hinges. 


 Now you can decorate your inside!  Keep in mind that there's not much depth.  I was pushing it with the Crypt Cameos (TH93967) but they were perfect for my wall!  The mirror is created using a Tim Holtz Baroque Frame (TH93267), and a piece of a Mirrored Sheet (TH93029) cut to fit behind the frame. It's really hard to see as my camera didn't pick up the image, but I used a technique that I have done on Yupo paper with Alcohol Inks, on the mirror.  There's a stamped web (Tim Holtz CMS306 Skulls & Cobwebs) on the mirrored sheet, and you can see how it's done here.    The spooky fireplace is die-cut with Tim Holtz Sizzix Fireside Thinlits die.  This was created with Tim Holtz Woodgrain paper, coloured with Distress Spray Stain first (I used a combination of Gathered Twigs, Vintage Photo, Fired Brick) then a bit of Distress Oxide ink added by spraying on craft sheet, add a spritz of water and then dipping the woodgrain paper lightly. I believe I used (I thought I written this down, sorry!) Frayed Burlap, Hickory Smoke, and Antique Linen.  The fire, grate, and stones were die-cut with Tim's watercolour paper.  Adhere your finished fireplace, add in a die-cut Bottle(Sizzix Regions Beyond), Candle and Spider (Frightful Things) also from coloured Watercolour paper.  Add in your witch PaperDolls which were lightly tinted(TH93973) and a Distress painted Halloween Token (TH93971) tied to one of the Witch's hand.  An Ephemera Cat (TH93963) was also added to the fireplace mantle.


Here's the bottom of the door, explanation is in the first part of this tutorial.


Here's another look at the finished inside.  Hopefully I've explained well enough for you to understand!


Here's also another look at the outside of my Haunted Door!  Thanks so much for visiting me and hopefully I'll have my other Tim Holtz Halloween Idea-ology projects up right away!  Fingers crossed!

See you soon,

Jan
3
Back to Top