HELLO LIFE ETCETERA TAG - TIM HOLTZ RANGER ARCHIVAL INK 2022 RELEASE

Hello everyone!  It's another Tim Holtz YouTube Saturday reveal, and this week it's all about new Ranger Ink Mini Archival Ink Kits! There are three new sets(Kit 4, 5, & 6), each with an assortment of 4 colours.  Love these mini sizes!  Archival ink is waterproof, acid free and a permanent oil-based dye ink.  These inks are permanent on many surfaces, they will not bleed when used with water-based inks, markers, paints (watercolour and acrylic),  and also liquid adhesives.


I've created this tag showing how you can colour with Archival ink and a stencil. I've created an image that did not smear or bleed when other mediums were used in my project. 


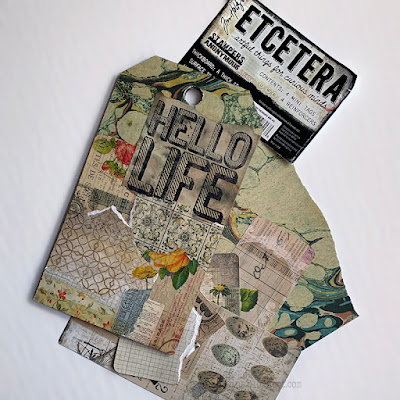
I've used a Stampers Anonymous Etcetera Thickboard Mini Tag (THETC-004) and collaged this with various pieces of patterned papers.  I have covered my tag with Distress Collage Medium and then adhered the paper, applying the collage medium over top also.  This gives it a finished surface and there isn't any loose edges on the papers.  Trim the edges to fit the tag.


I have used Tim Holtz Plain Collage Paper (TH93708) as my base to which I applied my archival ink.
This paper has been retired, but if you're like me, you seem to have a stash of everything Tim, or there could still be some out there in stores.  I've taped my piece to my glass mat with masking tape to stop it from moving.  The reason I've used collage paper with my stencilled image, is because I wanted my collaged background to fade behind and just slightly show through.


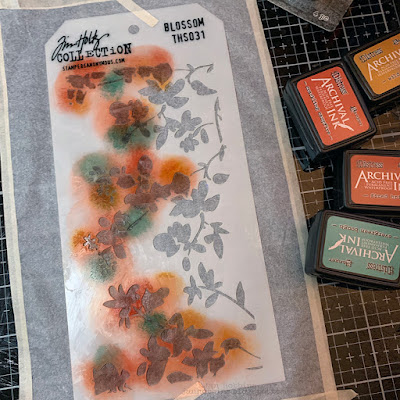
I've applied my chosen colours( Fired Brick, Crackling Campfire, Wild Honey, Speckled Egg, and a small amount of Villainous Potion and Frayed Burlap) to my Blossom Stencil (THS031).  I have used Tim's Blending Brushes(TDA62240) to apply the ink.  The open areas in the stencil aren't really large, so the blending brush can get into the corners and your image is sharper.  Plus, the brush creates a
softer blend of colours. Archival ink will stain, so to clean your stamps or brushes, use some Archival Stamp Cleaner. Because this ink is waterproof and oil-based, water will not work. 


Once your archival inked image has dried, it's ready to adhere with Distress Collage Medium.  Apply to your tag, the medium first, then gently lay the stencilled paper on top.  This paper, once wet, tears easily (which is great when you want torn edges!).  Apply Collage Medium on top.  That's the beauty of Archival Ink, when using different mediums with it, your inking will not smudge or bleed. If I had used Distress Ink (which is water-based), it would have bled when I added the Collage Medium. The Collage paper becomes more transparent when saturated, leaving your stencil image more pronounced.


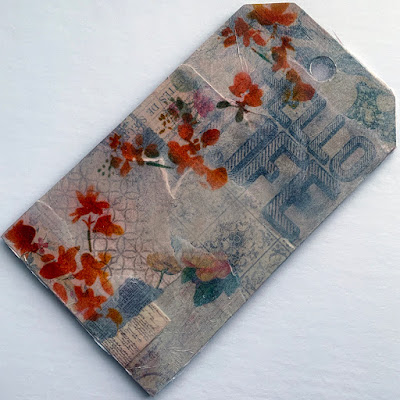
Trim off the edges, after your paper has dried.


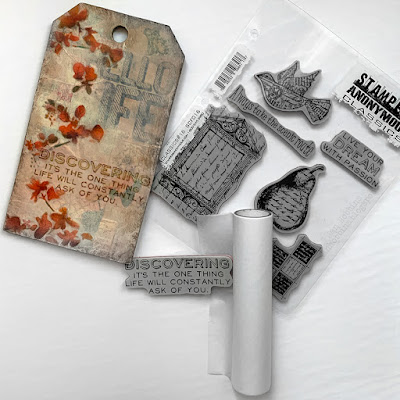
I've stamped a quote from Stampers Anonymous Set Classic#16 SCF016 with Frayed Burlap Archival Ink on a small piece of Collage paper and applied this in the same way as the stencilled blossoms, across the tag. I have also added a few darker spots of Villianous Potion archival ink to the edge of some of my flowers with a fine paint brush. I apply some ink directly from the pad to my glass mat (not the small non-stick white mat) and dip the fine paint brush in this. 


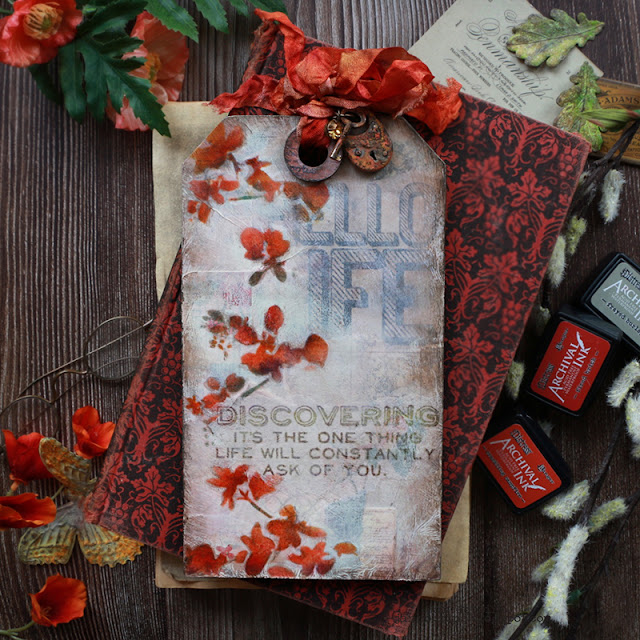
After, I've inked the edges of the tag with Frayed Burlap. I've also added an Antiqued Gem(TH94033) and A Lock & Key Adornment (TH94162) with a bit of Grit Paste and paint added.  If you want to add more layers or detail and dimension to your tag, you could highlight with markers, paint, or ink and your Archival ink will not bleed.
Hope you enjoyed this short tutorial!

Thank so much for stopping by,

until next time

Jan


3

BIRD & EGG COLORIZE VIGNETTE TRAY - TIM HOLTZ SIZZIX RELEASE 2022

 Hello everyone, it's been awhile!  I've been busy creating with the new Tim Holtz Sizzix release and it's a fantastic one!  Here's my first project, created with the new Bird & Egg Colorize set, and also the Quilted Embossing folder.


I love anything with birds, so this set really appealed to me.  I've used the back side a Vignette tray (TH93568), the 6 x12 inch size for my project.


I've used Heavystock (tda76322)that I coloured with various Distress Sprays and Distress Oxide Sprays.  The first die-cut layer is cut out with black kraftstock.  Sizzix has great videos on their YouTube Channel that show the entire process of assembling every Colorize Die.  Very helpful!


Here is the bird all put together!


I've die-cut three eggs, different tones.  These papers were also coloured with Distress Sprays and Oxide Sprays (Antique Linen, Tattered Rose Oxide, Scattered Straw Oxide, and Tattered Rose).  A great way also to use all those scrap pieces that you have saved!


Emboss a piece of Tim Holtz Watercolor Cardstock TDA53927 with the new Quilted Embossing folder.
I've chosen to colour this with Distress Sprays after embossing (Shabby Shutters Oxide, Old Paper, and Rustic Wilderness Oxide); I like the way the sprays sit in all the recessed areas.  Sometimes you can lose a bit of the embossing though, because of the liquid. You can't really see it in the photo, but there's a very subtle pebbly, leather-like texture to this folder, which it looks like it’s a textile when embossed.  I also took my small ink pad (frayed burlap) and lightly skimmed it over the stitching. So good!


My quilted piece of cardstock is placed behind a Lace Baseboard Frame TH93786 that has been coloured with a Distress Walnut Stain crayon and a small amount of Rustic Wilderness Embossing Glaze in the two corners.


For my "nest", I used Sizzix Funky Wreath 664434 and brown cardstock.  I've cut out a few and cut them in pieces.


The Vignette Tray is covered with Backdrops paper Vol. 1 TH94177, front and sides.


The tray is longer than the paper, so I've combined two pieces, most of the seam is behind the tree branch.
I've distressed the edges with Distress Crackle Texture Paste and Distress Crayon.  The Lace Baseboard frame is adhered about an inch from the top of the tray.


I had this larger bit of tree branch, it's about 4 1/2" long, and it was about 2" in diameter, which my husband cut it in half for me.  This was nailed to the tray about an inch below the frame and is used for my ledge for the nest and eggs.


I've hot glued moss, and the cut up pieces of wreath on the top of the branch.  I've added in my die-cut eggs, one of them has been cut a third off the bottom, so it is shorter.  I have also die-cut and coloured with Distress Sprays some foliage using the Brushstroke Flowers 665209 and Brushstroke Flowers 2 (665210) dies.  The white floral emphemera piece is the the Field Notes package TH94051.


A metal Wordband TH93000 was added to the top.  White Picket Fence Distress Crayon and paint was added.


Here's another look at my project.  Hope you enjoyed the tutorial! Make sure you check out the other projects created for this new release from all the makers!  Details on Tim's website.
Thanks for stopping by,
Until next time 

Jan

3
Back to Top