SEASON'S GREETINGS REINDEER - TIM HOLTZ SIZZIX CHAPTER 3 RELEASE

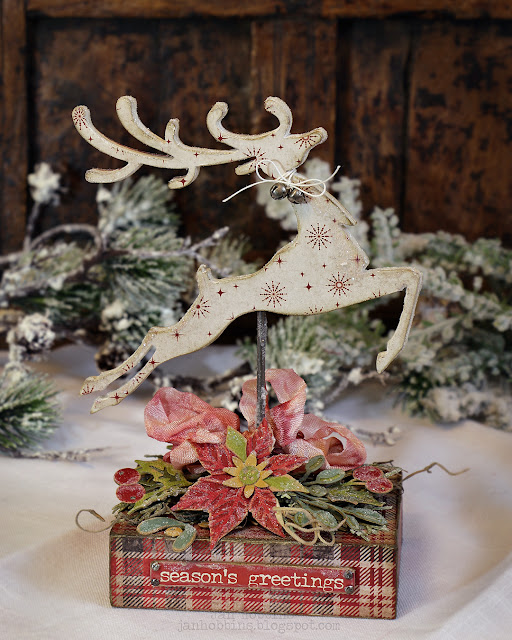
Hello everyone,  I'm here today sharing a Tim Holtz project created for the Sizzix Chapter 3 Facebook live.


As soon as I saw this Reindeer Bigz die (#664219)I knew I wanted to make it into a 3D project.


With a bigz die, you can create with heavier materials, such as chipboard. But instead of chipboard, I used a mat board made by Sizzix (656492), called Little Sizzles.  It's lightweight, cuts and inks beautifully.

I die-cut my deer multiple times with the mat board (I think about 4-5 times) and 2 times with my patterned paper for the front and back, remembering to flip your paper for the back (Tim Holtz Christmas 2018 paper stash). As you can see by my photo, I notched out a small piece about the width of my pole in the inner deer die-cuts.  This allowed the pole to be inserted without creating a lump in the deer. You do not have to do this on the paper and outer front and back die-cut mat board.  Glue all your pieces together.  I always sandpaper the edges lightly, so the piece looks finished off, then ink the edges.  I tied two Tiny Bell Findings(TH93744) with string around the neck of the deer to finish off.


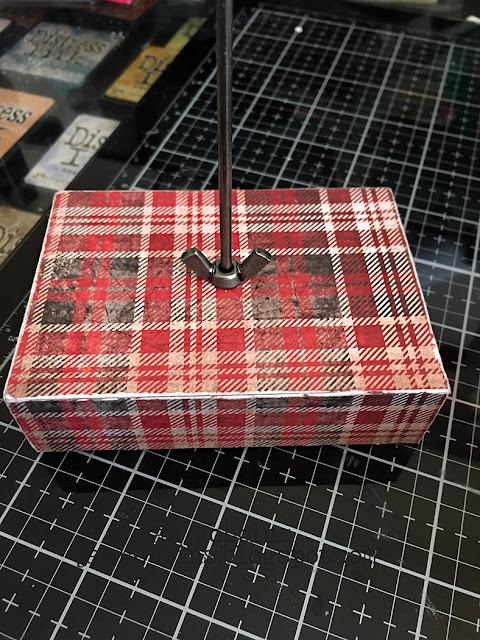
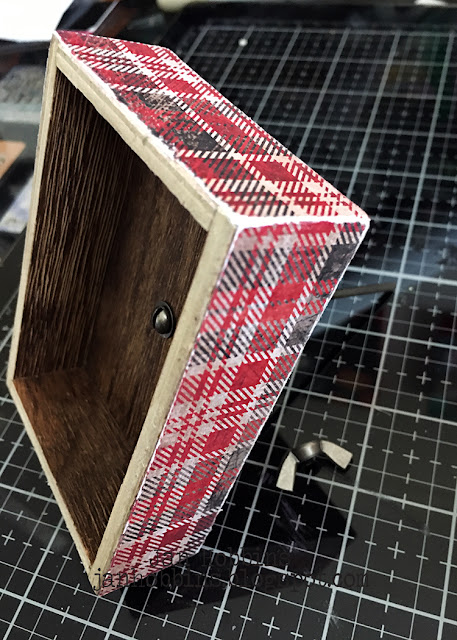
I then covered a small wood vignette Box (93279) with Tim Holtz Plaid paper on the outside of the box. I drilled a small hole in the center of the book so that my pole from the Idea-ology Photo Clip Kit (TH93351)would fit through.  

These photo clips were designed for the Mini Mason Jars, a package comes with three sets.


Use the washer and wing nut to secure the pole (long screw).


Insert the long screw into the hole in the bottom of the deer body, as shown here.  You can glue this in to secure it, or leave it so it's easier to store. 


Next, I die-cut my foliage using Sizzix's Chapter 3 Large Funky Festive Thinlits (664221) with various colours of Distress Kraftstock(TH93585).


After my foliage pieces were assembled I applied randomly, some Distress Rock Candy Glitter(TDR35879) with Multi Matte Medium or Collage Medium.  I also applied some to my deer and the long screw(pole).


Before adhering the foliage pieces, I inked the edges of my vignette box and added a Tim Holtz Christmas Quote Chip to the front of the box. This was lightly sanded and inked too. There were small Mini Fasteners Brads Screws(TH92790) attached in the four corners.  Some Crinkle ribbon(TH93020-discontinued) was dyed with Distress ink and tied to the pole. There's a small amount of Spanish Moss added in with the foliage die-cuts.  I attached the deer to finish off my project.


Here's another angle of my 3D deer.


Here's another look at my Christmas Deer.  Hope you enjoyed this tutorial as much as I did creating it!

Until next time,

Jan
4

HAUNTED BOOK - TIM HOLTZ IDEA-OLOGY RELEASE 2019

Hello everyone!  Well, this is my final project that was created for the Tim Holtz Idea-ology Halloween 2019 Facebook live.  


I had this old book of Chinese Ghost Stories, that I thought would make a great backdrop for my Halloween Vignette.


I wanted the Zombie Hands (TH93980) coming out of the book and they worked out perfectly to hold onto this vignette box with frame.  


Using a small Vignette box (TH93279), I covered it inside and outside with a piece of Abandoned Paper (TH93962).  Don't you love this paper!?


After I covered the box, I chose one of the smaller frames from the Halloween Layers and Baseboard Frames package (TH93986) and adhered it to the front.  You will notice that it is slightly larger than the box, but that is easily covered up with Ranger's Opaque Crackle Texture paste.  I applied the paste all around the opening and a little on the one corner.  Let this dry, then colour with Distress Crayons.  I rub it in the cracks, then apply a wash of Distress ink diluted with water. The ink is applied to my craft mat, then a touch of water added, then applied with a paint brush.

  
I then added in my embellishments.  First a small piece of dyed Mummy Cloth(TH93982) was adhered to the bottom of the box and up the side.  A small amount of spanish moss on top of that.  Bones(Boneyard TH93964) crossed, then a Skull(TH93968), a tombstone (CrypticTH93980) with a Remnant Rub on the front(TH93972), a Bitty Bat(TH93981) and finally a moon from the Halloween Snippets Pkg(TH93983). A small Clippings sticker(Curiosities Sticker Book TH93969) was adhered to the bottom of the frame. To determine where your zombie hands should go, place them on each side of the frame, place on your book, then mark your book where the bottom of the hands rest.  I used my craft knife to cut into the book with a large X, then more small cuts across.  Fold back the layers and ink with Distress Ink.  Before gluing your hands in the openings, distress your open pages with Distress Oxide inks.  My book was just a thin one, and the pages lay quite flat, so to get a bit more height in the middle I did add a piece of styrofoam in the centre of a page on both sides, close to the back and front of the book.  This styrofoam was about 1/4 to 1/2" thick, the edges a little thinner.  Glue in your hands, and slide the frame/vignette box in.  I didn't glue the box to the book. but you could secure it more with adhesive or a hot glue gun.  Curl up the edge of the pages.


Here's another look at my Haunted Book!  Hope you enjoyed my Halloween Idea-ology projects as much as I enjoyed creating them!  Thank you so much for your comments and visits here, they are all  appreciated!

Stay tuned, I will be sharing all my Christmas Projects created for the Tim Holtz Sizzix and Idea-ology Facebook lives!

See you soon,

Jan 

1
Back to Top