Those Urban girls...

have been as busy as Santa's elves!  Urban Scrapbook decided to donate a decorated tree at The Festival of Trees this year and we have been frantically making hundreds of flowers for the decorations.  I think the tree turned out fabulous, what do you think?


All the flowers, garland and bird were made from white and red cardstock and lots of glitter! I think we will find glitter in all sorts of places for a couple of months!  All the trees are auctioned off at the Snowflake Gala and the proceeds go to the Alberta University Hospital Foundation.  If you live in Edmonton, make sure you get to the festival, the trees are all gorgeous!
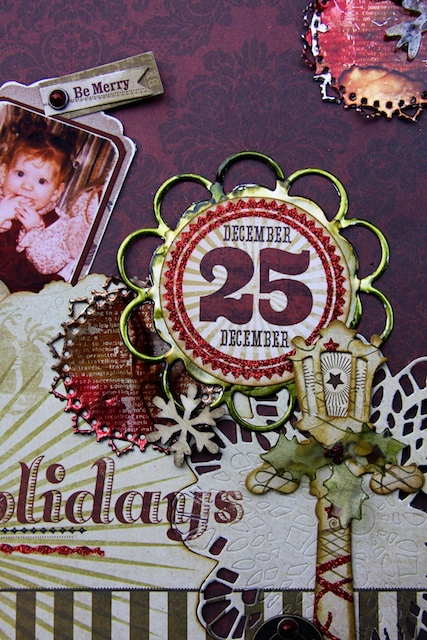
After working with all that white, it was a nice change to use My Mind's Eye Lost and Found Christmas for Urban Scrapbook's  December monthly challenge.  Here's mine:


In our kit, we had different elements to alter; chipboard, wood, acrylic and metal.  My favorite part was altering my Spellbinder metal sheet!  I used a Memory Box die, alcohol ink, and a technique using archival ink, which usually is done on acrylic.  The kits go on sale December 1st.


That's all for today, thanks for visiting!


0

It started with a card...

I decided to start on my Christmas cards yesterday and after finishing one, I got a little sidetracked.  I don't know how it happened, but I ended up making a little Christmas tree.  I had been on Martha Stewart's website early and loved her newspaper tree so I was inspired to try one.


 My tree definitely didn't turn out like hers, but I went for the more whimsical look(that's what I call it when everything is a little wonky or not perfect - it's whimsical!) and used a chipboard spool from Wendy Vecchi's art parts for the base.  I covered the base with Authentique  Christmas papers and hot glued my tree wire inside.  I used book paper instead of newspaper for the tree. I also used Sage Distress stain and sprayed Tattered Angels Marshmallow, and Spanish Moss Glimmer Mist on the book pages before stringing on the tree.
The glitter snowflakes are chipboard snowflakes cut out with Tim Holtz's small snowflake die and then covered in silver glass glitter.
The thin silver wire is silver bullion wire that is tightly coiled and you pull it apart to wrap lightly around projects.  I purchased this at Tinsel Trading. After the tree was put together, I sprayed it all with spray adhesive and sprinkled Shaved Ice and Tarnished Mica Flakes (both from Urban Scrapbook).  I added a bit of Distress Stain dyed seam binding to the wire stem on the top and bottom of the tree too.
On the spool, I added some Tim Holtz mini bottles, filled with the Shaved Ice and a few acrylic snowflakes.  There's my tree, but on the Martha Stewart website, she has a video showing how to put the tree together.
Here also, is the one card I got done!
I used Webster's Pages Holiday  papers, Tim Holtz doily die, Spellbinders label die, and Memory Box snowflake die.  The adhesive ribbon (love this ribbon!!!) is new at Urban and there's even adhesive lace ribbon.  It is so nice for cards.  The berries on the side of the card are also from Webster's Pages(last year).  Hopefully I don't get too sidetracked again, and get more cards done!  Till next time!


5

Winter...

has officially arrived here.  We had our second snowfall yesterday, this one making driving a little challenging.  Last week we had just a dusting of snow, so it still felt like fall.  Yesterday, it took me almost an hour to get home from work instead of 15 minutes.  Now with this snow, it certainly is putting me in the Christmas mood. I might just start those Christmas cards early.  Oh I know, most of you have had yours finished weeks ago, but I'm always scrambling to finish at the last moment.  The amount I plan to make usually dwindles as I get closer to the deadline.
 I still want to scrapbook some fall photos, and this week's color palette #84 at The Color Room was perfect.  Here's my layout:    
  I used Bo Bunnies "Et Cetera" line, the colors were pretty close to the palette.  I first lightly inked the background paper in the center with a chicken wire mask from The Crafter's Workshop.  I then cut out some District Market tissue paper using my new Tim Holtz Sizzix Doily die.  First I stained the tissue with a few different shades of brown Distress stain and after it dried, I folded the paper in half.  I placed it on the die with the folded part on the edge where it wouldn't cut out so it would be a full circle.  I then lightly brushed some Matt Medium (Claudine Helmuth) on the paper, placed the doily on top and brushed more matt medium on top, just enough to glue down the whole thing.  I punched out a border on both sides of a strip of paper, using the EK punch "Aster".  Down the center, I used the new We R Memory Keepers ribbon tool.  This one is the leaf design - very easy to use!  I added a 7Gypsies ruler, Bo Bunny brads & trinkets, Pink Paislee butterflies and some hemp string.  The flower was made with 7Gypsies tissue paper and plastic netting that I had saved from somewhere (groceries, maybe?)  There's also a small tissue flower and leaves cut out with Tim Holtz dies too. These two photos were taken in our car, looking up at the sun roof.  When we were on the east coast last month, there was quite a rain storm, blowing leaves everywhere.  When I looked up, I thought it looked cool with the leaves floating in the water and the trees above.
Thanks for looking, and have a great day!


1

Inspiration

There is lots of inspiration over at Tammy Tutterow's blog and this week she had me excited to try her technique with embossing!  I loved what she did with Ranger's Rock Candy crackle paint and embossing folders, so I sat down at my cluttered table (didn't I just clean this off the other day?) and pulled out my Tim Holtz snowflake folder.  When I started, I was sure I remembered what she did, but of course, I didn't and forgot to stain my paper before I embossed.  So I figured I'd try what I've been doing in the last week, put my medium on my non-stick craft sheet and adding color to it before I apply it.  I added a bit of Peeled Paint and Broken China stain to my mat and added my Rock Candy, lightly mixing it in.  It gives it a slight bit of color and still is transparent.  Taking a small square piece of plastic, I scrapped it lightly over my embossed tag.  Tammy gives a great step by step tutorial on her blog.  Here is my finished tag:


After my embossed paper was dry, I stamped lightly with Tim Holtz's Holiday Wishes music note stamp.  I used my Tim Holtz tag die and cut out my tag backing with light green American Crafts glitter paper.  I then cut out a rectangle from my embossed paper slightly smaller than the tag and inked the edges (Broken China).  Then, because I really wanted to use my new snowflake movers and shapers die (yet again, Tim Holtz) I cut out lots of printed tissue paper (District Market) but this time, I remembered to stain the paper with Broken China before I cut them out.
With matt medium, I glued a few of the snowflakes to the edges of the embossed paper and then adhered the embossed paper to my tag.  I then strung the rest of the snowflakes on very thin florist wire, dabbed glossy accents on parts of the wire and snowflakes, and sprinkled mica flakes (love these!) over top.  After the flakes were dry, I stuck the ends of the wire under each side of the tag, in between the two layers.  I added some bling which I colored lightly with alcohol ink( I always color clear rhinestones to get the color I want, with alcohol ink) the "winter" mirrored acrylic piece from Prima, stained seam binding and tulle, which I dabbed Stickles on it to give some sparkle.
Thanks to Tammy for her great inspiration, I have a new technique that I love!
Have a great day!
0

November Tag Challenge

I got my tags done early this month, yeah!  Having "Christmas" as the challenge made it super easy. Here's what I came up with:
The patterned paper I used is the Christmas Collection from My Mind's Eye. The leaves, swirls and pine cone are cut out with Tim Holtz's Festive Greenery die and the "25" is also one of his dies.  It's hard to tell in the photo, but the pine cone is cut out with dark brown glittered paper and then I glued tarnished mica fragments on top. Some ribbon, a word sticker (Simple Stories) and it's finished!
Now that those are finished, I can play with my new doily and snowflake Tim Holtz dies!
See you soon!
2

Catching up....

on a few projects, or at least trying to.  I have a bad habit of starting something and then when I'm in the middle of it, I get another idea or buy new stuff and start something else.  I seem to have a lot of unfinished projects spread around my craft room, and it looks like one big disaster area!  I managed to finish one of those layouts that has been sitting in pieces for months.  I love this outdoors collection by Kaiser, it's perfect for those guy layouts too.  My husband loves fishing, and has passed that love onto our sons too.  It's just too bad they don't always have good luck in catching very many!
The stickers, tags, and large wood leaf are from Kaiser also.  I colored the wood leaf with Distress stain and then used a 7Gypsies rub-on on one side. The leaves were cut out from grunge board and the Tim Holtz mini leaves die, dry embossed and  embossed with Ranger gold embossing powder.  The letters and leaf charm are from Prima.
Well, I'm on to the next project!  Have a great weekend!
0

It's November 1st and that means...

the Urban Design Team layouts are on display at the store.  This month we had the challenge of using masks from Prima, along with the gorgeous Glitz collection, "Vintage Blue".  Each kit also comes with a chalk inker from Prima's new Ingvild Bolme's ink and tool line.  I really like this ink, the shape is designed for easier handling, which it is, and the color(we had a navy called Farmer's Jeans) is rich.  I chose Heather C's layout to do instructions for the kit that is on sale at Urban, she did an amazing job!  Check out Urban's gallery to see them all.  Here is my layout:


I used modeling paste on my brick mask.  Using a small paint spatula or plastic card I applied the paste on half of the mask,  then carefully lifted the mask and applied to the other side, so it went across the whole page.  I left out a few bricks too.  After the paste dried, I squeezed small amounts ofTim Holtz Distress Stain on my craft sheet.  I used Antique Linen, Frayed Burlap,Weathered Wood, Vintage Photo and Old Paper.  With a Paint Brush I lightly colored the bricks.  You don't need very much to stain these and they blend together just as you see them.  I used a heat gun to dry them, they didn't seem to dry good on their own.  I also alcohol inked the Prima resin window and the pin top.  The blue flower was made with a Spellbinder die, Spiral Blossom One (Love this die!), the doily from a Cheery Lynn die and the banners are from Tim Holtz Sizzix.  I also painted the bird and birdcage with Tim Holtz Crackle paint.  My crackle paint is always drying up, whether because it's really really dry here or I just don't use it fast enough.  So now I just buy white (Picket Fence) and color it with Distress Stain. I don't use much stain, the more you use, the thinner the paint, which I find doesn't crackle as much so put it on thicker.  
When we were in Victoria, B.C.  in July, we went to see this castle.  It was originally a private residence and now is a college.  We weren't able to go inside, there were classes going on, but the outside gardens were incredible.  I want to take a course just so I can see the inside and enjoy the gardens!
Have a great day!


2
Back to Top