Compendium of Curiosities Challenges

I've gotten a bit behind in my Compendium of Curiosities Challenge projects.  I hadn't taken photos of the #5, #6 and recently completed #7 challenges, so I figured it was about time!

First off is Challenge #5, on page 39 called, Distress Watercoloring from Tim Holtz's book, Compendium of Curiosities Volume III.  Here's my completed project:

I decided to create an inside to the cover of my folio project from challenge #2.


Here's a look at my Distress Watercoloring.  I created a frame around my stamped image (Tim Holtz Classics #1 Stamp) with Tim Holtz Industrious stickers. Before adhering it to Tim Holtz Wallflower patterned paper that was trimmed to fit my folio, I embossed the left edge with the texture fade that is included with Sizzix's Layered Dragonfly die set. This was lightly inked.


I die cut flowers from Sizzix's Tim Holtz Tattered Flower Garland, and leaves from Spring Greenery
and adhered them underneath my stamped image.  I then adhered my page  to the inside of my folio with matte medium.

Challenge #6 was from page 37 of Compendium of Curiosities, called Altered Burlap Panel.
Here's my project:


I used Wendy Vecchi Gold and Crackle embossing paste, Tim Holtz Ephemera, Wallflower paper, Doily Stencil. Tissue, Distress Stain and Inks, and a Nature Adornment.  The metal zipper was die-cut using Sizzix's Zipper die.

And finally Challenge #7 from page 46, Painted Industrial:


Love this technique!  I used Sizzix's Tim Holtz Arrows and Boardwalk Texture Fade Set,  and  Layered Dragonfly die & Texture Fade Set.  Additional materials were, Ranger's Adhesive Backed Metal Foil, clear acrylic, Tim Holtz Distress paint, Wallflower patterned paper, Industrious Stickers, Metal Frame and also Izink pigment ink and stained seam binding.  


Here's a close up of my dragonfly.  There's a layer of embossed paper, then embossed acrylic which I had a bit of adhesive backed foil on the acrylic. 

There's my three challenge projects, hope you find time to join in on the fun or visit Linda's blog for great inspiration!

Thanks for stopping by,

Jan


17

The Story of Us Sizzix Layout

I have a tutorial on the Sizzix blog today.  I'm still in the 50's mood!  I'll be showing you how I created this layout:


Hope you join me there!

Scrapbook Generation has a fantastic free digital online magazine that focuses on sketches and how to use them.  This month, their July issue is featuring Sizzix.  Some of the Sizzix Design Team have created projects using sketches featured in this issue.  Here's a sneak peek of my two projects!


This is a great magazine, with over 200 pages of scrapbooking articles and inspiration.  Hope you check out what the Sizzix Design Team have created just for this issue!
Thanks for stopping by and have a great day,

Jan
1

Sizzix Layered Bee Card


Remember my bee that never made it into a previous project?  I used it in this card:


Using the Sizzix Tim Holtz Layered Bee die with embossing folder, I die-cut my shape out of chipboard that I adhered patterned paper to.  The patterned paper I used was from BoBunny's "Somewhere in Time" collection.


After this, I embossed the bee with the coordinating embossing folder and inked the edges.


I cut out and embossed the bee again, but this time I used vellum.

Next, I cut off the wings of the chipboard bee and then cut out the vellum wings as shown in my photo.  After the vellum wings were cut out, I applied a few shades of alcohol ink.  I attached my vellum wings to the back of my bee with a glue dot.

My bee was done!


I added in some flowers from Petaloo, Letter Stickers from Tim Holtz, and BoBunny chipboard pieces to my card base.  I then adhered my bee to my card.


I also have a layout featured today on the Weekly Scrapper blog here.  It's a layout that I did for the Tim Holtz CHA booth, featuring my favourite dies from this year's Tim Holtz CHA release.  Our shipment of these new dies should be at the store any day now!  Love these Seashore dies.  Hope you visit their blog, lots of inspiration!

Thanks so much for stopping by,

Jan


7

Urban Scrapbook Monthly Challenge Kit

Hi everyone, it's that time again, Urban Scrapbook's Monthly Layout challenge!  This month our kits were filled with paper goodness from Heidi Swapp, embellishments, gelatos, and even a stencil!  Here's my layout:


The kits are for sale at Urban Scrapbook, and this month the instructions for my layout are included in each kit.  You can also check out what the other design team members created with this same kit here, here and last but not least, here.

I have a few other projects to share, but it will have to wait for another day.  I haven't taken photos yet, (that would help, wouldn't it!), just haven't had a chance.  The weather has been so nice here, so I have been spending a lot of time in the yard, working on my flower beds.  They have been a bit of a disaster,  we now have not one, but two dogs who like to charge through them!  They have been foraging in the beds, looking for peanuts that the Blue Jays have hidden.  I can always tell what they've been up to, both their noses are full of dirt!

Thanks for stopping by,


Jan
1

Fab 50's Sizzix Inspiration

Hi Everyone, hope you join me today on the Sizzix blog for some 50's layout inspiration!


Have a great day!

Jan
1

Tea Light Stand

Have you ever had one of those projects that you are excited to start and you think you have a great idea, and then it just goes downhill from there?  I'm not sure where I was going with this one, it all started with the new Tim Holtz layered bee with embossing folder die.  I was really excited to use it, but as you can see there's no bee on this project!  Oh well, I'll use it on something else.


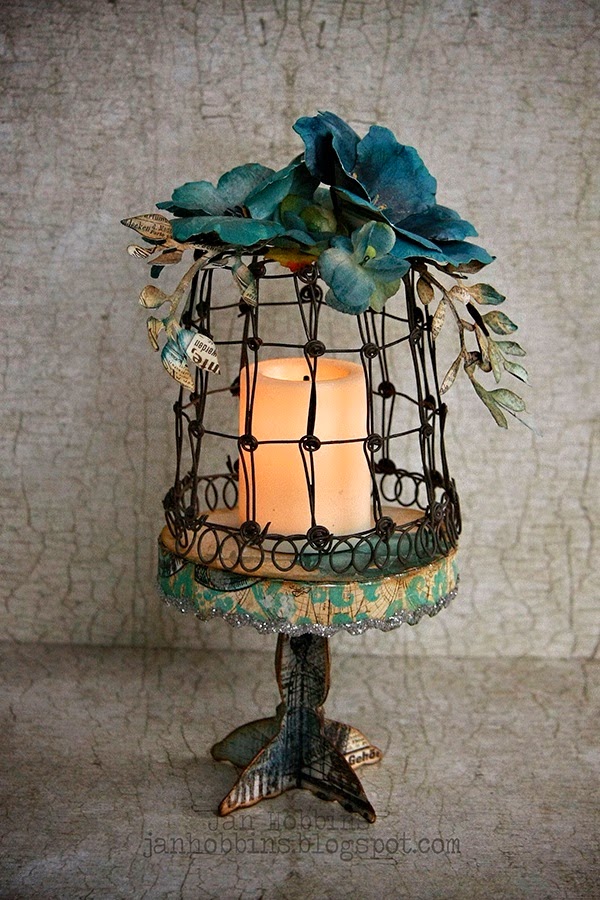
I did end up with this which I'm going to call a tea light stand.


I used the Mini Cupcake Stand die by Sizzix's Brenda Walton and patterned paper from BoBunny called, "Somewhere in Time".  Love the colours in this collection, and it has a bit of a steampunk look to it.
The instructions for this mini cupcake stand can be downloaded from the Sizzix website where the die is showcased.

It's very easy to assemble! These stands would be fun for cupcakes at parties or on a dinner table. Once I had mine assembled, I inked the edges, and applied Pumice Stone Distress Glitter to the scalloped edge.
For my wired cage, I used this tea light holder:

I have a few of these, and thought that without the glass insert, it would look great upside down on my stand.

The wire cage is very light, so it was perfect for my stand.  You could always make your own cage out of wire, that new Prima covered wire would look great!
I made two flowers from my Bo Bunny paper and Sizzix's Susan Tierney Poppy die.  There are also step by step instructions that you can download for assembling this die.


The various leaves were die-cut from Sizzix's Tim Holtz Spring Greenery Decorative Strip Die and Bo Bunny patterned paper.  The dark blue leaves were hand cut from my patterned paper.


Once I had my flowers and leaves finished, I adhered them to the top of my wired cage.  I also added in a few small flowers from Petaloo.


And that is my finished project.  

As for the bee, ...

It was too big for my tea light stand so I used it on a card.  I haven't taken a photo yet of the card, it got dark here early, lots of rain!  Hopefully I'll have it on here in the next day or two.

Wishing all Canadians, a great Canada Day tomorrow!

Thanks for stopping by,

Jan


6
Back to Top