Their Challenge Theme for the next fortnight is "Letter Perfect, hosted by Sara Emily. Here's Sara's description of this theme: According to Merriam Webster, 'letter perfect' is defined as "correct to the smallest details". We're not asking g you to be immaculate or flawless; we just want to see letters or words on your vintage or shabby chic project. They don't have to be the focus, but be sure we can see them!

I knew right away that I wasn't going to attempt writing anything myself, I have terrible writing! But I do have a lot of word and letter dies. I love the idea of using them on my cards, layouts or mixed media projects, you can choose any size, font or colour to match your project. These block word dies make perfect backgrounds as they use the negative space. I've used them in this way for birthday cards, especially the set that has Calendar months (661178). I will highlight the month of the birthday in a different colour so it stands out. Let's get started!

Starting with my word background, I cut out 2 pieces of light chipboard (or you could use heavy or mixed media cardstock, that can withstand painting) the same dimensions as the wood panel frame(TH93582) back piece ( 6 1/2 x 4 1/2). I drew a guide line around the top piece where the inner edge of my frame is. I love using the negative space on these Tim Holtz Daily Words Block Thinlits and they were perfect for this painted background. I then figured out what words to use that fit within that border. There was a small empty space left, but I knew it would be covered up with embellishments. I taped my words lightly with masking tape (love this thin 1/4" masking tape, I get from an art store) to hold everything while die-cutting.

Here's what my words look like die-cut. Glue this top piece to the solid piece of chipboard. Glue all the inner pieces of the A, D, O and R's or leave them off.
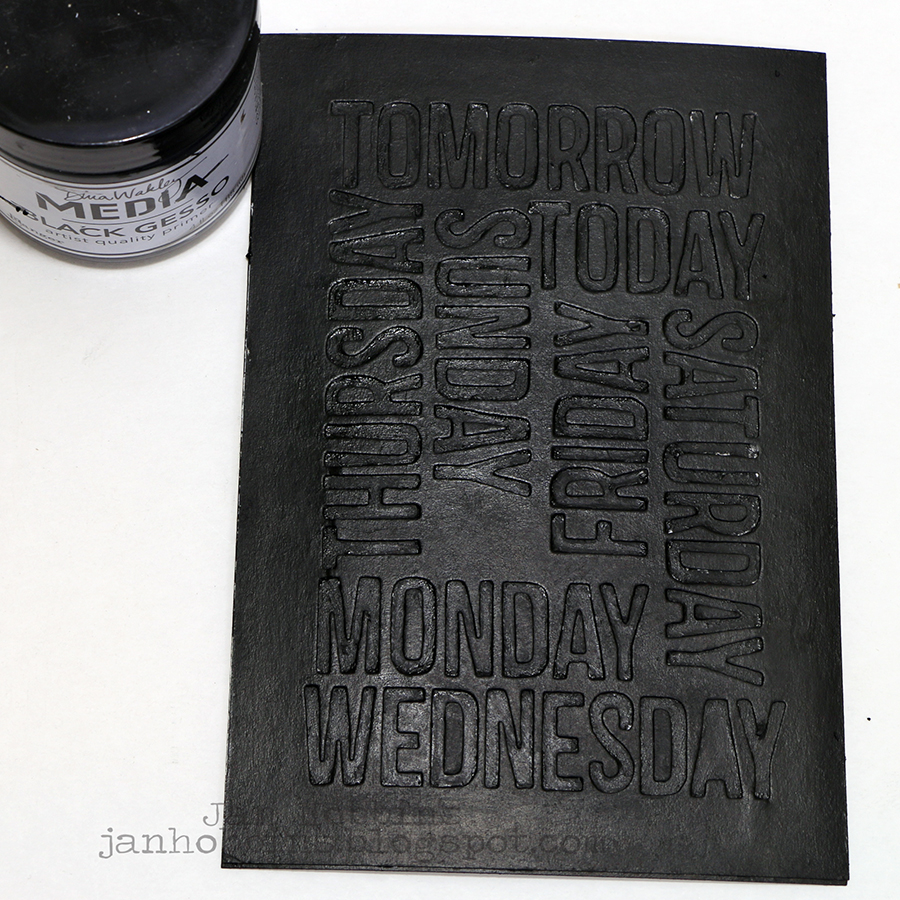
Once your chipboard pieces have dried, you are ready to paint. I started with Ranger's Black Gesso and painted everything. I tried to not have the inside of the letters too thick, I wanted them to be as recessed as possible. Dry before your next colour.

I still want my black colour to show through, so I use an Acrylic Glazing Solution with my chosen colour, Fired Brick Distress Paint (about 2/3 Glaze to 1/3 paint) to dilute my paint. Leave on a few minutes and then wipe off the excess with a baby wipe. I do this by dabbing lightly until I'm happy with the amount left, which is usually just in the corners or recessed areas.

Next I used Fossilized Amber Distress paint, same method.

This is what it looks like after wiping the amber paint. I wanted more paint left in my recessed words so they show up more.

I did another two coats of paint/glaze(a little more glaze, less paint this time), one of them Ground Espresso and the final coat with Antique Linen.

Here's the end result.

I lightly painted my frame with Antique Linen, and then dry brushed Ground Espresso to age it. The painted background was adhered to the frame backing. Before gluing the frame on top of my backing, I adhered a couple of pieces of paper ephemera on the left edge. You don't really see much of them in the finished piece, there's a clock half and strip of printed paper, but they add dimension.

Using Sizzix's Tim Holtz Heartfelt Bigz die (660233), I die-cut my different sizes of hearts from thick chipboard. There's 11 different sizes on this one die. One of the larger ones was painted with black gesso and then covered with Tim Holtz Clippings stickers (TH93583). I trimmed them around the edge of the heart. The heart was coated with Tim Holtz Crazing medium, then antiqued with a Walnut Stain Distress Crayon.

For the other hearts, I covered another large one with a portrait cut out from a Found Relatives card (TH93121) and distressed the edges, but you can always use your own photo. I love the backs on these cards as much as the photos, so I used some of the leftover card to cover another heart. The rest of the hearts were painted with Distress Paint, the red one had a Remanant Elements Rubs(rub-on) applied to the top. My quote was from the Tim Holtz Occasions Small Talk book. I applied this to a chipboard strip cut the same size, and inked the edges. I had to cut it into two pieces, as it was a bit to wide for my frame. Gears from the Gadget Gears (TH93297) and Mini Gears (TH93012) were also added.

For a bit of colour, I took a piece of Tim Holtz patterned paper, sprayed it with Rusty Hinge and Barn Door Distress Spray Stain. Foliage from Tim Holtz Wildflowers (661190) Thinlits die and a postal stamp from Labels (TH660060) were used to cut out my shapes.

After I finished adhering all my embellishments, I covered up the edge of my frame where the back and frame meet. Salvaged Design Tape (TH93672) was applied and sanded to distress it. This tape is great for hiding those seams!

You're done! Here's another look at my finished 'Letter Perfect' project. Hope I've inspired to you to use those letter or word dies for your backgrounds and also to join in Frilly and Funkie's challenge!
Thanks so much for stopping by. A big thank you to Frilly and Funkie for asking me to be a guest designer! I've enjoyed this challenge and I'm sure you would too. Be sure to check out all the inspiration from their design team and past challenges.
Until next time,
Jan


5 comments
Oh WOW! Love your technique for creating that background with the Distress Paints and die cuts. A perfect backdrop for the collection of hearts and gears with a warmth of late summer. Love it! Thank you so much for sharing your creative genius with us at Frilly and Funkie xx
Thank you for the detailed post. I really love how this turned out. Fantastic word background. And the little cluster of layers has a LOT of fun details.Your hearts, foliage, and those sweet labels add so much inspiration. Was a fun visit.
Great project design and tutorial! Thanks for all the tips, I have seen many beautiful projects with this frame but your design is one I think I could tackle! I also love the idea you mentioned about using the months word dies for a birthday card, brilliant!
This is such a wonderful panel. Thank you for sharing your steps for creating that gorgeous background, it truly is amazing! Congratulations on your guest DT spot. ~Ann
I don't think I could ever line up the couple to cut with my Bigz heart die, but soooooooooo love the result! What awesome embellishments you've made with these supplies. Your background work is out of this world and I just love the composition here. Thanks so much for joining us at Frilly and Funkie as our guest. Hugs, Autumn
Post a Comment