
I've created my small hanging home decor project using the Curio Box, Heartbeat, Crochet #2, and Falling Hearts Sizzix dies. Love the Heartbeat set so much, it can be used in so many different ways!

Here's a small tutorial on how I created this:

First I die-cut the tops of my 3 boxes with patterned paper (AbandonedTH94022) and the Curio Box Bigz die. I die-cut the box bottoms using chipboard. For the middle box, I die-cut this heart from the Heartbeat Thinlits set in the middle of the curio box top.

For the other two boxes, I die-cut the centres out with the Curio Box Framelits (4 Framelits come with the Curio Box Bigz die). I used the larger one for the box top and the smaller one (same shape) for cutting out a piece of cardstock cut to fit behind. I also cut out a piece of patterned Vellum (Wallflower Vellum TH93148) and adhered this behind the cardstock frame, then this behind the box top(3d dimensional foam adhesive squares). The other two Thinlits Heartbeat cardstock die-cuts were adhered across the top of the boxtops.

Before adhering the tops on the boxes, I installed the Tiny lights(TH94019), starting with the box that will be at the top. Punch a hole for the string to go through in one of the top corners. This string of lights will be divided between the three boxes. Exit the string in the corner of the box bottom, same side as the string entrance. There's about 1" space between each box. Your light string should exit in the middle of the corner as this will be covered by the crochet trim. I didn't adhere this corner closed until the strand was put through. There's no flap to adhere the box sides together, this is because if you're using chipboard, it never folds well because of the thickness. My tip for securing the corners; I use small strips of tissue paper and liquid adhesive to adhere the corners together and then add more liquid adhesive on the inside. Tissue is a great way to secure sections together, without the bulk. I also made a hole in the centre near the top, threaded a loop of twine(knotted at the end) through, for a hanger.

I temporarily taped the battery pack to the outside back. Adhere the tops to the box bases, after your lights are fixed in.

With the Crochet 2 Thinlits set, I die-cut several strips with cardstock. This die set does not have a cutting edge on the ends, so you continue the strip as long as your paper. I wanted a strip long enough to go all around the three boxes, so I adhered several together. Once you have done this, weave twine through the holes for extra strength. I left extra twine on the ends for tying a bow on the top.

There is a space left between each box, so I used a small piece of the crochet die-cut and adhered it to the back where it shows. This is adhered after you have the lights all assembled in the three boxes. The strand runs along the backside of the crochet die-cut, which will be covered. To get the trim on, I started with the middle of the strip and started adhering to the middle of the bottom box, going up each side. After you have reached the top middle, snip the ends of the leftover crochet trim.

For the middle box, I added die-cut cardstock hearts from the Falling Hearts Thinlits Set. These were adhered to the vellum, underneath the heart monitor.

Here's closer look at the top box when it is lighted.

Here's the bottom box lighted up.
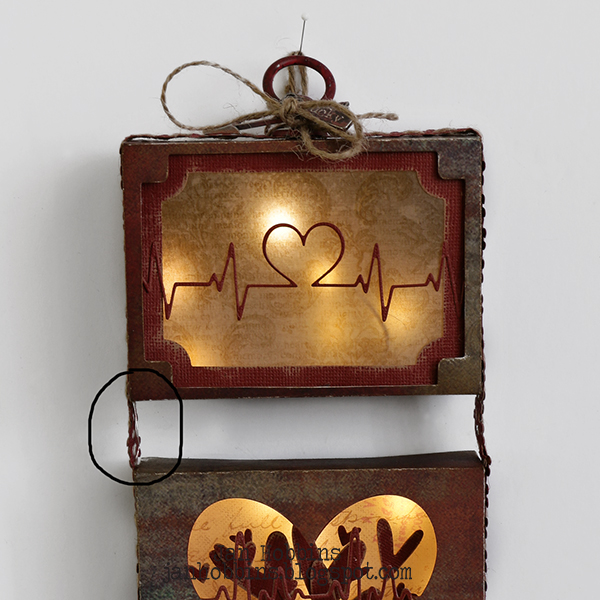
I also added a painted ring from the Mini Hardware Findings set(TH93571). and a Story Stick(TH93680), and Arrow(TH93127) to the top of boxes, tying the twine around it in a bow. I've circled the area where the light strand runs between the boxes, you can hardly see it.

Here's another look at my finished project! Hope you enjoyed my tutorial, thanks so much for visiting!
Until next time,
Jan


3 comments
Thanks for the tutorial, this is among my favorite projects...Love the lights running through the whole thing.
Oh wow!!!!!! I love the lights and what an incredible use of the Curio Box dies. The twine through the crochet die is brilliant. Love this!! -- Mary Elizabeth
Very nicely done!
Post a Comment