
The U.S. and U.K. Sizzix design teams have joined forces today for a Festive Blog Hop, so there is double the inspiration!
I'm sharing with you today, a Christmas decoration I made using the Sizzix Tim Holtz 3-D Star die.


I cut out two of each size of star. The paper I used is from Glitz's Joyeux collection.

Fold the the tabs under and crease the scored lines. Glue the two sides together with your choice of adhesive. I used Sookwang tape. If you are using very thick paper or glitter paper, I recommend a hot glue gun, it holds better. There's a thin wire that goes through the middle of both the stars and to make things easier, I placed that wire in between the two star halves before I glued them together. I cut about an 18" length of wire(allow for extra).

After the stars were glued together, I covered them with Rock Candy crackle paint. I covered one side, let it dry, then applied it to the other.
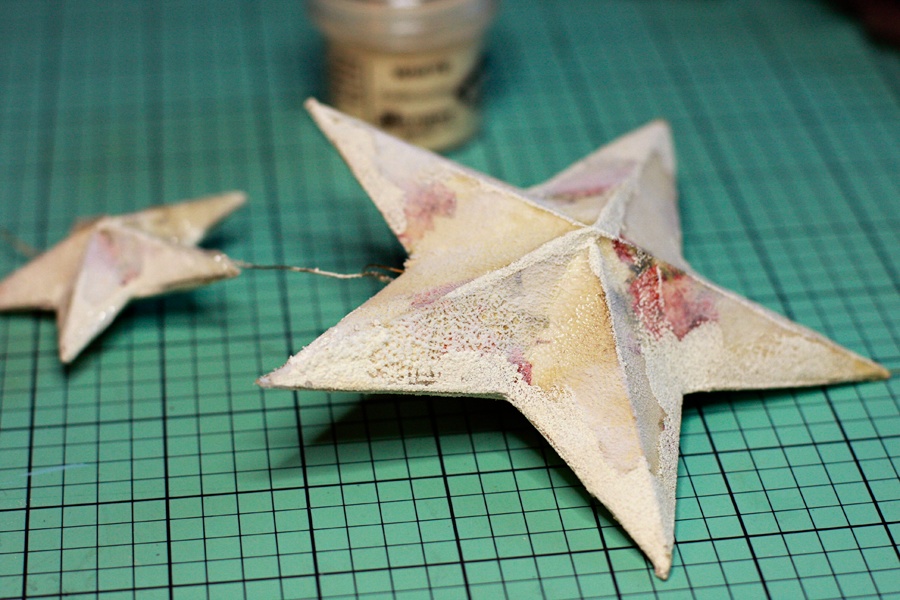
When the stars were dry, I dabbed a bit of Picket Fence and Antique Linen stain on the edges and random areas of the stars. Next, I used an embossing dabber (love this stuff!) on the edges and creased areas. The embossing powder I used was Ranger's White Puffs. I didn't even know that Ranger made an embossing powder that puffs up when heated! I saw it the other day, and had to try it! I think I might have overheated it in some parts, I'm going to have to experiment with it a bit more. But see that spot where the puffed embossing powder got in the crackled Rock Candy? It looks so cool! I painted a little on certain areas with more rock candy and applied Dry Rock Candy Stickles glitter.

Using the bow from my Sizzix Holiday Wreath die, I cut it out with Red Kraft Coredinations paper, sanded the edges, applied Rock Candy Crackle paint, and Rock Candy glitter.

For the little pennant on the bottom, I used one of the Cash Keys from Tim Holtz. But instead of the numbers, I wanted a small Christmas picture, so I cut out a portion of a sticker from Tim Holtz's Seasonal Salvage Stickers. I used the outer part of the oval sticker for a template. I put the picture in the blank medallion and covered it with the epoxy cover.


If you want a small spool and beads in the middle like I did, pull your wire so there's extra to play with in between the two stars and cut apart. I strung my beads and spool, then twist the wires together again, hiding the attached parts inside the spool. Finish off the bottom, attaching the medallion. Finish off your top, leaving a space for the bow. I attached the bow with very fine vintage gold bullion angel hair wire and then continued on wrapping it loosely around the stars. This wire comes in very tightly coiled pieces and when you pull it slightly apart, it can be used on your projects. I love using this stuff, but it's very hard to find. I found mine at Tinsel Trading Company on my last trip to New York.
I think these stars are one of my favorite Sizzix releases this winter, there's so many ways you can use them! Hope I have inspired you to try making ornaments out of this die, they would make great gifts!
Make sure you visit the other Sizzix designer blogs listed on the U.S. Sizzix site and the U.K. site, they have outdone themselves! And what would a blog hop be without prizes! If you would like a chance to win a pack of Textured Impressions Embossing Folders, comment on Paula's post on the UK Sizzix blog (depending on your location) or Tammy's post on the US Sizzix blog(depending on your location). 10 lucky winners will be chosen from each of their blogs on Wednesday, December 5th. Winners will be announced on Thursday!
Until next time,
Jan


24 comments
Love your Christmas stars - they are beautiful - another die for the wish list!
What a beatiful stars...fantastic project!:)
P.
Just Awesome... I Love this Star Die every time I see it used so Perfect for the Holiday's !
Love it. So festive.
This is beautiful Jan! Love the snowy texture on the stars.
I need this die! LIKE NEED!!! Your project is sooo inspiring!
Great project! love the stars!
Wow! What a cool decoration!! I love what you did! :)
Love your ornament. Thanks for sharing. love framelits
Cool! love the idea.
Fabulous! Love the 3-D star and all your embellishments on it! Great ornament!
DeniseB
A great Christmas decor idea!
Noreen
http://craftyjournal.com
This is wonderful-I may give it a try as a lovely,unique tree topper.
what a great project, I wondered what else I could use that kind of die with and now I know, thanks for the ideas.
Very cute, love all the little elements you used with the 3-D stars!
These are really cute! Love the combination of elements/pieces!
Beautiful!!!
Love your shabby star! Such lovely details!
Your ornament is very nice! This star die tempts me so....I am not sure I can do a lot with it with fabric but I might just need to get it anyway for paper. It's so cool!
Cute!!!
Wonderful project Jan! I love the stars and what a beautiful bow!
very nice - love the use of the Rock Candy look!
Sandra ltb
I really like that you used multiple design elements to create such a lovely piece. The star will have to end up in my Xmas stocking!
Your stars are beautiful. Love the snowy finish.
Post a Comment