Hello everyone! Today I’m sharing my final Tim Holtz Sizzix Halloween 2021 project. Autumn is my favourite time of year; the leaves changing colour, the crisp air and of course decorating for fall and Halloween. I’ve made this little Halloween notebook, a place to jot down ideas, recipes, or just something to sit on a coffee table for decoration.

I've used three of the new releases in this project; Pumpkin Patch, Leaf Fragments, and the Foliage 3D Texture Fade.

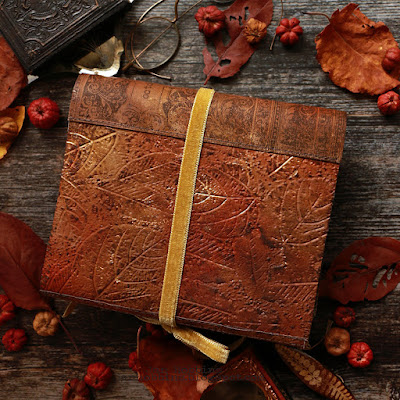
Here's a look at it opened. Love the embossed Foliage folder!

For my book cover, I’ve used Sizzix’s Texture roll, 663698. This substrate can be stamped, die-cut, inked, stitched and washed. Tim Holtz also carried this substrate, but it has since been discontinued. Who knows, you might even have some in your stash! It's perfect for books, as it bends without tearing. Because I need a longer strip, and wanted a spine for my cover and the embossing folder is only so wide, I have split it up in sections. My measurements are approximately; front cover is 4 1/8" wide, the spine, is 2 1/4", the back is about 4 1/4" and the little piece that wraps around the side to the front is 2 1/4", overall height is about 6". These measurements depend on the size of your memo pad that goes on the inside.


Doesn't this stamped and embossed texture substrate look like leather?
#103 Book Cover

The spine was a piece stamped with Tim Holtz Stampers Anonymous #103 Book Cover and Archival ink. I've also stamped the October 31. The stamp is wider than the spine and you will need to stamp a bit extra on the bottom. This was also coloured with Distress sprays after stamping. I've heat set the stamped image before spraying, to ensure that it doesn't run. If you use a water-based ink, it will react with the sprays and run.

After your pieces are coloured, machine stitch them together to form the complete cover. My memo pad is about 7/8" wide, so the spine curves loosely around it.

Once my cover was sewn together, I covered the inside using Distress Collage Medium and Halloween Collage paper. The collage medium was applied again on top of the collage paper. I cut a piece of cardstock slightly larger than the notepad width and about 3/4 of the length. I machine stitched around the three edges before gluing the sides and bottom to the back cover. This holds the memo pad.

Usually memo pads have a hard cardboard on the back, if yours doesn't I would add my own. Slip your memo pad cardboard back in the pocket.

Now you are ready to add in your decorated ribbon closure.

I’ve die-cut a pumpkin from the pumpkin Patch Colorize set with Warm Kraft Stock Stack Warm paper TH94112.

I had Mixed Media Heavystock coloured in various colour combinations and diecut Leaf Fragments

Gold ribbon from the Warm Velvet Trim TH94115 package was sewn onto a square piece of sturdier ephemera. This square is the base for your embellishments.

The die-cut leaves, pumpkin, and mummy cloth, owl ephemera and cat charm were added.

Your notebook is complete! Thanks for dropping in, until next time,
Happy Halloween!
Jan


4 comments
What a fun project...love the colors and I am a big fan of the Fall Season as well...finally cooler temps...
Your cover is amazing; looks like real leather! Gorgeous fall project!
Fall is my favorite too! this is a fantastic project and your colored Leaf are amazing!! I am bookmarking this, and recently got a sewing machine, so this is DEFINITELY inspiring me to try this. thanks a million for all your beautiful artwork and inspiration you give us freely. I appreciate it so very much. and a hug to Tim who starts our imagination : ) T from AZ
Perfect for fall!!! Thanks for the tutorial! The cover looks just like leather! Beautiful project!
Post a Comment