
Hello everyone! Halloween is almost here, and I’m sure there’s a lot of you still creating for this spooky holiday. Usually I’m in full Halloween mood, decorating and still creating, but I’ve been visiting our new granddaughter and her big sister, so I’m missing out a bit this year. Plus, my husband and I unfortunately came down with Covid, so I haven’t had much energy. So, sorry this post is a little late, I had planned to get it done sooner! Here’s how I created my Vignette Arched Shrine!

I covered my entire shrine in the Halloween Collage paper with Collage Medium. I wanted the Woodgrain to show through, so I applied directly over top of the shrine. I also applied Collage Medium over the paper to seal it.

A narrow Design Tape was added to the edges.


The top base piece was covered with Halloween Worn Wallpaper. Lightly sand and ink the edges to give it a worn and distressed look. Glue the two pieces together with Collage Medium.

I wanted an even bigger base, so I could create more dimension with my embellishments. I had an older Idea-ology baseboard (it was a cigarbox top looking baseboard) that I covered with Worn Wallpaper also.

The smaller original shrine base was adhered to this, towards the back.

I’ve drilled a hole in the shrine for my tiny lights. This is near the bottom edge.

I love this scenic card in the Halloween Layers pkg, which was the inspiration for this make. It was adhered in the middle to my shrine. It’s wider than the box, but instead of trimming. I left the sides curved.

I’ve left some tiny lights at the bottom coming out from under the scenic card and the rest are going above.

This is the Spiderweb transparency from the Halloween Transparency pkg.
it’s cut up to fit in the upper shrine part.

I’ve used the smallest Vignette box and a Vignette Frame for my small scene.


It will look like this with the transparency sandwiched in between the box and frame. I’ve drilled a small hole in the vignette box for a few lights to go inside also. The box will be glued first onto the shrine, before the frame and transparency.

The box is glued just above the scenic card. The lights are arranged around and inside the vignette box.

I lightly sanded with steel wool, the transparencies, the pattern is on the back side, so don’t sand the back or it will come off. This was just to give the surface a duller finish so the Distress Translucent Crackle paint stuck on better. If you want a cleaner look, just skip this. Gently rub in black soot crayon to accent the cracks.


Next, adhered the larger transparency piece. The bottom of this will be covered with floral pieces, so don’t worry if it’s crooked. You can see where my transparency is slightly off around the box, but it doesn’t matter as the frame covers it.

Adhere the frame on top. I’ve added crypt paste to the frame also.

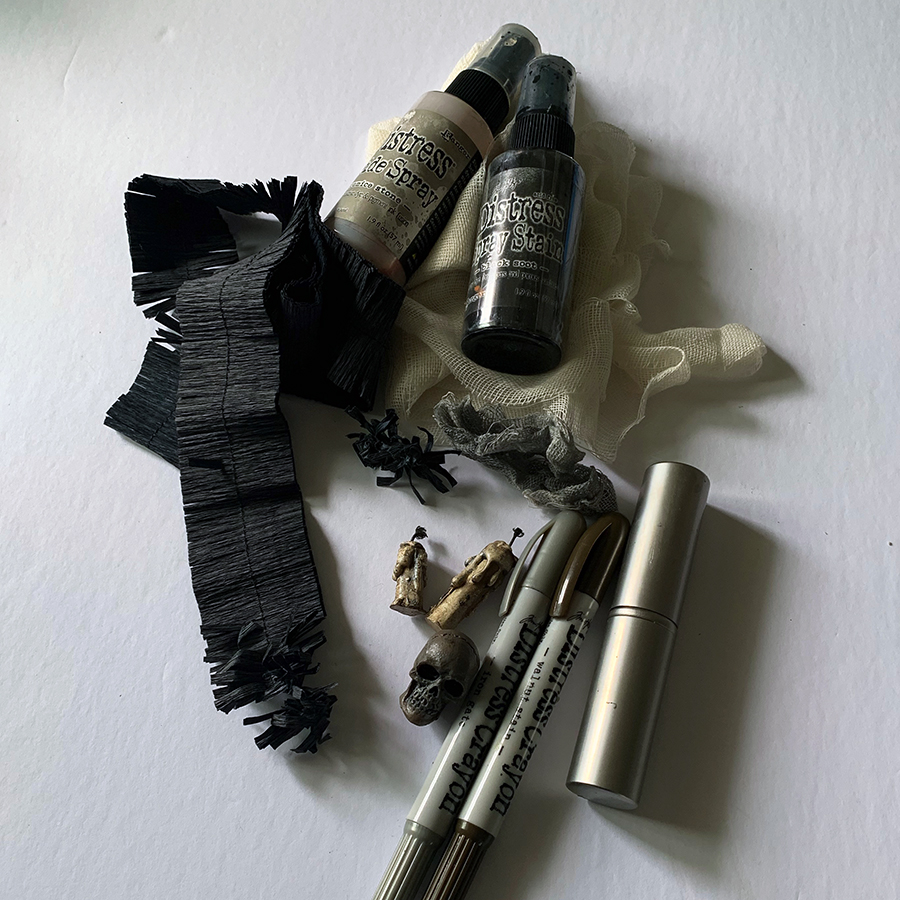
I’ve also used Drippy Candles, a skull, mummy cloth, an urn, Halloween Fringe, and Bouquet tiny flowers. The mummy cloth was coloured with distress sprays and the candles, skull were tinted with distress crayons (Decayed pearl Mica (Halloween Seasonal) and Walnut Stain. I’ve kept everything neutral in this project, except for the Bouquet flowers and the Wedding flowers on my paper doll. These were coloured with purple/violet sprays and Distress Crayons.

My Halloween paper doll is slightly shaded with a neutral distress crayon and the flowers in purple/violet shades.

This is the back of my tombstone. Remnant Rubs were also added before the Crypt Paste. After the paste had dried, I highlighted the raised areas with a dab of Distress paint.

Once you have all your embellishments tinted, coloured and crypt paste added, adhere with Distress Collage Medium to your small vignette framed box. I added the small piece of tinted mummy cloth first, then the candles, skull and flowers. The urn, which also has Crypt Paste added, is filled with a small piece of Halloween Fringe and tinted tiny bouquet flowers. This is glued to the bottom corner of the Shrine. My gate piece is also adhered with Collage Medium to the edge of the Shrine. I also reinforced it to the edge with a small piece of thin wire that I bent over the gate post and poked into the wood. The paper doll is glued to the front, her elbow looks like it’s resting on the gate.

I added patches of Crypt paste to the base. I chose some book clippings from the Halloween Sticker book and placed these so it looks like they are sunken into the paste. There’s two ways to do this. One, is to cut out a thick piece of cardboard the same size as your clipping piece, place it on the base, apply the paste, then lift up the cardboard piece. Once the paste has dried, stick down the book clipping. Or, place your clipping lightly on the base, then apply your paste, lifting the clipping immediately after, wiping off the paste on the clipping (with a craft knife or craft pic so you get a nice clean impression left). Stick it back down after the paste is dry.


My Vignette story is told with book clippings all around the back edge. I removed a bunch from my sticker book that I thought would work, placed them on my craft mat, to figure out which ones I wanted to use for my story. It was fun trying to figure out a bit of a story using the available stickers. These are all inked lightly on the edges.


As when the howling of the wolf is heard -
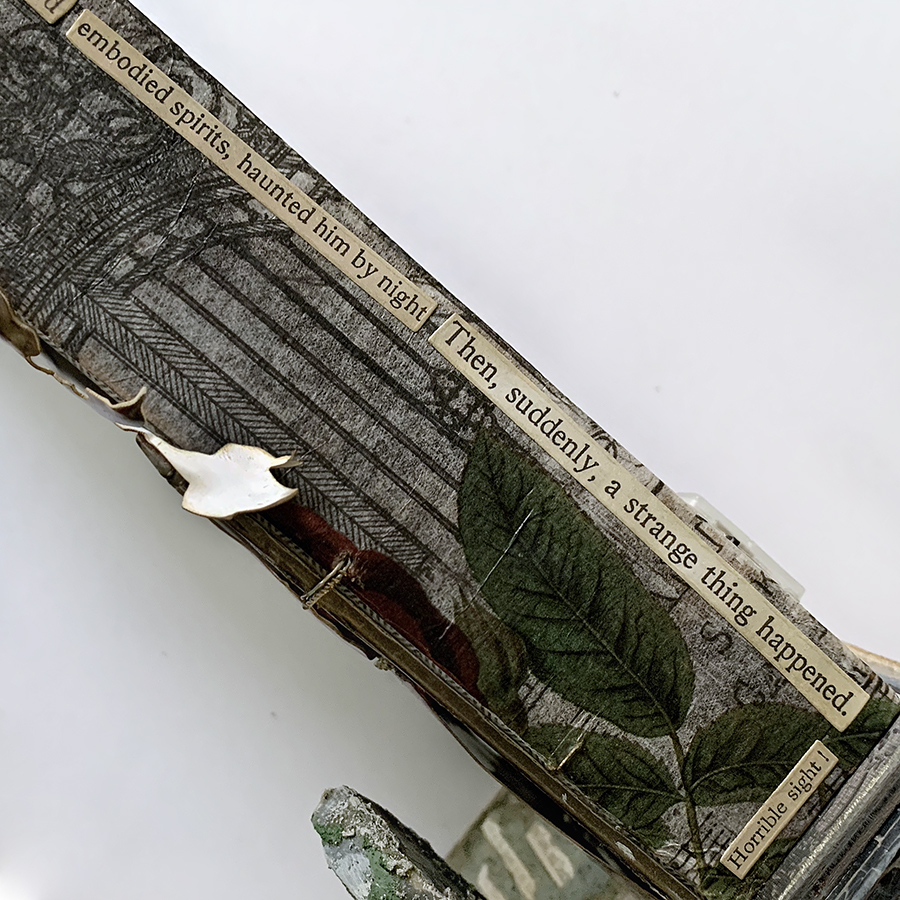
Embodied spirits, haunted him by night - then suddenly, a strange thing happened. - horrible sight!

A Halloween Shape Seal was added to the top, with Crypt Paste added around the edges. A bit of craft moss added around the base and a couple of tiny flowers to finish it off.


This is what it looks like light up. Most of the lights are around and in the small vignette box, but the few that I left at the bottom behind the paper doll are just enough to light that area up.

Here’s another look at my finished project.
Hope you enjoyed this tutorial!
Until next time,
Jan
Supplies
Vignette Arched ShrineTH94273
Halloween Collage Paper TH94254
Tombstones TH94173
Halloween Ornate Gates TH94159
Halloween Paper Dolls TH94266
Curiosities Sticker Book TH94271
Halloween Layers Th94264
Halloween Fringe TH94262
Halloween Design Tape TH94259
Urns TH94174
Drippy Candles TH94260
Halloween Worn Wallpaper Scraps TH94147
Halloween Remnant Rubs TH94268
Mummy Cloth Trimmings TH94155
Skulls TH94270
Halloween Transparencies TH94272
Pearl Droplets TH94265
Halloween Ephemera Pack TH94261
Halloween Shape Seals TH94269
Bouquet TH93569
Vignette Frames TH93694
Vignette box TH93279
Halloween Tiny Lights TH94157
Craft moss


1 comment
Excellent!
Post a Comment