Hello everyone! The month of October is almost upon us, and I’m sure a lot of you are busy creating for this spooky time of year. I’m sharing my first make for the Tim Holtz Halloween Idea-ology 2022 release. If you missed Tim's YouTube live, you can get all the links here. So much inspiration, all the makers created some incredible Halloween projects.
I created this Hocus Pocus Confectionery clock. Lots of little details in this one, I'll try and explain most of them!
I started out by taking apart my Curio Clock and covering the two sections. The outside the clock body is covered with paper from the Halloween Backdrops pkg. The silver ring was coloured (I just blotted it so it looked more distressed) with Latte Alcohol Ink.
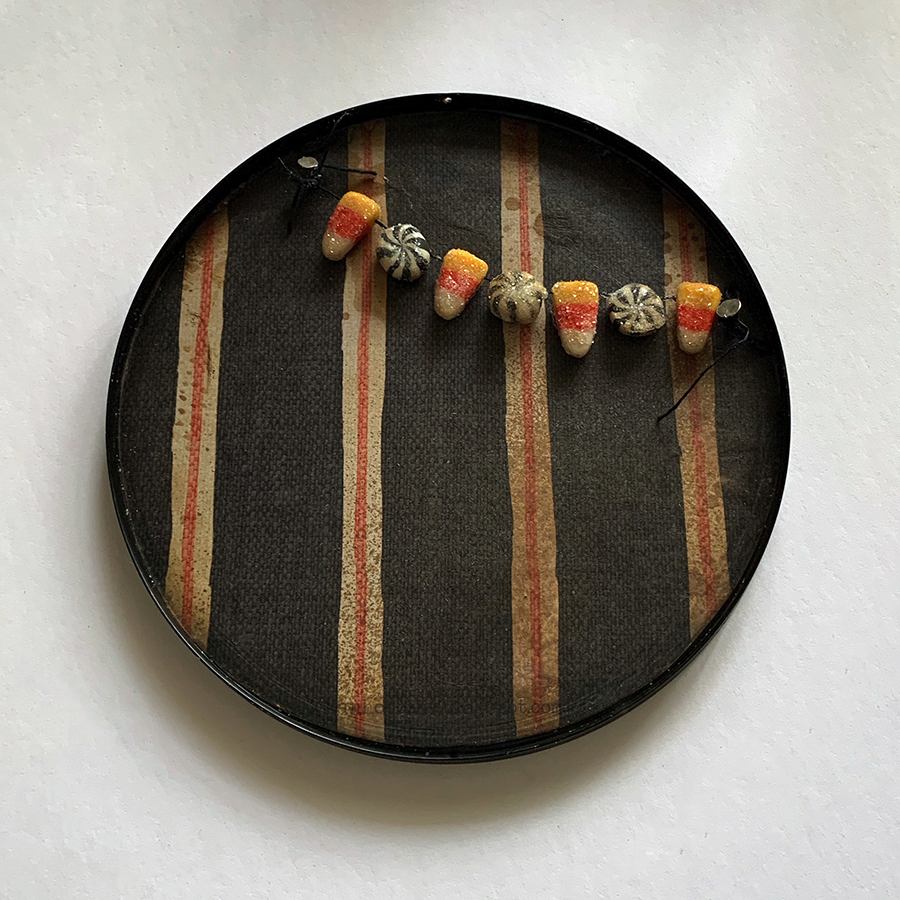
The inside of the clock back (circle) was also be covered with Backdrops paper. I don’t glue this in yet, as I want to attach the candy garland. For the clock base, I used wide tape from the Halloween Design tape pkg. This tape was the exact same pattern as the paper.
This project is about Halloween candy, so I wanted it to have a very sugary look. So, before adhering my Backdrops paper, I applied Distress Frosted Crystal Embossing Powder with Distress Clear Embossing ink. To maintain that frosted look after embossing, don't overheat! Adhere your Alcohol inked rim back in the clock. Reattach the clock body to the base.
Before adhering this, I used the same design tape as the clock base, and stuck this around the inside. In hindsight, this cardboard base could have been stronger to support the cauldron and other embellishments. It came apart in transit to Tim and also when it was sent back to me, so if you feel it needs to be stronger, (in case you are mailing it or it will be jiggled about!) a larger piece of foam could help. I also think, because the Design Tape has a more slick surface to it, that could be why my glue didn't hold as well. You could always eliminate the tape in that bottom area. I've used Distress Collage Medium with a bit of hot glue to hold it temporarily in place while the medium dried as I wanted it tight against the front.
This is how the "table" will look like.
One end of the tiny lights will go in the cauldron and the rest at the back of the table. I have the battery pack for the lights coming out of the bottom. The metal strand in thin enough, it can close, but there is a chance it could damage your light strand. I have used a pair of wire snips before, making two small cuts (about 1/8 to 1/4") out of the lid at the bottom, and bent the middle piece inside or off completely. Just enough to give the wire some room and your back lid can close tightly.

For the back of my clock, I’ve hung a candy garland. The Halloween confections and candy corn are “sugared” with Glossy Accents and Distress Rock Candy Glitter. I've used Glossy Accents because it's thicker and more glitter adheres to it. It's also a great glue! After these were dry, I used heavy craft thread and a needle to string together the candy pieces (they are a soft material similar to Fimo clay, so the needle goes through). The end pieces of the thread were knotted around tack nails. These nails were bent in half (90degrees) with pliers, and poked through the paper, the ends on the back of the paper adhered with tape or glue. Now glue the paper to the clock back. . It looks like the garland is nailed to the clock.
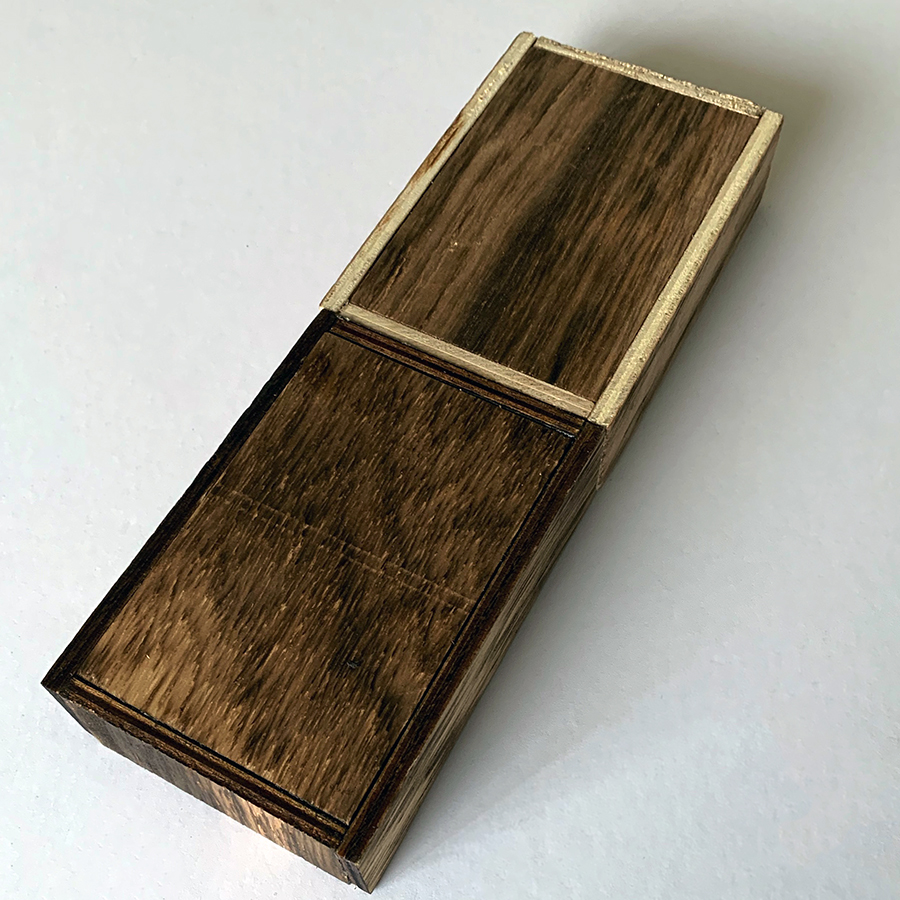
I used two small Vignette Boxes (about 2 1/4 x 3 1/4) attached, end to end for a base. Bigger base, more embellishments! Distress Collage paste and a couple of nails secured them together. This was also covered with Backdrops paper.
Here's my base covered with the Backdrops Halloween paper. The paper is one continuous sheet across, so you can't tell there's two boxes. Sand and distress the edges with brown Distress Ink.
Adhere your clock to the wood base. I've just used Collage Medium for this, but let it dry overnight to really secure it. The back isn't secured yet, I needed to figure out what is going to show in that circular space. Now for the embellishments!
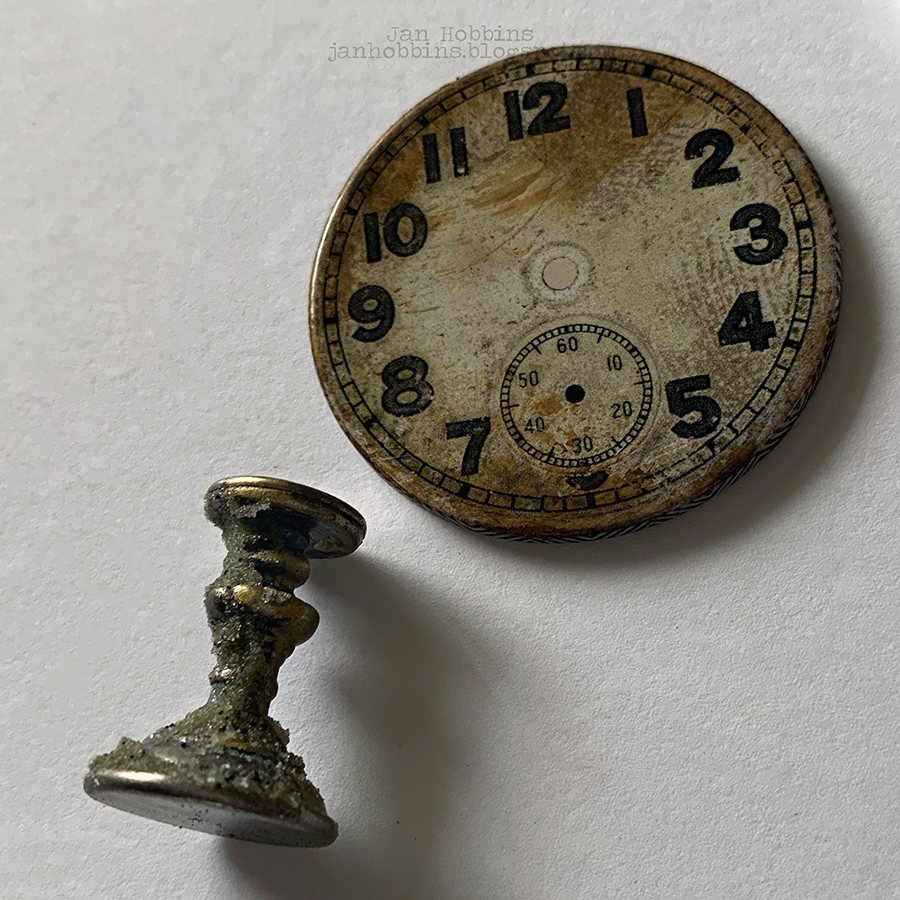
For my stand, I've used a Candlestick and a Baseboard Clock Face. The candlestick has a touch of Statue Foundry Wax to age the silver and Crypt Paste (love this stuff!). On most of my areas where I've applied Crypt Paste, I have highlighted the raised areas with my finger, a touch of paint, after the paste has dried. I usually use a lighter colour, here I've used Pumice Stone. The clock face is distressed with ink, and the rim is covered with the narrow Design Tape (excess is folded underneath). Glue these two together with Collage Medium.
The square October 31, is from the Halloween Layers Pkg. I've applied Distress Translucent Crackle Paste to the edges, and when dried, applied Walnut Stain Distress Crayon to accent the cracks. This is on the back "wall" just below the garland and in the middle. There's also a "Trick or Treat" Label Sticker just across the bottom of this at an angle.
My "Hocus Pocus Confectionery" sign was created in two parts. Both of the labels were die-cut with Tim Holtz Sizzix Vintage Labels Thinlits Set. The dies also emboss while cutting, so I inked the metal die with Crackling Campfire Archival Ink before embossing/die-cutting. The ink is just on the embossed area. Hocus Pocus in a Label Sticker, placed inside the vintage label. I die-cut the word, Confectionery, with the Sizzix Alphanumeric Label Thinlits Set.

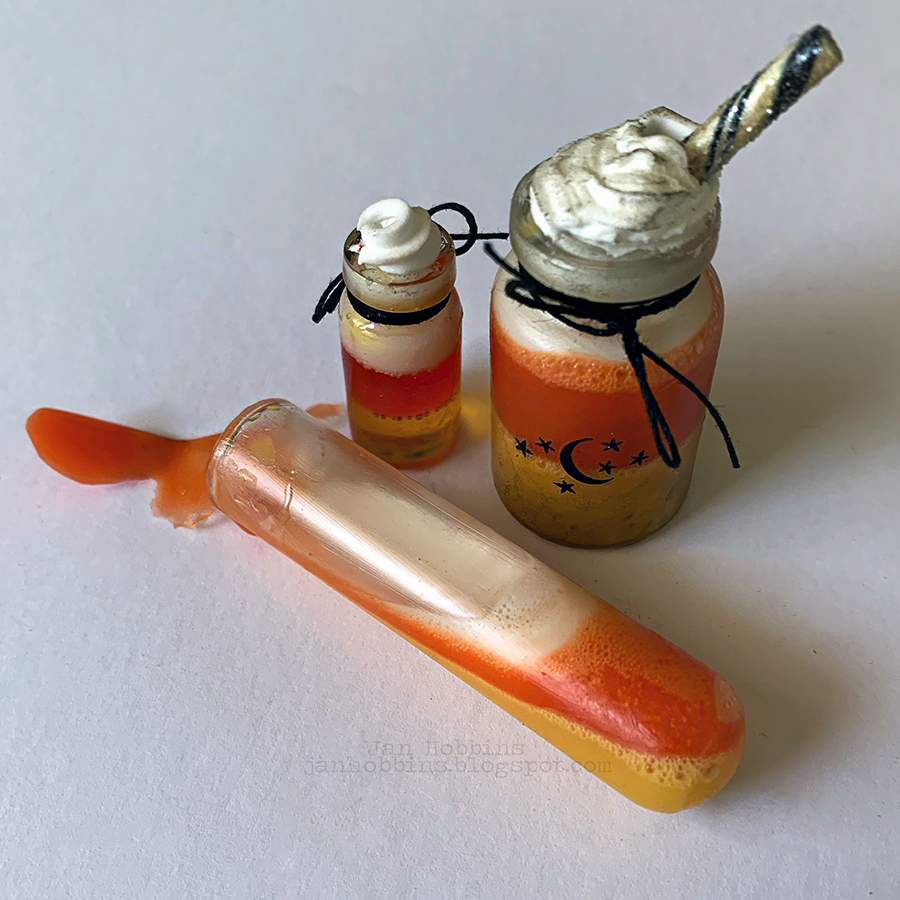
Now, for my Candy Corn drinks, and test tube. I've used Ranger Ink's Clear Resin Kit. It's a 2-part epoxy resin that hardens when the two equal parts (one bottle is the resin, the other is the hardener) are mixed together. You store these together and apply to your project, then set aside to cure. You can also get their package of small cups with stir sticks. It's a longer process, when doing three different colour combinations, as I let each layer cure/dry before doing the next one. But this is something you can do in advance or at the beginning of your project. You don't need to mix a lot up for each colour. Once you start filling little containers, you can't stop! For the clear "candy corn drinks", I coloured my resin with a drop of Alcohol ink. I first started with yellow, filled my vials a third, set aside. I had some left over, so I added in a drop or two of yellow paint to make it opaque, stirred this in. I filled the larger vial a third, and then poured some into the test tube. For the test tube, I wanted it to look like it had fallen and some dripped out. I had a small shallow cardboard box, or a piece of cardboard is fine, lay some parchment paper down so the resin doesn't stick. You will want to tip your tube so the end is slightly higher, it doesn't take much for the resin to slowly drip to the end and out of the tube. I used a piece of cardboard with a hole in it to hold the end of the tube, bent the cardboard so it is was slightly raised and taped it to the bottom of the box. I recommend you figure your setup before pouring resin. After the yellow has set, I usually leave it overnight, do the same with orange alcohol ink, paint and a new batch of mixed resin. After the orange has cured, repeat with either Ranger Ink Snow Cap Mixative (it's opaque) or white paint.
For my fluffy toppings on the drinks, it's just White Opaque Texture Paste! I didn't need a lot of it, so instead of a cake decorating bag, I just just clipped a tiny hole in the end of a small plastic bag. I pushed my cake decorating star tip through the hole (make sure you have a tight fit, so a small hole is better) and put in a small amount of texture paste. Twist the end of your bag, so nothing escapes out the other end, and squeeze onto your drinks. I added a glittered Halloween candy stick while the texture paste was still wet in the larger vial. Halloween remnant rub was added to the outside and black craft thread tied around the rims. Your vial should come off easily from the parchment paper, if you have excess spillage, you can always cut off what you don't want and curve the edges down with your fingers. I've rubbed in a light layer of Collage Medium to the outside glass test tube and large vial, lightly distressing with brown distress ink, giving it an aged look.

For my baking tray of glittered bat cookies (and I added in some glittered pearls after), I created the tray from the Vintage Label Thinlits die. I used black Metallic Kraft stock paper, the die inked with black Archival ink before die-cutting. I slightly sanded the metallic paper before die-cutting (I used some steel wool) so that the ink would adhere better. After die-cutting, sand the edges, and apply Statue Foundry wax with your finger in a few areas if you want it to look more aged. The tiny bats were from the Halloween Ephemera Pack, they were also glittered with Glossy Accents and Rock Candy Crystal Glitter. My two little handles were Tim Holtz Jump Rings, poked into the ends.
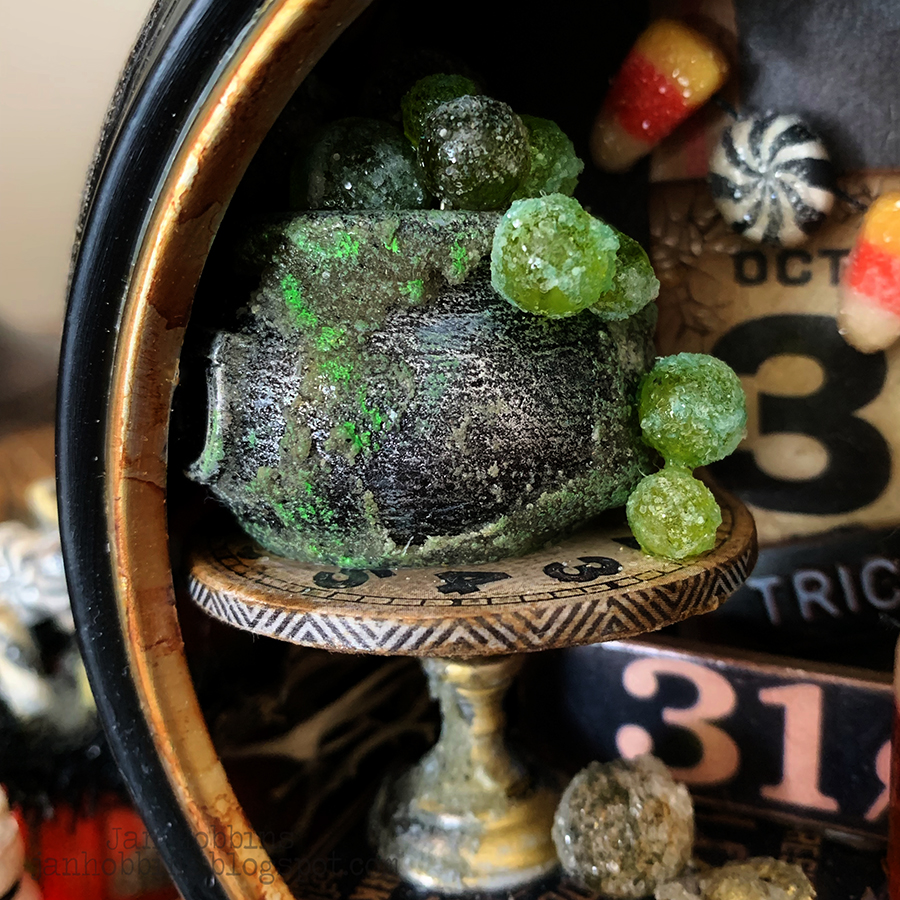
For my candy brewing in the cauldron, I used the clear glass Bubbles. These were coloured with Limeade and Mushroom Alcohol Ink. I then applied Glossy Accents and Rock Candy glitter, set aside to dry. While these were drying, I applied Crypt Grit Paste to my Cauldron.

Once the Grit Paste had dried, I accented a few areas with green Distress Paint. Before adhering the frosted bubbles, stick your Tiny Lights inside the bottom of the cauldron. You don't need a lot, the excess strand comes out the back, behind the cauldron and along the back of the table. You can either directly glue your bubbles (I've either used glossy accents for this or Collage Medium) on top, or cut out a piece of plastic packaging to fit on top of the lights and glue your bubbles on top of that. For the bubbles outside the cauldron, I have glued these on before doing the lights and filling the cauldron. That way you can do have the cauldron on it's side so they don't fall off. I usually do these one at a time, and if they don't stay, try a rubber band to hold them on while they dry. Glue your cauldron to the stand with Collage Medium. Save a few of the bubbles for the table top.

The Halloween Jack O Lantern is highlighted with a bit of Ranger Ink Elixir Pearlescent Crayon. It's filled with Rock Candy glittered Halloween Confections. The sticks are slightly coloured with green. The round ones are on toothpicks to make them look like lollipops. These are all glued with with Glossy Accents (Rock Candy sprinkled on top) Wired Black Tinsel is glued around the pumpkin rim and extra left over to bend upwards with a tiny frosted bat on the end. I wanted my tinsel a little smaller and aged looking, so I heat it very briefly with my heat gun( not my embossing gun). You don't want to overheat, and start a fire, it doesn't take long to see the tinsel shrivel!
Here's my little frosted bat on the end of the wired tinsel.
Glossy Accents was applied to my Halloween Skull, Spider Adornment, and Bones, then Rock Candy Glitter applied. Here, you can see where my extra tiny lights were, before I adhered a Baseboard( 31¢) in front to cover them. I just wanted to see a green glow, not the lights. My skull and bones sit on top of a book made from a book cover in Halloween Ephemera and old book pages cut up to fit inside the cover.
Before adhering my embellishments to the back, I added some thin Design Tape around the base of my clock. I've also frosted up extra Candy Corn and Pearls to place on the base. All my embellishments are glued down with Collage Medium. Sometimes I will use a small dab of hot glue to hold the object in place ( or an elastic band) while the collage medium is drying (This is what I've done with the test tube, as it's on a slant). The drippy part coming out of the tube is glued over the edge of the base with Collage Medium also.
Here's a look of the inside of my clock.
Here it is with the tiny lights on.
I've also frosted a small Halloween Pumpkin, and attached dried moss (I purchased a package of Halloween dried mosses last year from the craft store, there were I think 4 different kinds, perfect for Halloween makes.)
Here's another front view.
I've adhered my Confectionery sign to the front.
Here's another look at my finished project! That was a long one! I never realized how many little details there were until I started explaining, lol! If this is too large a project for you, there's always one or two things you can add to your own Halloween make, or give you something to think about when using your own halloween stash. Thanks so much for visiting!
Happy Halloween Crafting!
until next time,
Jan
Supply List
Idea-ology - Curio Clock TH92474, Vignette Box (small-2.875 x 3.1875) TH93279, Corked Vials TH92899, Jump Rings TH92726
Halloween Idea-ology - Baseboard pkg. TH94252, Ephemera TH94261, Label Stickers TH94623, Layers TH94264, Adornments (spiders) TH94250, Tiny Lights, TH94157, Black Wired Tinsel TH94253, Pumpkin Jack O Lantern TH94179, Small Pumpkins TH94267, Bubbles TH94180, Pearl Droplets TH94151, Cauldron TH94171, Remnant Rubs TH94268, Candy Corn TH94257, Confections TH94170, Design Tape TH94259, Skulls TH94270, Test Tubes TH94156, Boneyard TH94168, Backdrops Paper TH94251, Candle Stand TH94166
Sizzix - Vintage Labels Thinlits set - 665929, Alphanumeric Label Thinlits set 664177
Ranger Ink Distress - Crypt Grit Paste TSHK81081, Opaque Texture paste TDA71297, Rock Candy Crystal Clear Glitter TDR35879, Frosted Crystal Embossing Powder TDA78319, Collage Medium, Clear Embossing Ink Pad, Alcohol Ink( Limeade, Mushroom, Latte, Snow Cap Mixative), Archival Ink Pad (Crackling Campfire, Black Soot), Foundry Wax (Statue), Pearlescent Crayons Halloween Set #4 TSHK81128, Brown Distress Ink for edging
Ranger Ink - Clear Resin Kit INK69768, Resin Cups INK73420, Glossy Accents
Heat Gun, Hot Glue Gun, Craft Dried Moss, Black Craft Thread, Cake Decorating Tip (I used star)


3 comments
Yes, lots of details, but that is what makes the project so special and very interesting to look at. Great job explaining, I feel like I could make this just from you describing what you did and to what. Thank you for taking the time to write the post, I know it is time consuming to do so. Great make!!!
Love your project. The amount of details is amazing!!!!! Thank you so much for sharing your process.
Love the project and so generous of you to share all the details. I 'm totally going to make this and hope it looks half as good as yours! I have so many of these supplies, just can't seem to stop buying so now is the time to make!
Post a Comment