Hello friends! I'm sharing another project today created for the Tim Holtz Christmas Idea-ology 2019 Facebook Release.

This is my Christmas Vignette Tray. For a change, I've used the backside of the tray.

This is rather a long tutorial, so you might want to grab a beverage, sit back and relax! I know most of you have completed your Christmas projects this year, but you can always use the inspiration for next year!

I started off by giving a light coat of white gesso or paint to the back of my large Vignette tray(TH93568). Along the outer edges, I applied Ranger's Opaque Crackle Texture Paste INK57505, then set aside to dry.
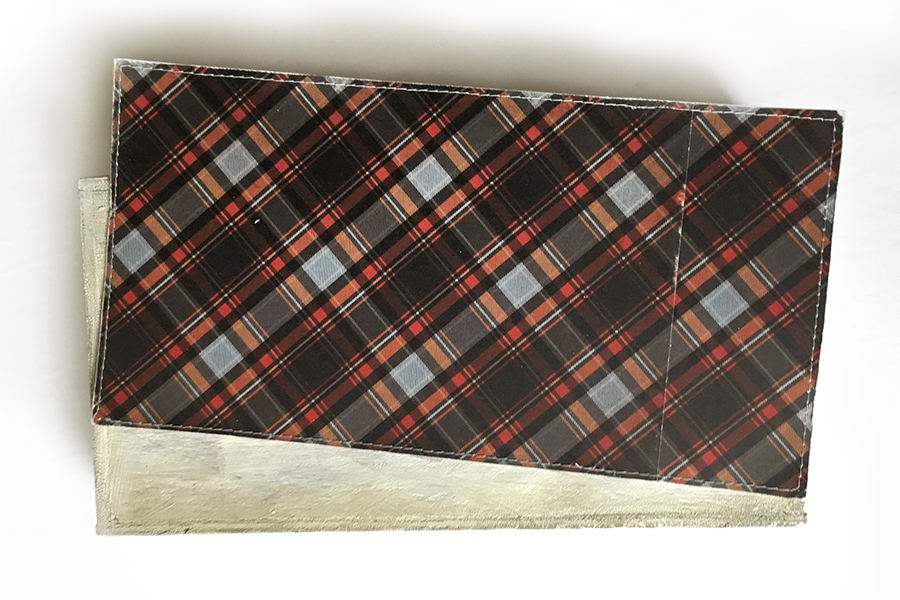
Cut out paper to fit your tray. This plaid is from the Tim Holtz Christmas Paper Stash TH93988 and because it's not as wide as my tray, I pieced it together. I knew I was going to put a vignette box in the middle, so I tried to make the seam where the box would cover it. Machine stitch around the edge. Adhere this to your tray back. I didn't use adhesive right up to the edge of the paper, just up to the stitching, as I distressed and lifted those edges.

I've used Etcetera Scalloped Trim pieces(THETC-008) all around the edge of my tray. I used the longest piece and cut a shorter one to fit the longer sides. Shorter one on the sides. These were painted first with white paint, dried, then Ranger's Opaque Crackle Texture paste on top. Once the crackle paste has dried, use a brown Distress Crayon on your pieces, and rub it in with a damp finger. This brings out all the crackle!

I've used quite a few of these Christmas Quote Chips (TH93998). But if you're like me, I buy these every season, so I've accumulated quite a few so I don't mind using them up! With the narrow ones, I figured out which ones I would use and how they would fit around the perimeter of my tray first. I managed where I just had to trim a couple of them to fit. Distress and ink them, even use a bit of Tim Holtz clear Distress Crackle Rock Candy(TDC31888) to age them. Paint Tim Holtz Hardware Heads (TH93788) and adhere to each end of the Quote Chips.

Adhere the Quote Chips all around the edge of your tray. I have the words facing the front of the tray.

Next adhere the scalloped trims. I was so happy that the combination of the two were the exact width of the tray edges, with the scalloped parts slightly overhanging.

Cover the inside edges of a large Vignette Box(TH93279) with pattern paper. Crackle the corners with Crackle texture paste. I did this because when I place the Christmas Vignette Box Top (TH94000 Sparkling Tinsel Icicles one-5.5 x 3.875) on top, I curled up the corners to expose the crackle. I had drilled two holes through the back of the box and tray to secure these two pieces together with screws.

I also drilled a hole large enough for a Tiny Lights strand (TH94019) to go through.

Here's how the back looks.

I secured the lights around the upper edge of the box using small nails (TH93668) at each corner(slightly sticking out), and wrapping the wire around once. Your strand should end up at the bottom of the box with extra left to wrap around the trees.

I've used a winter postcard from the Christmas Layers and Baseboard Frames(TH94017) for my background scenery. I curved this card, so I used 3D foam dots on each side to hold the card edges up higher. The edges rest on top of the foam dots. Adhere them underneath.

Your postcard will look like this from the side.

Your light strand is in front of the postcard.

For the snow at the bottom of the box, I cut out a small piece of styrofoam. It's flat on one side and curved to fit the postcard on the other. Apply Ranger's Tim Holtz Grit Paste(TDA53422) to the top. While it's wet, apply Tim Holtz Distress Mica Flakes (TDR69140) and Clear Rock Candy Glitter(TDR35879) to the top. Set aside to dry.

Take the stands off the Tim Holtz Trees (Woodland Tree Lot TH93757 and Mini Woodland Tree Lot(TH93758). Colour these with Distress Spray Stain in your chosen green colours. Apply a bit of Matte Medium with your finger on the trees and sprinkle Mica Flakes and Distress Glitter. These trees are adhered into the styrofoam.

Glue the snow piece with the trees to the bottom of the Vignette box. Paint a Salvaged Santa or Snowman (TH93995) with Distress Paint and adhere next to a tree. Wrap some of the light strand around the bigger tree on the left and with the remaining bit, hide behind the snow at the back and bring it across to the other side to wrap around the tree at the right. Adhere your Vignette box top to the wood box. Curl up the edges of the box top.

Now for the deer on the little shelves. I cut out pieces from the leftover negative bits of the Pinked Etcetera Trims(TH9401, the same width as the Silver Stencil Chips(94018), numbers 2 and 5. For each shelf you need one flat and one pinked strip and crackled these. Cut out two pieces of the Idea-ology Icicles (TH93778) the same width as the trim shelves. Apply clear Distress Crackle Rock Candy(TDC31888) and Distress Rock Candy Glitter.

Cut out a piece of Christmas Stash patterned paper for the back of the stencil numbers.
Distress ink and alcohol ink the number stencils to age them.

Paint the Decorative Deer (TH93994) with Distress Paint and lightly sand these to make them look worn. Apply Distress Rock Candy Glitter with Matte Medium.

Adhere the Stencil Numbers on each side, a little less space at the top as the shelf will go underneath.

Adhere the shelf underneath. Die-cut some foliage with the Sizzix Large Funky Festive Thinlits die(6642221). Cut these apart and glue onto the shelf with a alcohol inked red Beaded Berry(TH93779). I applied a tiny amount of white paint to the snow. Adhere the deer to the shelf.

A silver Metallic Droplet was adhered above the stencil numbers.

I also cut out a piece of the negative leftover trim from the Pinked Trim package as pictured above.
This is to hold the battery pack for the lights. Glue this to the back corner of your vignette tray.

Cut out a piece of Ephemera or paper to fit over the trim piece. This creates a little pocket to hold the battery pack. Now it's easy to remove the pack when changing batteries.

For the top of the Vignette Box Top, I cut off the bottom of a Wood Slice(TH93662) so it was flat on the bottom. Glue this to the back of the box in the middle of the top. Apply Mica Flakes. I used this to give the ribbon/foliage cluster some height. Die-cut various pieces of the Sizzix Large Funky Festive Thinlits die(6642221) with Distress cardstock. Adhere Distress Rock Candy Glitter to the foliage and adhere to the box. I dyed seam binding ribbon with Distress Candy Apple Spray, tied it in a bow and adhered to the wood slice. Add in a couple of Tiny Bells (TH93744) and a tree from the Yuletide Adornments (TH94008).

And that my friends, is how I created this Christmas Vignette Tray.

I think my favourite part is the trim around the tray. I want to create this again on another tray!
I still have a few more projects to share, I hope to have them posted before Christmas! Fingers crossed!
Thanks so much for visiting,
Jan


3 comments
Fabulous project, love everything about it...great tutorial as well...Merry Christmas/Happy Holidays...
WONDERFUL!
How is it that there are only 2 comments on this post. Your projects are amazing and your tutorials are so easy to follow. You are very generous to share so much of your work with us. Thank you!
Post a Comment