Merry Christmas everyone! I'm sharing another project created for Tim Holz and his Christmas Idea-ology YouTube reveal.

This YouTube reveal and all Tim's videos are always available to watch on his YouTube Channel. There's so much inspiration in every video, along with lots of tips and tricks.

My base is the Vignette Box which is 4" x 2 3/4". The box is only 1" deep and I wanted it a little higher, so I added on the Scalloped Etcetera Trim to the bottom. My woodgrain paper is from the Christmas Backdrops pkg. TH94181 and the plaid paper is from the Christmas Pocket Card Pkg. TH94190. I love some of the full patterned sides of these cards, the patterns are smaller, perfect for small areas. The "Made in England" trims are from the Christmas Worn Wallpaper pkg. th94182.
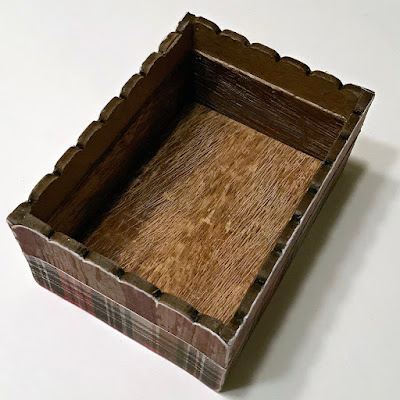
I've used the Tim Holtz Sizzix Decorative Trim Thinlits(665435) die to cut out my scalloped paper pieces that match perfectly with the Stampers Anonymous Etcetera Trims THETC-008. These trim pieces are glued onto the edge of the box first and when dried, then the paper pieces. You will have to cut the baseboard pieces to fit to size. I've used Distress Collage Medium, which is amazing, how well and sturdy it adheres any surface. I use this medium to glue my metal pieces too.

Next, the plaid paper is glued on. I've overlapped the sides, about 1/8" over the woodgrain, for extra security on the seam between the trim and box.

Don't you love these Christmas Tree Stands(th94198)? I've aged mine a bit, with alcohol ink and a bit of paint. I've also added in acrylic.

I cut a piece of Tim's Frosted Acrylic Sheet, which is retired, but you may have some in your stash! (th93153) I've used alcohol ink to colour it and cut a circle in the middle for the base to fit. I've done this, as I will be putting a few of the tiny lights in this part.

Before adhering the base to the vignette box, I've drilled a hole in the centre for the Tiny Lights strand. The strand will come up under the box, through the hole to the back side of the stand, wrapped around the tree and back down, leaving enough to go back across to the bottom of the lantern. I've used just two lights for the inside of the lantern. This is what the base looks like with the tiny lights.

I've dyed my bottle brush tree (Woodland Tree Lot th94211) with green Distress Sprays and also some Frosted Tree Lot Mica Stain Spray (limited release from Ranger Ink TSCK78234) to give it a bit of shimmer. I've alcohol inked some Mirrored Stars (th94207) and added those to my tree, along with clumps of Distress Mica Flakes TDR69140. I've taken the base off my tree and adhered it into the base.

The lantern th94199, has been aged, you can do this with alcohol ink and Distress Paint. I've also used a light brushing of Bronze Distress Paint. I've also added a bit of Alcohol Ink (Latte or Butterscotch) to the Lantern glass. A piece of dyed Idea-ology Mummy Cloth was tied to the lantern handle. Once you have the lights on the tree, push your remaining couple of lights into the lantern cavity. Glue your lantern to the box base.

My Decorative Deer th93994 are covered with glitter from the Ranger Distress Holiday Sparkle set. tsck78210. The glitter was applied with Glossy Accents. In the back corner, I've glued two Wood Slices TH94209, staggered. To glue the Quote Flair Button th94196 standing up, I've used Snowfall Texture Paste, from Ranger's Distress Holiday Texture set tsck78227. This is the glittery texture paste you also see on the box base, and the deer were also glued on with this. I just applied a good clump and attached my embellishments before it dried. I've added some around the tree stand and lantern to give it a bit more security. There's also a bit on the Quote button.

On the back of my Quote Button, I've cut out a small piece of paper, applied the "joy" Christmas Remnant Rub th94194, and fit it into the center of the button. Red stars (with a bit of Holiday Sparkle glitter added) were added to the back and in front of the lantern. Some were from the Christmas Baseboard pkg. th94193 and the thinner ones were from the Christmas Layers pkg. th94185.

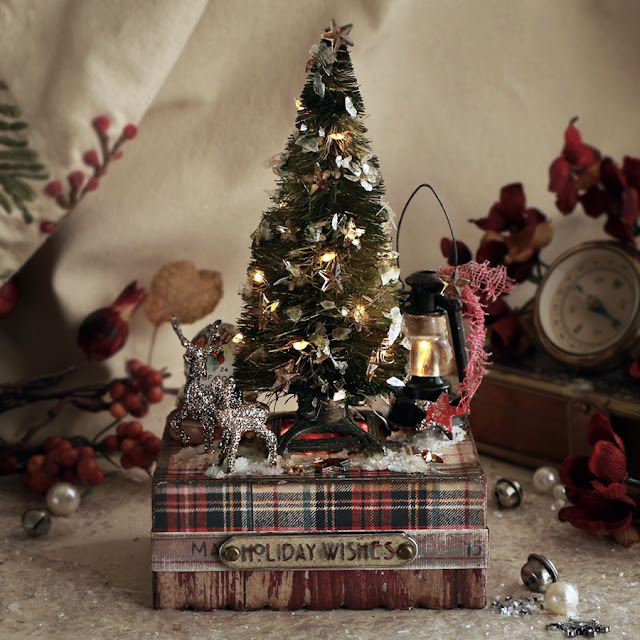
Here's another look at my Christmas Tree Vignette Box!
Thanks so much for stopping by, I've got one more project to share, hopefully in the next few days. I've been busy sewing some Christmas gifts, so I have been away from my paper crafting and the computer. Also my house is a disaster and I have taken over every room! lol.
See you soon,
Jan


2 comments
just so fabulous...Yes, I know about taking over rooms with projects. Got to have room to work...LOL. Never have enough room!
Superb! and maybe next year..... i always run out of time to do something for myself. this is something i would like to have in my home! thanks for showing us what is possible : )
would love to see some sewing projects, too. I will try to find them on this blog.
Teresa in AZ
Post a Comment