Hello everyone! I can’t believe that September is over, it went by way too fast! I’m sharing my first Halloween project created for the Tim Holtz Idea-ology Halloween live on his YouTube channel. If you missed the live or you’re looking for more Halloween inspiration, visit Tim’s blog here. So many fantastic projects!

I wanted to use this new Display Globe as soon as I saw it! But I do like to a vignette with more space to tell my story, so I decided to make a book for my base. Ever since I saw Tami Bastiaans’ Halloween book (tutorial here) I’ve been wanting to make one. I also wanted the feeling of a crystal ball and of course, you can’t have a Halloween make without tiny lights!

Here’s another look at my make without the lights on.

A closer look without the glass dome. Now, onto the details how I created this!

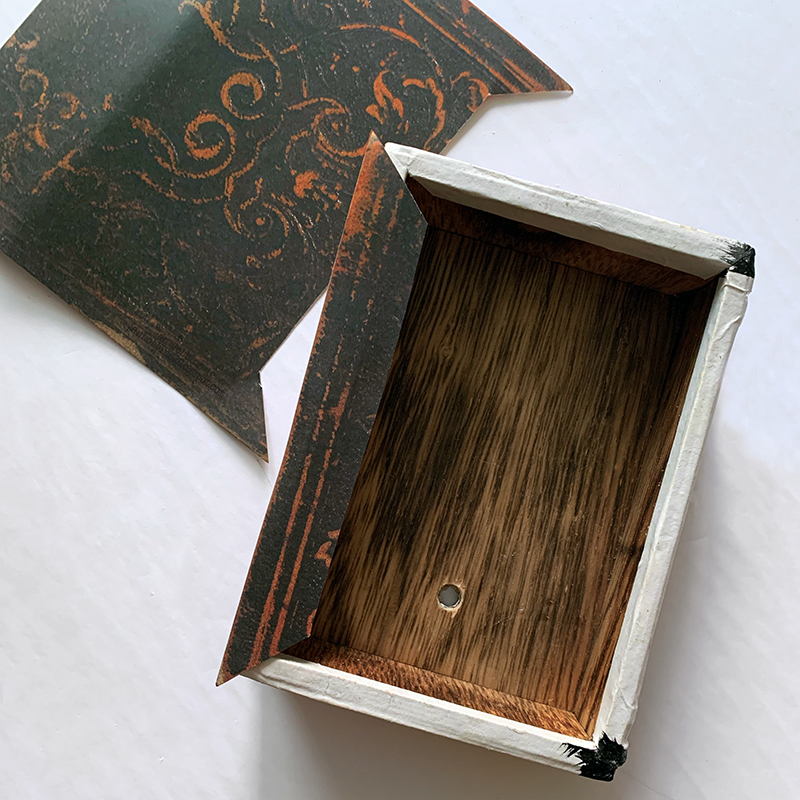
First I’ve drilled a hole in my wood vignette box where the centre of my globe is going to be. The tiny lights will come through this so the battery pack is underneath. Here, you can see I've started to adhere my thin strips of chipboard to the box edges, forming a book shape.

I’ve also drilled a hole in the cork base for my tiny lights to come through. They are inside the cauldron.

The cork bottom is painted with Black Soot paint as shown. Using a piece from the sticker book (it wasn’t quite enough, so I added a piece from the ephemera pack that was similar), I’ve covered around the cork edge. Make slits at the top to slightly curve the piece. Crypt Halloween Grit paste was added randomly on the base.

I didn’t take a lot of photos of my book construction, but Tami has lots of step by step photos here.
For all the ridges on the book edges and the curve of the spine, glue strips of chipboard to your base. The three edges of the box/book are glued at the ends an the top piece(closest to the spine) is on top of the box. I’ve adhered white printer paper over everything to soften the edges. 
To get the look of book pages, I applied Distress Opaque Texture Paste, then a Tim Holtz wire Craft Scratcher(TTS00373) or if you haven’t that, something like a comb or even take an old gift card and cut one end into teeth. You just need something to create the lines. After this dried I lightly inked the pages with brown ink and a Blending Brush.

The top of the book is covered with a paper from the Backdrops package. It is cut about 1/4” larger than the book front, so it covers just around the book edge.

I’ve painted the top and bottom of the spine, edges with Black Soot paint.
With the leftover paper from the cover, I cut narrow pieces to cover the edges on the three bottom edges of the book. The side where the spine is won’t need one as you will cover it with spine Kraft Stock.

The bottom pieces just come up to edge of the book pages.

My spine is a piece of Black Kraftstock that was embossed with the 3D Cracked Leather Embossing folder. It was sanded to give a worn look. Ink lightly with a brown Distress Ink. The “wicked” is stenciled with the Halloween Script (THS063) stencil, Distress Crackle Opaque Texture Paste, apply gold embossing powder and let it air dry. Once it’s dried, heat the embossing power. This is then cut so about an inch comes to the front and leave enough to tuck in the ends. Lightly sand the ends so the built up pieces at the ends are accented.

The candle is glued to a candlestick with Collage Medium. I added in drips down the stand with a hot glue gun and then painted with Distress paint. Crypt Grit Paste was added to the cauldron. Backdrops paper added to the top of the cork base.

Glue the cauldron to the cork bottom. I’ve also dabbed a bit of orange Distress paint on the grit paste.

String the Tiny lights from the underneath the book into the cauldron. Choose how much of the strand you want to use and cut off from the end if you’re not using the whole strand. I make a circle of the lights in the bottom and a single strand down the side. Glue your Display Globe cork bottom to the book with Distress Collage Medium.

The glass bubbles were coloured with Twilight Alcohol ink. I thought I would try to see if Distress Collage Medium would take some of the shine off, I wanted them a little duller. It worked exactly how I wanted but the colour was slightly altered, a bit pinky orange in there(which I thought was great!). I just put a very tiny amount on my finger and lightly rubbed it on each bubble and let them dry. I glued the small piece of orange coloured (distress orange spray stain) Mummy cloth around the inside edge of the cauldron and down the side(covering the tiny light strand). The candlestick was added in after the bubbles were dry. Make sure the glass dome fits over everything.

The little book is made from a book cover from the ephemera Halloween pack and paper from an old book, then distressed and inked. All the titles on my books are from the Book Clippings in the Halloween Sticker Book. An Idea-ology Toadstool and a bat from the ephemera pack were added with black string tied around them and the book.

Next to the globe, I have a skull, bones, broom, books, framed photo and vial with a metal tag. The photo is from the sticker book. The frame is in the same package as the candlesticks. The skull & bones are packaged together. The broom is packaged with the cauldron and gravestones. For the vial, I added a drop or two of orange alcohol inside and swirled it around. The outside was coated with Collage Medium and air dried. I always put a layer of this medium on glass, metal, anything non-porous, first before I apply paint, helps the paint adhere. Once the vial was dry, I applied Transparent Crackle Paste. A bit of orange paint in the cracks and a label from the book clipping stickers, and a metal 13 tag completed it.

Gilded Foundry Wax was added to the raised areas of my frame and then a touch of Crypt Grit Paste, highlighted with a touch of orange distress paint. To get the frame to stand up, I hot glued a book standing up, then the frame glued behind it, slightly to the edge of the frame. Another book is glued right behind the frame, sandwiching the frame between the two books. Add in some mummy cloth and moss to finish off the vignette. With all the embellishments, ephemera, and metal bits I always ink, stain, paint, or sand to give them all the vintage distressed look.

For the glass globe, I cut a thin strip(about 1/4") of rusty metal looking paper from the Backdrops paper pack, inked and glued that around the bottom edge. Hardware heads that were coloured slightly with purple paint and Gilded Foundry Wax, were added. Your Halloween Display Globe is completed!
Hope you enjoyed this tutorial and it inspires you to create your own Halloween Display Globe! Make sure you check out all the other makers, their projects are amazing! Thanks for visiting here!
Until next time,
Jan
Materials Used:
TH94344 Display Globe
TH94340 The Manor
TH94341 Halloween Word Plaques and Tags
TH94337 Graveyard
TH094332 Halloween Ephemera Pack
TH94339 Halloween Skulls & Bones
TH94335 Halloween Sticker Book
TH94331 Halloween Backdrops
TH93279 Vignette Boxes
th94082 Toadstools
TH92899 Corked Vials
TH94260 Drippy Candles
TH94180 Glass Bubbles
TH93788 Hardware Heads
TH94155 Mummy Cloth
TH94157 Halloween Tiny Lights
TH94145 Black Kraft Stock stack
TAB25511 Twilight Alcohol Ink
THS063Halloween Script Stencil
Sizzix 665766 3D Cracked Leather Texture Fade Embossing Folder
tda79309 Distress Collage Matte Medium
tda71297 Distress Opaque Texture Medium
tda71303 Distress Opaque Crackle Paste
tshk81081 Distress Crypt Halloween Grit Paste
TDAK80435 Distress Foundry Wax Kit #1 Gilded/Mined
Various Distress Inks and Sprays
Antique Gold Embossing Powder
Chipboard pieces for book
Hot Glue for candle drips
craft moss


No comments
Post a Comment