Showing posts with label Stencils. Show all posts

SEAMSTRESS DESK VIGNETTE - TIM HOLTZ IDEA-OLOGY 2022 RELEASE

 Hello everyone!  I’m back sharing another project, this one is with the new Tim Holtz Idea-ology 2022 release.  If you didn’t catch Tim’s live release on his YouTube Channel, you can watch the replay anytime, details on his blog. He will have photos and links to the other Makers projects also there.  Make sure you check them out, there’s some amazing makes and lots of inspiration!  Now onto my first project!  This one was not sent to Tim for the YouTube Live.


This project was all because of the Moon Transparency, one of my favourite images. My scene in this vignette is the desk of a seamstress.  So many women in my family are/were sewers. I've been sewing, since a very young age and my daughter is a fashion designer, so this theme has special meaning to me.


There are different plastic images in this new package, some wonderful butterflies which I can’t wait to use. I decided to use the moon in a window and of course Tiny Lights to light up like stars. I’ve used a Baseboard Window Frame to place in front of the image and Vignette box.  


I’ve covered the vignette box with the new Metallic Colored Kraftstock the back has been distressed. 


The sides have been embossed with the Quilted 3D folder, then distressed. 


The base is a new Square Vignette Box, which gives more room for all those embellishments. This was covered in paper from the new Backdrops Volume 3 pkg. I’ve used the Doily stencil and Distress Crackle paste randomly around the edges. Walnut stain distress crayon was applied in the cracks after it had dried.  


Before assembling my base, I worked on my embellishments. These new domes are a medium size, perfect for displaying those small items. I’ve used the centre of a small embossed Impresslits Medallion on my dome base. This has Distress embossing glaze, then Distress Crayon applied to it, giving it a metal look. The outside of the base is covered with new Linen Tape.  


The glass dome has a very small amount of Collage Medium applied to the inside, just enough to give it an aged look. I’ve added a strip of Design Tape Trim around the bottom edge. These trims are perfect for covering the edges of the vignette structures also, they are the same width. I wanted it to look like clothing samples in the dome, so I used the new Tiny Paper dolls, removing the feet, hands and heads (sorry, that sounds terrible , doesn’t it). The clothes were tinted with Distress Crayons and Memo pins were hot glued to the backs. These were poked into the dome cork base. 


In the Ephemera Memoir pack, there's my favourite, the book covers.  I love making little books with these, wish there was a whole pack of these! I've added a Snippets Label Ephemera to the front of one (a word from Book Clippings added later) and Ephemera Snippets on the other.  I've also made a larger book, using a piece of ephemera for the front cover (glued onto a piece of chipboard).  For the spine, I've used a piece of the Linen Patchwork Design Tape and the title is a piece of ephemera.


I've grunged up a Quill Adornment, with Alcohol Ink and Distress Glaze.  This was adhered to a pen nib, also grunged up.  I've wrapped the area where the two are adhered (with Distress Collage Medium) with some black Tim Holtz EclecticThread (I think this is retired, but could still be available in retail stores)


Even though this was a Halloween release, I love these Drippy Candles and Candle Stands.  Also grunged up.  I've used Distress Collage Medium to adhere these together.  It's amazing how well this medium holds, even with metal.


Now, to get my main pieces together.  I've drilled a hole in the top of my Square Vignette box and the bottom of my Vignette box for the Tiny Lights to go through.  Adhere the two boxes together with Distress Collage Medium (before attaching the moon transparency and window frame).  Thread your lights through from the underside of the bottom box, into the top one.  I concentrated the lights more where the stars were and left a bit extra outside the box for the candle.  Adhere the transparency, then the window frame.  I have added two Brad Fasteners for knobs on the window frame.


Here's with the lights on, so you can see how the lights look like stars.  Now, I'm ready to build up my Vignette box with my embellishments.


The back of my vignette.


The top of my Dome has a small Ring Fastener (minus the ring!) to hold a clear Bauble (Christmas release), both adhered with Collage Medium, and a bit of thread tied around to cover up the glued section.
The top of my window box has a Quote Seal, highlighted with Distress Picket Fence Crayon and Picket Fence paint around the inside edge.  I've used a bit of Spanish Moss and Sizzix die-cut leaves also.
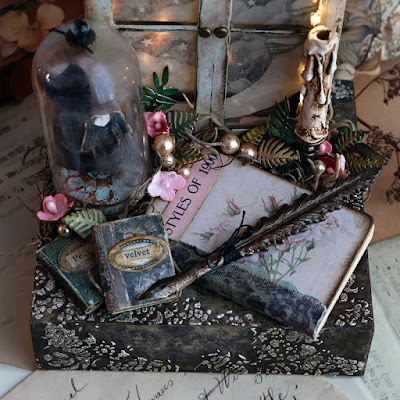

Next I've added my small Dome, candle, Books, and Quill pen.  The tiny lights are just behind the candle (there's just two, cut off any extra lights you don't want).  Fill in the spaces with Spanish Moss, Baubles (coloured with Mushroom Alcohol Ink), Bouquet Flowers (dyed with Distress Pink Sprays) and die-cut leaves.


Here's a side view of my vignette.


Here's another look at my finished make!

This is the first of my Idea-ology makes, more to come!

Thanks so much visiting, hope you enjoy this new release as much as I do.

Until next time,

Jan


Materials Used
TH94247 Backdrops Volume 3
TH94242 Vignette Boxes Squares
TH94248 Baseboards Windrow Frames
TH94241 Transparent Things
TH94239 Display Dome Small
TH94225 gauge Dials
TH94220 Adornments Quill &Arrow
TH94221 Ephemera Pack Memoir
TH94228 Kraftstock Metallic Colours 
TH94230 Linen Tape Patchwork
TH94235 Paper Dolls Mini
TH94236 Quote Seals
TH94188 Ephemera Snippets Labels
TH94152 Snippets Ephemera
TH93279 Vignette Boxes
TH92909 Pen Nibs
TH94166 Candle Stands
TH94172 Drippy Candles
TH94099 Baubles
Th94180 Baubles Halloween
TH94019 Tiny Lights
TH92833 Split Ring Memo Pins
TH94128 Design Tape Trims
Th93060 Ring Fasteners
TH93569 Bouquet Findings
TH92703 Brad Fasteners
THS018 Doily Layering Stencil
tda71303 Distress Crackle Texture Paste
Distress Crayons, Inks
Distress Embossing Glaze - Speckled Egg
Alcohol Ink - Mushroom
Sizzix 662702 Funky Floral
            662720 Medallion 3D Impresslits
             665734 Quilted 3D Texture Fade 


4

HELLO LIFE ETCETERA TAG - TIM HOLTZ RANGER ARCHIVAL INK 2022 RELEASE

Hello everyone!  It's another Tim Holtz YouTube Saturday reveal, and this week it's all about new Ranger Ink Mini Archival Ink Kits! There are three new sets(Kit 4, 5, & 6), each with an assortment of 4 colours.  Love these mini sizes!  Archival ink is waterproof, acid free and a permanent oil-based dye ink.  These inks are permanent on many surfaces, they will not bleed when used with water-based inks, markers, paints (watercolour and acrylic),  and also liquid adhesives.


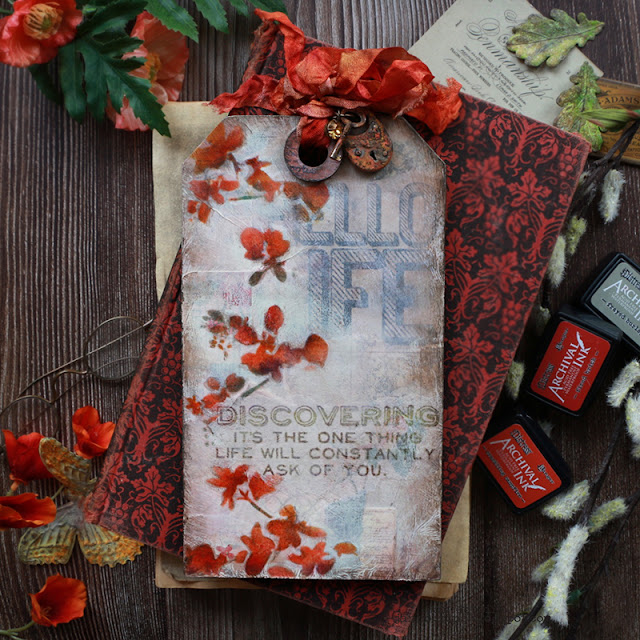
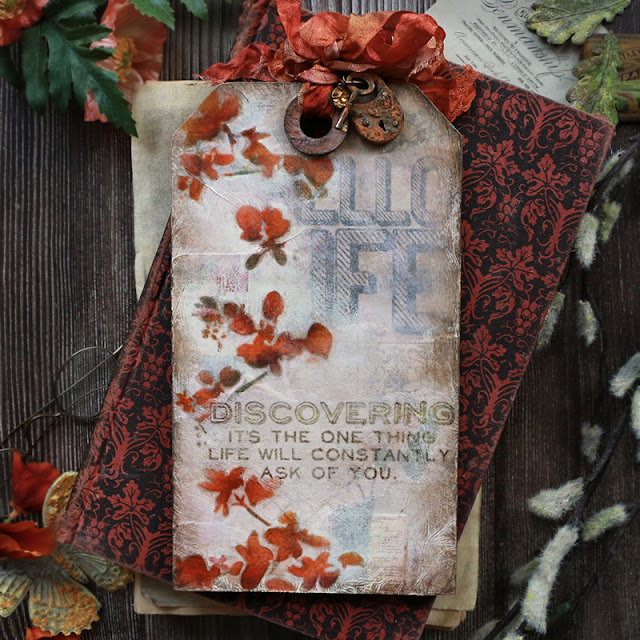
I've created this tag showing how you can colour with Archival ink and a stencil. I've created an image that did not smear or bleed when other mediums were used in my project. 


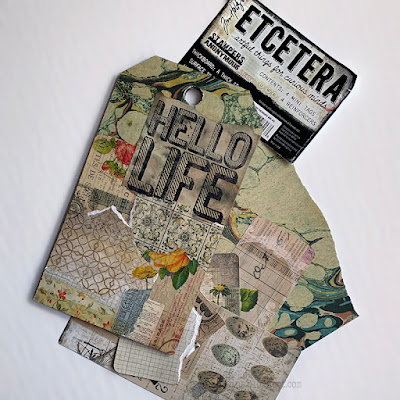
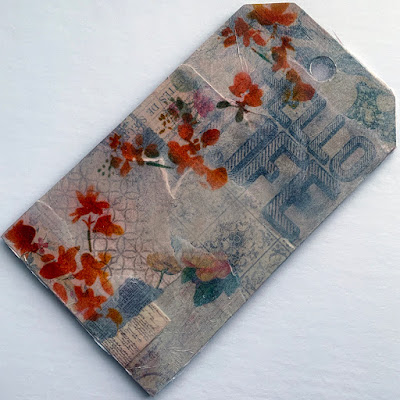
I've used a Stampers Anonymous Etcetera Thickboard Mini Tag (THETC-004) and collaged this with various pieces of patterned papers.  I have covered my tag with Distress Collage Medium and then adhered the paper, applying the collage medium over top also.  This gives it a finished surface and there isn't any loose edges on the papers.  Trim the edges to fit the tag.


I have used Tim Holtz Plain Collage Paper (TH93708) as my base to which I applied my archival ink.
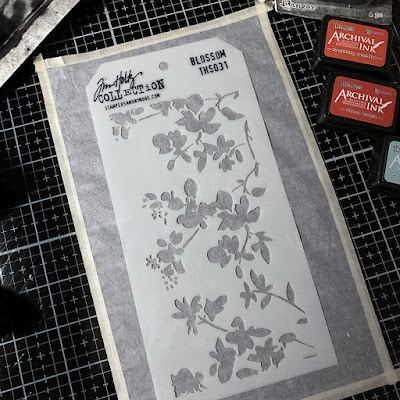
This paper has been retired, but if you're like me, you seem to have a stash of everything Tim, or there could still be some out there in stores.  I've taped my piece to my glass mat with masking tape to stop it from moving.  The reason I've used collage paper with my stencilled image, is because I wanted my collaged background to fade behind and just slightly show through.


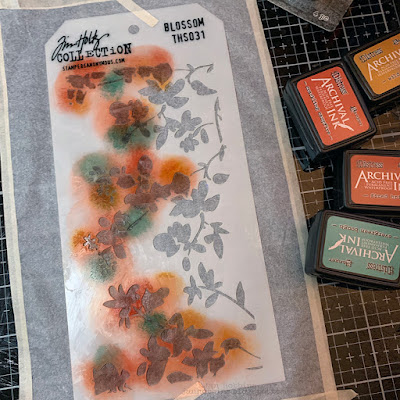
I've applied my chosen colours( Fired Brick, Crackling Campfire, Wild Honey, Speckled Egg, and a small amount of Villainous Potion and Frayed Burlap) to my Blossom Stencil (THS031).  I have used Tim's Blending Brushes(TDA62240) to apply the ink.  The open areas in the stencil aren't really large, so the blending brush can get into the corners and your image is sharper.  Plus, the brush creates a
softer blend of colours. Archival ink will stain, so to clean your stamps or brushes, use some Archival Stamp Cleaner. Because this ink is waterproof and oil-based, water will not work. 


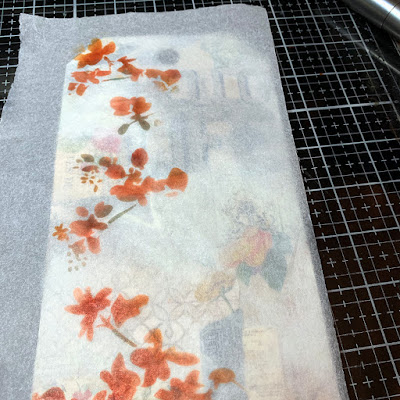
Once your archival inked image has dried, it's ready to adhere with Distress Collage Medium.  Apply to your tag, the medium first, then gently lay the stencilled paper on top.  This paper, once wet, tears easily (which is great when you want torn edges!).  Apply Collage Medium on top.  That's the beauty of Archival Ink, when using different mediums with it, your inking will not smudge or bleed. If I had used Distress Ink (which is water-based), it would have bled when I added the Collage Medium. The Collage paper becomes more transparent when saturated, leaving your stencil image more pronounced.


Trim off the edges, after your paper has dried.


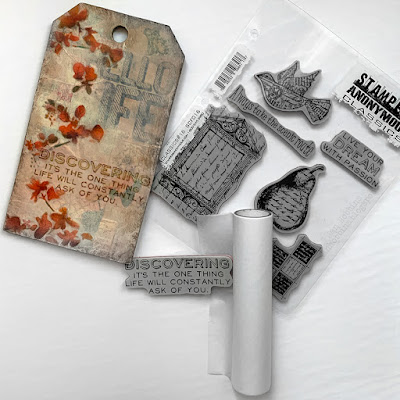
I've stamped a quote from Stampers Anonymous Set Classic#16 SCF016 with Frayed Burlap Archival Ink on a small piece of Collage paper and applied this in the same way as the stencilled blossoms, across the tag. I have also added a few darker spots of Villianous Potion archival ink to the edge of some of my flowers with a fine paint brush. I apply some ink directly from the pad to my glass mat (not the small non-stick white mat) and dip the fine paint brush in this. 


After, I've inked the edges of the tag with Frayed Burlap. I've also added an Antiqued Gem(TH94033) and A Lock & Key Adornment (TH94162) with a bit of Grit Paste and paint added.  If you want to add more layers or detail and dimension to your tag, you could highlight with markers, paint, or ink and your Archival ink will not bleed.
Hope you enjoyed this short tutorial!

Thank so much for stopping by,

until next time

Jan


3

FLOWER FIELD VIGNETTE BOX - TIM HOLTZ SIZZIX CHAPTER 2 RELEASE

 Hello crafting friends! Still trying to catch up! This is my last project from Sizzix Chapter 2.


I've created this 3D Shadow Vignette Box using two of the new Chapter 2 Thinlits sets.


Here's a look at the back of my Vignette Box.  The ovals are all created with the 
new Stacked Oval Framelits set(665368).

Stacked Oval Tiles 665368

Flower Field 665369


The flowers were die-cut from the Flower Field Thinlits set.


The Oval set has 25 dies, 5 of each size (5 sets).  You can cut out quite a few at a time!  These were all die-cut from Mixed Media Heavystock.  For the ones with flowers inside, I die-cut a Flower Field piece from the Heavystock and then cut out my ovals from that piece. You will get fragments of the flower pieces which I just adhered to my ovals. My Vignette box (largest of set TH93279, 3.875 x 5.5 x 1.5 ) was covered with Mixed Media Heavystock also, on the outside.  The oval die-cuts were glued on randomly as shown in my photos.  On the top of the box, I used a piece of the die-cut oval negative piece from my heavy stock sheet.


Once all your die-cuts are arranged and adhered on the outside of the Mixed Media covered Vignette box, paint the entire outside with a dark colour.  I've used Distress Ground Espresso paint for my first layer.  After this has dried, dry brush your next chosen colour and let dry, and so on( I think I used Forest Green, Peeled Paint, and Speckled Egg).  I usually use about 3 or 4 different colours.  You don't use very much on your brush for the dry brushing, wipe off the excess your brush.  This gives your painted surface, depth and texture.  Ranger Ink is going to be retiring some of the Distress paints, so if there's certain ones you like, I would try and stock up!


Cover the inside with patterned paper (edges inked) and Mini Foundations were adhered (Collage Medium)  to the bottom.  A bit of paint was added to the foundations.


Die-cut the Flower Field die (I die-cut two) with Distress Watercolour Cardstock (I used the flat side) and apply colour  to your die-cut.  I smoosh different colours of Distress Ink pads on my Glass Media Mat and use a watercolour brush to dilute the colour, then paint. This die does not cut on the bottom, giving you the choice of how much paper you want there. To get the dimensional look, I cut a narrow piece of die-cut, applied adhesive foam and adhered in front of another narrow piece in the middle of my box.


I cut out two pieces of Distress Kraft Heavystock to fit inside the Vignette box.  Using the largest Oval Framelit,  I die-cut the centre of one, and then the next oval size down, in the center of the other Kraft piece.  I then applied Oxide Sprays, Distress Sprays, and finally Distress Crackle Paste with the Tim Holtz Crackle Stencil was applied randomly.  Once that had dried, I used a Distress Crayon to to apply in the cracks.  It's handy to have these finished before you adhere your flower field pieces, so you can determine what is going to show in the cutout ovals.


When I cut up my Flower Field pieces and adhered them in-between with adhesive foam, they are staggered so they aren't covering up the layer behind too much.


Here's another look at the different levels.


To finish off my Vignette box, I added a Mini Hardware knob (TH94123) with a bit of Velvet Trim TH94113 on top, and a Phrase sticker from the Metallic Sticker book TH94134.

I have a few more Tim Holtz projects I will be posting, I'm a little behind!  

Until next time,

Jan


5

TRUE FRIEND CARD - TIM HOLTZ SIZZIX CHAPTER 4 RELEASE

Hello friends!  I'm sharing a card today created for the Tim Holtz Sizzix Chapter 4 Facebook Reveal.


I used the new Sizzix Leaf Print Thinlits set and a Stamper's Anonymous Gingham Stencil.


Love the different ways you can use this leaf set, can never have enough leaves!


I started by cutting out the negative leaf dies with black Kraftstock and matted a piece of Metallic Kraftstock(I think it's the Champagne TH94021) underneath (mat this after the stencilling!  I decided to stencil after I matted and had to redo!).  I machine stitched around my black rectangle before adhering the mat.


For the stencilling, apply Ranger's Distress Crackle Texture Paste TDA71303 on your black kraftstock.  I didn't use the whole stencil, just a portion of the centre and the edges weren't even. While this was still wet, apply Fossilized Amber Embossing Glaze.  I just used my fingers to apply, as I just wanted it the central area, tap off the excess, and apply a small amount with the Crackling Campfire Embossing glaze on the edges.  You will have the two colours mix a bit, that's why I didn't want to use a lot, because it won't go back in your jar.  You can always save the extra in a little bag for future use. Set this aside to air dry, and then once dry, heat with your heat tool. You can apply a small amount of Distress Crayon in the cracks to accent them.


Next, I die-cut the solid Leaf Framelits from Tim Holtz Ephemera pieces.  Some were labels, others, small journalling tags, but they all had a beige tone.  I like that the printing is quite small on the ephemera, so it shows underneath the small leaves.  You can always use patterned cardstock too. The coordinating Thinlits were die-cut with Metallic Kraftstock which I had applied adhesive sheets(Sizzix Adhesive Sheets) behind, before cutting out.  I also cut out a leaf framelit (this will be solid) in metallic kraftstock, this goes behind the word, 'True'.


I added a bit of colour to my die-cut printed pieces with Distress ink( it was Crackling Campfire) before adhering the Metallic Kraftstock.  I also die-cut a few pieces of the Holiday Brushstroke Thinlits 664736 in metallic for extra foliage.  


My words were die-cut used Tim Holtz Alphanumeric Tiny Type Upper Thinlits set and the Metallic Kraftstock.  'True' was die-cut from my first reject of stencilled cardstock.  Never throw out the rejects!
I also applied adhesive sheets to the backs before die-cutting.  The solid leaf was distressed before adhering the word 'true'.  Adhere all your letters, leaves and foliage.  To finish off my card, I dyed a piece of seam binding with Crackling Campfire distress spray, made a bow and a small baseboard piece from
Junk Drawer Baseboards TH94044 was also adhered. This was adhered to my kraft card base.

Thanks so much for visiting, I will be back with more of my holiday makes!

Until next time,

Jan 

3

A NEUTRAL POINT OF VIEW

I decided to take part in a challenge at Frilly and Funkie, called A Neutral Point of View.  As much as I love colour, I do love a neutral palette!


I've created this neutral textured frame with a Tim Holtz Collage Frame (93711) as my base. I distressed the frame with a bit of Distress Oxide Inks (Tattered Rose, Vintage Photo and Frayed Burlap).  A paper from Idea-ology Etcetera Paper Stash pad(TH93551) was adhered to the back of the frame with adhesive foam.


With the Tim Holtz Roses (THS075) Stencil, I applied Ranger's Texture Paste to my frame.  I then coloured with the Distress Oxide Inks.


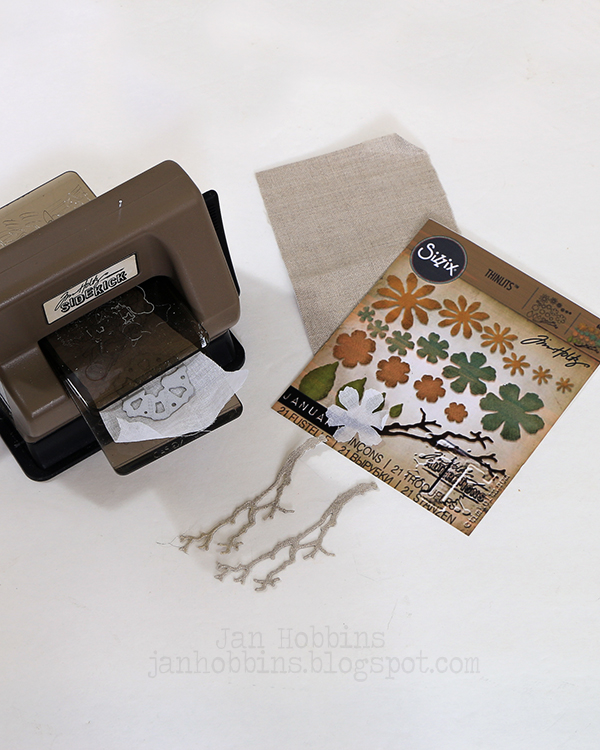
My flowers were die-cut with a sheer fabric (it's like a stiff gauze type) and one of the large flowers from Sizzix's Tim Holtz Small Tattered Floral Thinlits (661806) set.  I also die-cut two branches with  linen from Tim Holtz Textile Surfaces (TH93294) adhered to cardstock.  Once I had my flowers die-cut, I coloured them with the same three Distress Oxide Colours, sprayed them with water, and then dried them with my heat tool.  The heat caused my fabric to curl, which I really liked.

I also die-cut a doily (661497) with metallic cardstock, then distressed with Alcohol Ink and a bit of paint.  This was then cut in half, a painted Compass Coin (TH93061) with a Ring Fastener (TH93060) was attached in the middle, along with a Story Stick(TH93680) tied to the ring with Tim Holtz Thread.  I also die-cut leaves from Tim Holtz Funky Flowers #3(662702).


A butterfly from Idea-ology Botanical Ephemera (TH93554), a Paper Doll (TH93555) and Idea-ology Clippings stickers (TH93583) were also added.


Here's another look at my frame!  If you love challenges, check out the Frilly and Funkie Challenge Blog!

Thanks for stopping by,

Jan


SaveSaveSaveSave
13
Back to Top