Hello everyone! It's hard to believe that Halloween is almost here, I don't know where this month has gone. Here's my second Halloween Idea-ology project that I had created for the YouTube reveal.

This is another project that became a lot bigger than what I had planned! I've concentrated more on the front of my cabinet and have explained how the door was created.

I've used the new Ornate Metal Gates(TH94159) on the front of my Apothecary Cabinet. Of course they need to be locked up, there might be a few sinister potions and spell books in there.

Here's a photo of the cabinet opened, revealing it's contents.

Here's a look of the side and back. I've made a small paper pocket for the Tiny Lights battery case to fit into. Now, on to my tutorial, it is a rather long one.

For my cabinet, I’ve covered the Vignette Divided Drawer (TH93793) inside and outside with Backdrops (TH94146)

The 'feet' of my cabinet are the skulls(TH94169) that have a hole drilled into the top of the head. I hammered a nail from the inside of the cabinet through to the head (fill the hole with Distress Collage Medium first for extra strength).

The cabinet door is made from Sizzix's Mat Board 656492, but you can use chipboard. I like this mat board as it's very lightweight yet still sturdy and I wanted to keep the door as light as possible especially because the Ornate Gates are a thicker metal. The door piece was cut to fit the dimensions of the outside Divided Drawer. On the door piece, I traced around my gates to get an idea of placement and how big to cut out the opening. You will want to leave room for the spinners(hinges) that make the gates swing open.

I decided because the gates were quite heavy and I didn't want the door to bend, I cut out an extra center piece, plus 2 extra small pieces for above and below the center piece. There's about 1/4" space in-between and this also looks like panels. The hole is cut out in the middle for both the main door and the center piece, so they match up. At some point, while you are working on the door front, if you choose, add some Halloween Distress Grit Paste to the gates, along with colour(paint or alcohol ink) to age them. Set aside to dry.

These pieces were also covered in Backdrops paper except for the door inside. This was painted with Distress Paint. Ink the edges.

Now for the Metal Game Spinner (TH92717) hinges. Lay your metal gates on the front where you would like them and mark where the little bars will connect with the spinner. The top ones have a bit more room to play with, but you have to be pretty exact with the bottom ones. Make a cut wide enough for the spinner to poke through with your craft knife. The center of the spinners is a hole, which is what your gate posts are going to fit into.

On the backside, bend the end of the spinner down at the bottom and then up at the gate tops.

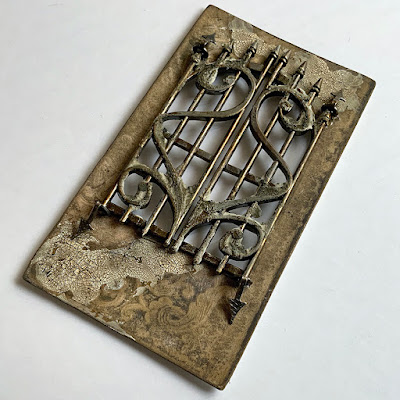
The Game Spinners at the front of the door piece and bent down at the bottom and up at the top, as shown in the photo. Your gate can now swing open. I've also added Distress Crackle Texture Paste(TDA71303) to the door and cabinet base. This was coloured and aged with brown Distress Crayons.

Here's a closeup of how the gate bar fits into the game spinner at the top.

Here's another closeup of the bottom hinge game spinner and bar.


To cover up the brad bent ends and secure them, I applied Distress Collage Medium quite thick, dry, then applied a bit of grit paste with some Hardware Heads TH93788 that were also painted a bit. A piece of Halloween Ephemera TH94151 was adhered (also distressed and inked) with a portrait sticker from the Halloween Sticker book TH94148. Also included were some Book Clippings from the sticker book.

You can see the game spinner behind the door knob(hitch fastener), where it is bent so it catches the edge of the cabinet to keep the door closed. Ephemera was added under the cabinet opening also. Also hardware heads covered the brads from the hinges.

Now for the inside of the cabinet, which I did not take any step by step photos. Must have been a very late night!

This is the top shelf. I started my Halloween Tiny Lights 94157 at the top here (the hole is drilled behind the moon). I used just a few along the bottom and then pulled the strand behind the shelf to the one below. The moon face is from the Halloween Layers TH94150. This has been grunged up and also with a bit of Crackle Texture Paste on the edge. A Halloween Quote Seal sits on top of the boxes, distress crayon was added in the recessed areas. A Corked Vial Glass Bottle TH92899 is filled with Creepy Eyes TH94061 in Resin. There's also a Tiny Vial Corked Glass Bottle filled with. A rolled up piece of Ephemera is laying on its side.

My little boxes, explanation below, have the Halloween Snippets TH94152 glued on the ends.


For the middle shelf, I have the Lantern TH94160, which has a bit of Distress Crypt Texture Paste and paint added to age it. The tiny lights come down from above behind the rolled Ephemera papers, poking out behind the Candle Stand TH94166, then behind the books, into the Lantern and out again, down behind the shelf to the bottom shelf. The Candle Stand has been grunged also with Texture Paste and paint. A small Mini Flair button 94158 was adhered with Collage Medium, upside down so that the Alcohol Inked (purple) Glass Bubble TH94180 sits securely inside. This was also adhered with Collage Medium and a bit of Texture paste added around the bottom. My books were made with the Book Covers that are included in the Halloween Ephemera package TH94151. I cut up old book pages to fit inside. Halloween Snippets were added to the book covers.

The bottom shelf has more boxes made with the Tiny House Thinlits set. Halloween Snippet Labels were added. There's a Halloween Baseboard TH94153 in the back (the tiny lights come down behind it) which has been distressed. The tiny lights come behind the candle and one is right behind the wick, then back down behind the book and Test Tubes TH94156. This is where the tiny lights end. The Test Tubes are filled with moss, the smallest Toadstool (TH94082) in one and bones TH93964 in the other. The outsides were covered with Collage Medium to make them look aged. Distress Crackle Paste was added lightly to the edges of the Divided Drawer, Distress Crayon added to age.
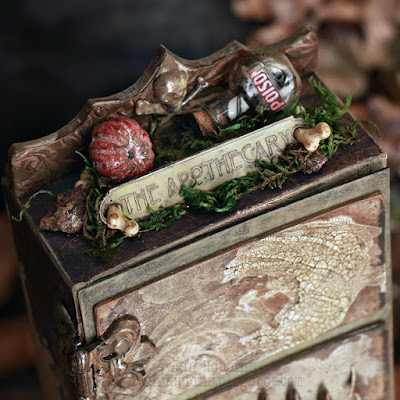
For the top of the cabinet, I used a Stampers Anonymous Bat Web Etcetera Thickboard Trim ETC014 cut to fit the width of the cabinet. This was covered with a piece of embossed mixed media cardstock. I used the Mini Botanical 3D texture fade 665631 to emboss this. Distress Paint was used to color it. A skull from the Skull & Spiders Adornment pkg TH94161 was adhered in the middle. A bit of Grave Texture paste added to it to make it look like it was carved into the back. This was painted also.
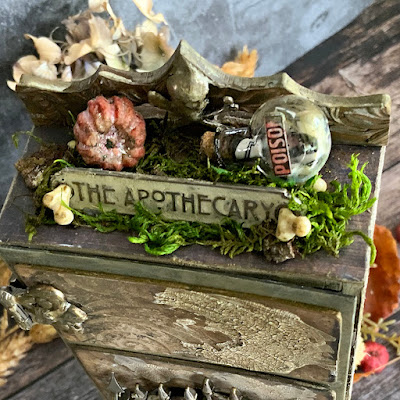
Moss glued to the top before a pumpkin TH94169 was added. A Tiny Vial TH93201with cut up pieces of the Halloween Confections TH94170 inside. A Halloween Snippet label added. My sign is one of the Halloween Word Plaques TH94164. The recessed area was filled in with Halloween Distress Grave Texture paste. I cut two bones in half and stuck them through the holes and glued the other ends behind the sign. This was adhered to the top also.


Here's the lantern lit up.

This is what the candle looks like lit up.

Here's another look at my finished cabinet. Hope you enjoyed my tutorial!
Thanks for visiting, and I hope to post my last Idea-ology project before Halloween!
Until next time,
Jan


7 comments
Such an awesome piece of art Jan!! TFS
Absolutely spooktacular Jan! Brilliant ideas to use the game spinners for the gates and knob hitch and the tiny houses for the boxes! Thanks for sharing the details! Happy Halloween!🎃
every time you OUT DO the last... amazing and inspiring, and BRILLIANT!
teresa in AZ
Yippee! I have been waiting on this one...love it. Your hinges are a work of art in itself...such a fabulous idea! Can hardly wait to get started on mine...
This is amazing. I love the tiny boxes so clever to reimagin the tall house die. The detail and invetion are spectacular. thanks for the tutorial too! x Amanda
Absolutely spectacular Jan!
Gorgeous cabinet thanku so much for explaining it all..
Post a Comment