Hello crafting friends! This is the first of my Tim Holtz Idea-ology Halloween 2021 projects that I’m sharing today.

I'll just say, this project had a mind of its own and became a lot more than I was intending. I had no idea what I was going to create, and I was pressed for time, I think I had five days to get all my makes done. My shipment of product never arrived, it's somewhere out there, along with a couple of my previous projects, so Mario managed somehow, to resend me everything. One of the other makers, Stacy, also had her projects go missing, maybe they are together! lol! Anyways, I like to think of this as the old witch who lived in a coffin, the dark side of the old woman who lived in a shoe! There's a lot going on here, I did try and take photos as I went along, but there might be a few times that I was creating late at night, so there might be a few things with no photos, I will try and explain as best as I can.

I started out with a Vignette Coffin (TH94177) and covered the outside with Distress Kraft HeavyStock(TDA76384). First, this was embossed with the 3D Lumber Texture Fade and coloured with Distress Oxide Sprays and Distress Sprays. The line across the coffin where I embossed the paper from opposite ends, will be covered with an extra piece of embossed paper.

There are two extra embossed and coloured pieces that go across. But before adhering the paper, first I am cutting a hole through the coffin for the window.

I've used two round windows in the Window Frames Baseboard pkg. (TH94154), one is slightly larger than the other (I've used the larger one on the outside). I've used a piece of the web transparency (Halloween Transparencies TH94167) cut to fit behind the larger frame and a piece of Mica (broken in the corner) for the inside window frame. I've sanded very lightly in the corner of the spiderweb transparency, so that a spider can be spotted from the inside.
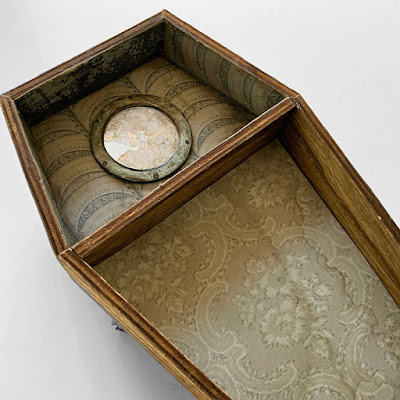
Before adhering the window on the inside, I've covered the inside of the coffin with Halloween Worn Wallpaper(TH94147). The edges are inked before adhering.

Here, you can see my bad attempt at cutting the hole. I just traced the inside of the window frame, and drilled holes all the way around, then punched out the inside piece, sanding everything flat. I'm sure if I waited for my husband to get home, he would have had the proper tool, but I needed to get on with it! The frames cover it anyways. Before gluing on the embossed paper, I adhered black pieces where I've cut out part of the embossed wood paper. I've glued a creepy eye(TH94178) on top of the one piece of black cardstock.


Next glue on the two extra boards and window frame. I've added some Ranger Ink Halloween Crypt Grit Paste around the edge of the window frame.

I then decided to put the coffin on a wood base, using a vignette box TH93279 (3 1/2" x 4 3/4"). This was covered with paper from the Halloween Backdrops Pkg. TH94146. I've drilled two holes in this for Halloween green Tiny Lights(TH94157). One is for the cauldron( about 5/8" from the front and 1" from the side) and the other will be under the coffin( about 1 3/4" from the side and 3/4" in) These measurements are just to give you an idea, and they were taken from the inside.

It must have been a late night when working on the cauldron(TH94171), no photos! For my cauldron, I drilled a hole through the bottom for my tiny lights. If you are unable to do this, just plan where you are bringing the lights up the outside and into the inside, this can be camoflouged later with bubbles, sticks, or moss etc. I've added Crypt Grit Paste randomly on my pot. The green bubbles are alcohol inked Halloween Bubbles(TH94180). These have been glued into the cauldron with Distress Collage Medium, just one or two at a time, letting them dry in-between (yes, I know this will take awhile, but you won't have them falling apart while drying). I have kept the bottom and centre hollow, so there is room for the tiny lights. I can't remember but I might have put the lights( I used two or three) in while gluing the bubbles, taking care not to glue in the lights, just so I have that space empty. I also cut a bone in half and glued in the ends with the bubbles. On my base, I broke up small pieces of sticks and hot glued them in a small circle, leaving the center open for the lights to thread through. There is some Crypt Grit paste in-between the sticks at the bottom. You can also leave a bit of space in-between the sticks so the light shines through. The tiny lights(you don't need that many) go in the cauldron and back out underneath, and then over to the other hole. You can always use two sets of lights if you want. In front of the cauldron, bent down the side, there's a tiny piece of embossed 3DCobblestone 665375 Black Alcohol Ink Cardstock. The stones are highlighted with Pearl Alcohol ink.

At this point, I wasn't sure what I was doing in front of the Coffin, so that is why I drilled a hole through the bottom of the coffin to match up with the one in the base. I placed my coffin where I wanted it on the base and stuck a toothpick with a bit of paint on the end, through the hole, and marked the bottom of the coffin so I knew where to drill. You can always just thread the tiny lights in front of the coffin and cover it up, you wouldn't really see it.

Here's where I drilled the holes in the coffin for my tiny lights. I created a hollow post with three coffee stir sticks and covered them with these thin strips of Worn Wallpaper pieces. If you want lights to shine through in places, just carve out a few spots up the side with a craft knife. You can also add Distress Crackle Texture Paste(TDA71303) to the front edges of the coffin and also randomly on the top and sides at this point. After this has air-dried, colour with Distress brown crayons.

The post also acted as base for my curtain to be adhered, so it was away from the back, giving it more dimension. I also have a little girl Halloween paper doll (TH94149) peeking behind the curtain.

I used some wood slices for steps, so it looks like there's a hidden staircase behind the curtain. I did add These are old ones, but there are new ones that are part of the Christmas release(TH94209). The Edgar Allen Poe round picture is a Halloween Mini Flair Button (TH94158), that's been grunged up a bit. Right below that is an Idea-ology Urn(TH94174) with some Distress Spray dyed Blossoms(TH93569). A bit of Crypt Grit paste was added to the urn also. Under the flowers is some Mummy Cloth(94155) shredded up.

For the top shelf (the attic) I've placed one tiny light behind the candlewick and then the rest along the back of the shelf.
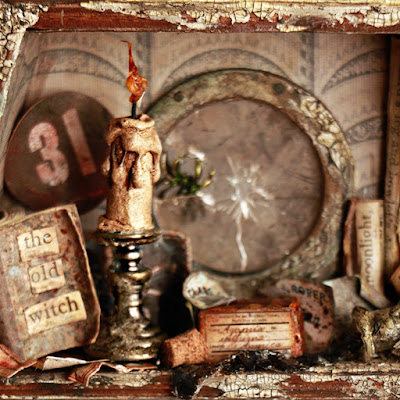
The Drippy Candle (TH94172) is grunged up with a Distress Crayon and glued on top of a Candle Stand (TH94166). On my craft mat, I applied Glossy Accents shaped like a tear drop and a drop of orange alcohol ink added and let dry. This was adhered to the candle wick to look like a flame. A tiny light was bent behind it. I've added a Spider Adornment TH94161(a bit of green alcohol ink added) in the cracked opening of the mica in the window frame. The book is made from a book cover ephemera piece in the new Halloween pkg.TH94151, pieces of old book paper cut up and the words are from the Halloween Sticker book TH94148. There's quite a few of these book covers in the package but I think we need a whole package of these, they are addicting to make. The '31' is also from the Ephemera package.

All the tiny labels are from the Halloween Snippets Ephemera pack TH94152, which is all labels!
The rolled up papers are scrap pieces of backdrops paper or ephemera pieces with the word clippings from the sticker book down the fronts. There's a small vial grunged up with Rock Candy Crackle paint (TDC31888) and Ranger's Halloween Midnight Mica Flakes mixed in Rock Candy and hardened to look like it's spilling out of the bottle.

I made little boxes for a couple of my Halloween makes, using the skinny house from the Paper Village Thinlits set 664741. I cut two per box, glued together like I was building a house. Except I bent the pointy ends in to look like a flap and clipped the other end along the fold, just enough so they would fold closed also. If you want a shorter box, just cut off a bit from the one end. Perfect size for vignettes and the labels! Good way to use small scraps of paper.

I decided to place my Paper Doll in front of the bottom base for she's right at the front. I traced the doll shape onto a piece of Ranger's Black Matte Alcohol Ink Cardstock TAC65487 and instead of her skirt curved on the bottom, I added a touch so that it was straight. The paper doll was tinted with Distress Crayon and glued to the cardstock. I did this so she was very sturdy, as I just adhered the bottom of her to the box. This alcohol ink cardstock is a really nice dark matte black, is non-porous and very sturdy. I wanted to turn my paper doll into a mysterious witch, so I coloured Mummy cloth with Distress sprays and Oxide Sprays, cut them in short strips, except for one which was 2-3 times longer. The short pieces were hand stitched together at the top and tied around the witches neck.

The longer piece was loosely draped around her head and shoulders. I've added some smoke or mist, can't quite decide what it is, behind the witch. This is just cotton batting used for stuffing in pillows, etc. that I coloured with Distress sprays. I also used Empty Tomb and Hocus-Pocus Mica Sprays in there to give it a bit of glimmer. I sprayed the bit of batting, and with a paper towel, patted it dry. You don't need a lot to tint it. I used a small bit of hot glue to the back of the doll and stuck a small bit of the batting to her. It's not really stuck on a lot, it's so light, it just kind of sits there.


Now for my favourite part, the creepy toadstools(TH94082)! I took the Creepy Eyes(TH94178), glued one on a larger toadstool, that I coloured a bit with Distress Crayons. For the smaller toadstool, I took out the pupil from an eye and just used that. Hot Glue some moss around the eyes, to make it look like the eye is part of the toadstool. For the Skull toadstool, I broke off the stem right under the top, glued a Skeleton head (TH94169) under the top and then glued the stem under the skeleton. Glue your moss to cover up all your connecting parts.

These creepy toadstools were hot glued around the base at the back of the coffin. I added moss a a twig all around and also where I have the little openings in the coffin boards. I've also added another spider, strung on some invisible thread so it can slide back and through.

Here's the skeleton toadstool at the side.

I didn't have photos of the finished sides, but I added in some book clippings phrases from the Sticker book(TH94148), lots to choose from! I also added one of those tiny masks to my little creepy paper doll behind the curtain.

There's my spider handing from the invisible thread and moss was also added.

I also added a metal Halloween Word Plaque (TH94164) to the back of the base. Halloween Grave Texture Paste was added to the recessed area.

Here's a look at the Vignette with the tiny lights turned on.

Here's from the back of the coffin with the lights on.

Here's another look at the finished vignette. I know this is a project that has a lot going on, but hopefully I've inspired you to find one or two ideas to use for your own Halloween projects. I have two more projects to share, hopefully before Halloween, I'm trying! Unfortunately, here the weather is turning cold and I've been trying to clean up the yard and prepare everything for winter. We've had a few nights already below zero, so it's coming! I'm not ready yet, I really don't want snow, which we could get next week. Yuck!
Thanks so much for visiting!
Until next time,
Jan


4 comments
Beautiful!
Jan, this is amazing, and I'm so grateful for your post. So much fun to 'watch' this witchy vignette come together--you're a creative genius and no detail was overlooked. My favorite bits about this are the creepy eye and bone poking out and the schrooms! Just wonderful eye candy, and I'll be checking back, because I'm sure I've missed some other incredible details. This is one of those projects you can't take in thoroughly at one pass, if that makes sense. Bravo!
Totally creepy, and I love it! Thanks for sharing your tips and techniques.
I love all the amazing details! I just picked up a bunch of these TH Halloween goodies to make a creepy shadow box and needed ideas how to fill it. Thank you so much!
Post a Comment