Hello everyone! It’s hard to believe that Halloween is almost here, isn’t it? I’m sharing with you today, my last project created for Tim Holtz Idea-ology Halloween 2022. I was hoping to post this sooner, but I guess late is better than not at all!
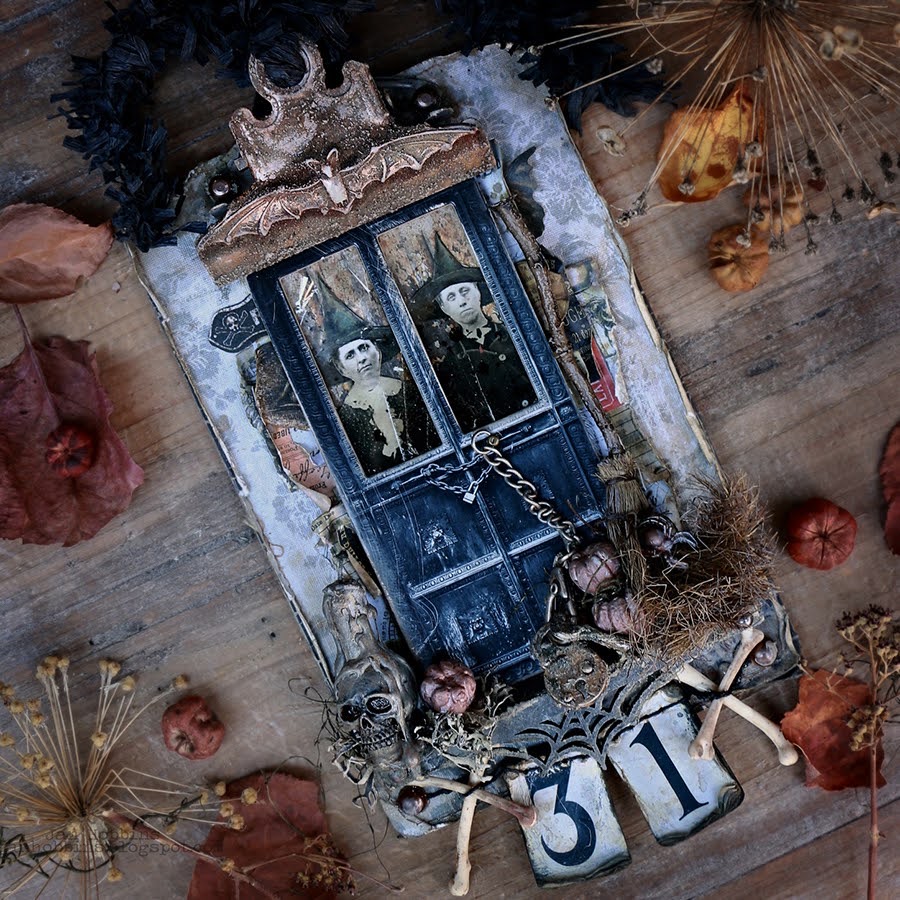
I’ve created this Halloween mini clipboard using one of my favourite items in the Idea-ology release, the baseboard door. The skull is amazing too! Here’s how I created it:

To start off my mini clipboard project, I have removed the clip. This just unscrews from the back.

Before adhering a Bat Adornment, I added some Statue(I think it was Statue or Mined) Foundry Wax to the clip and bat. Once the bat was secure and the Collage Medium was dry, Crypt Grit paste was added. I applied it a bit thicker around the bat so it looked like it was part of the clip. Set this aside to dry. I didn’t add any around the back of the clip yet, I did that after it was screwed back on.


I glued my pieces together. You can paint them before or after assembling. They were painted with Black Soot Distress paint, then dry brushed with Frayed Burlap. Two Pearl Drops were added on each end, and then Crypt Grit paste added.

For my Witches behind the door, I used this pair of Halloween paper dolls. The edges were trimmed to fit behind the Halloween Baseboard Door. I also added some witch hats from the Curiosities Sticker Book. The paper dolls were glued in front of paper from the Halloween Backdrops paper pkg. I’ve adhered a small Mica Tile (I’ve purchased these US Artquest tile pkgs. from Amazon) behind the door windows. This tile had little black flecks in it, which added to the theme.

A Swivel Clasp chain was added to the door with a brad. I have hung a lock and key from this. I’ve cut out a piece of Backdrops paper about the same size as the door. Ephemera and Halloween Collage Tiles were added along the outside. I machine stitched them on, but you can just glue them on. These come out just outside the door as shown in the main photo.

Before adding my papers to the clipboard, I applied Crackle Halloween Design Tape all around the edge of the clipboard. A piece of Worn Wallpaper was cut to the size of the clipboard and machine stitched around the edge. The edges were then inked and distressed. This was then adhered to the board. I also covered the back of my clipboard with paper but didn’t have a photo of it. The centre piece of paper with the ephemera was adhered over this. The clip was screwed back on and Crypt paste applied around the back where the posts were. After the paste was dry, I added a touch of Frayed Burlap paint to the raised areas on the clip.

This Skull embellishment has a drippy candle glued on top (with Collage Medium) and then I added more drips down the candle and skull with hot glue. Foundry Wax and a bit of paint were added to blend the two together and cover the hot glue.

For my “31” I used these two Halloween Baseboard pieces. I have a tiny hole punch or you can use something else like a craft pic to punch a few holes near the top, for sewing heavy thread through. Leave threads on either end to tie up the bones. Once they are hand stitched, I wet my baseboard pieces(mostly around the edges) and this makes the layers of paper separate. I roll up the edges, to make it look old and distressed. Ink the edges, distress, color, to age them.

Glue your door onto the clipboard, with the top edge slightly under the clip. Just make sure you leave enough room for your small shelf at the bottom of the door. The tip of the web is at the bottom of the clipboard.

Adhere your web shelf, then the “31” right in the middle below. I’ve also adhered the tied up bones(these were also inked and aged). Two Pearl Drops were added on each side with ends of the thread tucked around or beside them.

I’ve added a broom on one side, which was distressed with paint and sprays. I bent the broom bristles to make it look old and well used.

My skull was adhered to one side with craft dried moss and a Halloween pumpkin (Foundry Wax on the pumpkins too).

The lock and key also had Foundry Wax and Crypt Paste added.

A Spider Adornment was aged with Foundry Wax and paint, then attached to the broom. Two more pumpkins treated with Foundry Wax and paint were added, along with moss, beside the broom.

Here’s another look at my finished Clipboard. Hope you have been inspired by all the fabulous Halloween projects created by the Tim holtz makers. If you missed the YouTube live, check Tim’s channel or his website for links to all the maker’s projects.
Have a great Halloween and happy crafting!
Until next time,
Jan
Supplies
TH93278 Clip Board
ETC014 Bat/Web Etcetera Trim
TH94250 Halloween Adornments
TH94266Halloween Paper dolls
TH94271 Curiosities Sticker Book
TH94252 Halloween Baseboards
TH94255 Halloween Collage Tiles
TH94261 Halloween Ephemera
TH94251 Backdrops Paper pkg.
TH94147 Halloween Worn Wallpaper Scraps
TH94259 Halloween Design Tape
TH92677 Swivel Clasp
TH94270 Skulls
TH94260 Candles
TH94262 Halloween Fringe
TH94265 Pearl Droplets
TH94162 Lock/Keys
TH94267Pumpkins
TH94168 Boneyard
TH94176 Broomstick
Tdak80442 Kit 2 Foundry Wax (Statue)
Distress Paint - Frayed Burlap, Black Soot
Halloween Mica Stain
Crypt Grit Paste
Dried moss from craft store


1 comment
You know, we really need a pack of Baseboard Doors next year for Halloween. Another fabulously spooky, grungy, Halloween make. I think I might finish the clock this weekend...I'll be sure to link you to it...Happy Halloween...hooooowlll, hooooowwwwlllll. at the moon.
Post a Comment