Hello everyone! I’m sharing another project created for the Tim Holtz Sizzix Halloween 2022 release. Colorize animal Thinlits are so fun to create with and Myron the frog is a great addition to the collection!
Myron comes with a cute mushroom too, of course I couldn’t stop at one! Sizzix has step by step YouTube videos on their Colorize Hub Section for every Colorize die set, which I highly recommend watching.
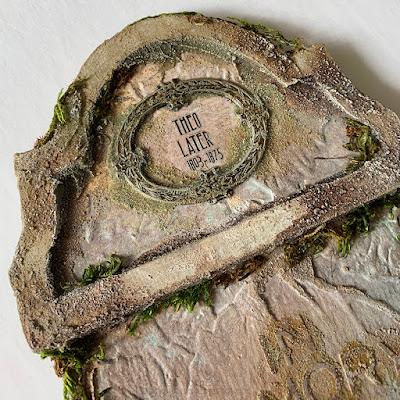
I wanted my tombstone to look like it was carved stone, so I used the Acorns 3D Embossing Folder on the textured side of Distress Water-colour cardstock. I decided to use the circle embossing plate from the Embossing Diffuser Set#1 to eliminate any embossing in the centre, so I could add in my letters. This plate replaces a cutting/embossing plate.
The embossing will only occur around the open circle.
To colour my tag, I lightly sprayed with Distress Oxide and Distress sprays. I like to give my cardstock a bit of colour before embossing, and then after, adding a small amount so it gathers into the grooves, highlighting the embossed areas. I tried to keep it lighter in the middle, using Antique Linen, Frayed Burlap, and Walnut Stain(I think) near the edges. My embossed cardstock was adhered to the tag, It's slightly shorter in length, but the top and bottom will be covered by the tombstone add-ons.
Using the Alphanumeric Thin set, I die-cut the words, In Memory Of. This was from coloured Distress cardstock, similar to the tombstone. I’ve added a small amount of Distress Grit Paste around and over some of the letters. When I applied the grit paste, colour from my Distress sprayed paper seeped through to the paste. I didn’t mind this, as it gives my tombstone a more aged look. If you don’t want any seepage in between layers of your mixed media project, I would recommend applying a small amount of Distress Micro Glaze on your bottom layer. This glaze is a water resistant sealer, so it will stop the colour seeping into your glaze.
I did the same embossing with a diffuser on a small piece for the top piece of my tombstone. This time I used the oval diffuser plate.
There is a border that goes on top. This I painted with Distress paint (Frayed Burlap) and it will be adhered to the top of my tag.
The bottom piece was also painted. Grit Paste was applied in the corner and on the frame. I had used last year's Halloween Grit Paste (I actually had some left!) but this year's Cr ypt paste would have the same effect, slightly different colour with a black fleck (TSHK81081) or even the Translucent Grit Paste (TDA71730). I tinted it in areas with a very small amount brown Distress paint and a lightly touch of Antique linen across the raised areas. The Grit paste was also applied the same way to my bottom piece.
Once you have the top and bottom pieces adhered, I hot glued dried moss along the edges.
I used the Kraft Stock Cool Stack paper(TH94110) which is greens and earthy colours, and Black for Myron. This was sanded lightly. The mushrooms were from Distress Heavystock that was coloured with Distress Sprays and Oxides. For added interest, I applied some Translucent Grit Paste to Myron's belly with an older Tim Holtz stencil (Dot Fade THS006), slightly tinted with a very small amount of green Distress spray or ink. It's a bit tricky to apply, but you can wipe away or scrap off any excess in areas you don't want it. Let this dry. After I had my Myron Frog and Mushrooms assembled, these were adhered to my tag (foam adhesive squares for dimension) and moss also tucked in everywhere.
A Halloween Remanent Rub (dearly departed and a decorative scroll from an old set) was applied to the bottom piece. You are done!
If you missed Tim's YouTube Sizzix Halloween video, it can be watched here!
Hope you enjoyed this brief tutorial and happy Halloween creating!
Until next time,
Jan
Supplies
THETCH012 Mini Tombstone Etcetera Tag -Stampers Anonymous
Acorns 3D Embossing Folder
Embossing Diffuser Set #1 657945
Myron Colorize Thinlits Die Set
Alphanumeric Thin Thinlits set 662226
Dot Fade Stencil THS006
Kraft Stock Cool Stack TH94110
Distress Water-colour and Heavystock Cardstock
Frayed Burlap, Antique Linen Distress Paint
Distress Sprays and Oxide Sprays (to colour mushrooms & Tombstone background)
Crypt Grit Paste TSHK81081
Translucent Grit Paste TDA71730
Halloween Remnant Rubs TH94268
Adornment Deco Frames TH93792
Dried Moss from Craft Store
Foam Dimensional Adhesive Squares


2 comments
Jan, this is gorgeous. You're an amazing designer. Alys
had fun making my version of this tombstone. when I get pics I will post in addicts. thanks as always for sharing and all the inspiration.
Post a Comment