Hello friends! Here’s my second project that was created for Tim’s Sizzix Everyday 2023 YouTube live release.
I love this new Road Trip Colorize set, so fun!
I’ve used the new Alphanumeric Bulletin set for the word “wander” and my cardstock is the Ranger Distress Christmas Woodgrain and the Halloween Woodgrain sheets. This die set cuts out the 2” letters in two parts, an outline and an inner letter. This allows you to use both pieces separately or together.
Sizzix Sticky Grid Sheets really helped line up my dies when I die-cut my word. I used the negative space of my Christmas Woodgrain paper for my card background so I wanted the letters straight. I left out the letter “N” in the word as I was going to add that (just the outline) over my car luggage. I’ve repeated this with the black Woodgrain paper. You could also use just plain black cardstock, as you are only going to use the outline part of the letter die-cut. Remove the white outline part of the letters and replace it with the black.
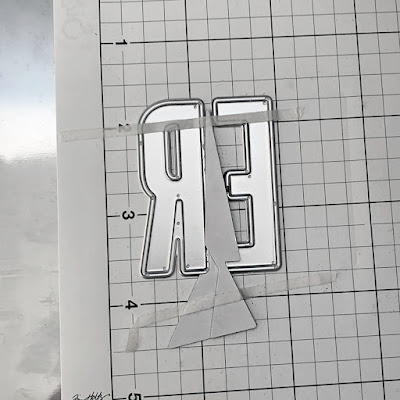
To add the die-cut tree so it looks like it’s embedded into the letter, leave your letters on the sticky grid. This is a bit tricky, and I’m not sure if I can explain this properly or even if I remember how I did it, but here goes! Sorry, I was suffering from a painful abscessed tooth at the time and on painkillers, so that didn’t help!lol!
My tree pieces are already cut out with my chosen colours, but do not assemble the tree yet. For small pieces, I add adhesive sheets to the back of my paper before die-cutting. It really makes it easier to assemble your small die-cuts. Place the bottom tree piece on top of letters where you would like it. I tried to pick the best place where it wasn’t going to die-cut the pieces too narrow or tiny. Cut each layer of the tree separately as it’s too thick to do it assembled.
I’ve used masking tape to tape down the next tree sections so it doesn’t move.
After the tree parts are die-cut, you are now going to remove the letters and place your tree dies on the sticky grid. You will now die cut your letters where the tree is going. So when you are assembling your card, your tree parts will replace the parts of the letters that were die-cut out.
You will do the same with the negative cardstock piece and tree base. Sorry, if this sounds confusing! It’s like putting puzzle pieces together! If this is too time consuming, just adhering the tree on top of your letters would look just as good.
Build your Colorize car, I recommend using the Sizzix directions, plus they make YouTube videos for all their Colorize sets. Again, I apply adhesive sheets to the back of my cardstock before die cutting those smaller pieces.
Assemble the luggage piece separately. There are two rope pieces in your set, one is for the luggage and the other is for your tree, in case you want to use this at Christmas.
Adhere your car so the luggage ends up right where the “N” outline is. The top half of the N outline goes in front of the luggage and the bottom half is behind the car roof.
Assemble your Colorize sign. I’ve used an Idea-ology label for the sign part and applied a Tiny Text Remnant rub. Also assemble your car exhaust (or this could be used as clouds).
After adhering all my pieces to my card front, I added in a couple of cardstock mats and then my cardstock base. This die set is so cute, so many possibilities! I found that the people in the Christmastime die set 664731(a couple with a tree and lamppost) are a pretty good proportion for using in the car. You just need to use the upper part of the people and flip them so they face the same direction.
Hope you have had a chance to see the release on YouTube, so much inspiration! All the details and links to all the makers is on Tim’s blog.
Thanks so much to visiting!
Until next time,
Jan
Alphanumeric Bulletin Thinlits 666281
Distress Black Woodgrain Cardstock tshk81135
Distress Light Gray Holiday Woodgrain Cardstock tsck81197
Tiny Text Remnant Rub th93695
Tim Holtz or Sizzix coloured cardstock
Adhesive sheets


1 comment
Very unique card. Love it.
Post a Comment