Showing posts with label The Little Black Dress Kit Club. Show all posts

My Final Project

This layout is my final project for The Little Black Dress Kit club.  After a lot of thought, I decided to step down from the design team.  I loved working with these kits, but I think it's time to ease up on a few commitments.  After spending so much time at home last year with my illness, I want to enjoy what little summer we have!


It's time for Urban Scrapbook's July kit.  This month's challenge is all about dry embossing.  The kit is filled with Simple Stories new summer line,"100 Days of Summer" paper, sticker letters, a Tim Holtz embossing folder, and lots of fun embellishments.  I embossed the center of my paper by wrapping the sides around my machine's platform plate.  Your paper will crease where it was folded, but I just think it adds to the distressed look.  I also inked my embossing folder before I put in my paper, and then embossed it(the yellow paper beside the photo).  I love the different effect you get!


Check out Urban Scrapbook's website to see what the design team has come up with this month!  The layouts are all on display at the store too, along with the kits for sale.
Have a great Thursday!
1

Usually....

I hate gloomy, rainy days, but today I'm lovin' it!  I have the day off, I did all my running around, groceries, etc. on Tuesday, so I have my "cozy" clothes on and I'm not leaving the house!  My husband just got home from out of town this morning, and brought me my "Timmies" coffee, could it get any better?  I'm just scrapbooking (well, going to scrapbook, ... I better!) I've spent the morning looking for photos, playing with photos, checking out blogs, so now I should be inspired enough!  What to you do to get inspired?  If any of you have any great ideas or wonderful websites/blogs I'd love to hear about them.
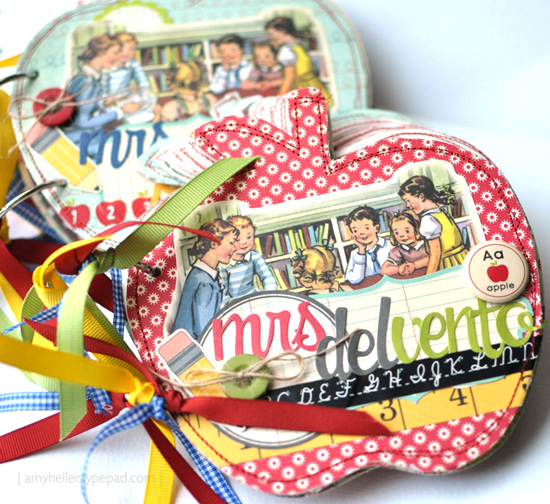
For those of you that are searching for teacher gift ideas, check out Amy Heller's blog where she has made these cute apple shaped books:


Or, if you're really ambitious, check out what Roxanne has made for teacher gifts.  Seriously, Roxanne?  You must really love your kid's teachers!  These books are amazing!  I don't think I would want to give them up!  If you have checked out her blog, you will also notice the tag she has made for demo night at Urban Scrapbook.  If you have nothing to do tonight, drop by the store to make one!
Here's another layout for The Little Black Dress Kit Club June kit:

Yes, I know, I am obsessed with butterflies lately!  It was that "all over the page" Martha Stewart butterfly punch that got me started!  Then I saw the punch with two little butterflies and one larger one used by some of the gals at the store, so I had to get that one.  That filigree one started calling my name soon after, so I brought that one home too.  That's the problem with working at a scrapbook store, you end up bringing something home everytime you work!
Anyways, I'm just warning you, there will be more layouts with butterflies!
This photo is of my husband's grandparents, shortly after they were married.  I was contacted by a woman in Wales, from Ancestory.com (another obsession) asking if we were in some way researching the same family.  Turns out we were, and she invited me to look at her family tree and her photos.  She has researched my mother-in-laws' family back into the 1700's, and had lots of old photos.  One of them was this photo which my mother-in-law had never seen of her parents before(love how her mom is standing on the step to be taller, she was barely 5 ft. tall).  Unfortunately, her father died suddenly when he was around forty, she was only eight years old, so she doesn't have very many photos of him.  I gave her a copy of this one and a few of him when he was a boy, she was so excited!  After looking at old photos, there's one thing that I noticed.  I love the ones that are taken informally, they might not be the greatest photo but you can see more of the person's personality.  I like looking at their surroundings, it makes for a more interesting photo, I think.  I wonder what our families will think when they look at all our photos years from now?  I know mine will be laughing hysterically at some of my hairstyles, that's for sure!
That's it for today, I'm off to my scrapbook room.  Have a great day!
1

It's been awhile....

since I have posted anything.  Seems like my days get busier everyday and I just don't have time or the energy to post here!  I should be doing all my laundry right now, but I'm avoiding that growing pile!  No kids at home any more, so why do I still have so much?
We had our visit to New York to visit our daughter.  Here's some photos I took from the plane.  It was a nice clear day, so we had a great view of the city.


 She's a pretty busy young woman (two jobs) but we managed to see her as much as possible.  We stayed in a hotel this time, our son and his girlfriend stayed with her in her teeny tiny apartment.  It was a great hotel - The Hampton Inn in Chelsea, two blocks from her apartment.  Plus, it was just down from an antique store and across the street was a flea market on the weekend.  The antique store had shelves of door knobs, door plates, all that stuff you could use for altered items!  But unfortunately New York prices!  We did come home with some gorgeous door handles.


Our first day, we went to meet our daughter for lunch near her work place, but on the way we stopped at my first "wish list destination" which wasn't too far from our hotel either, "Tinsel Trading".  I haven't been able to get there before, so I was determined this time.  A whole store of ribbons, trims, vintage ribbons, buttons, etc.  There are some incredible vintage ribbons in glass cases that are so beautiful but extremely expensive.  But this isn't the only notions store in the garment district.  There is store after store of trims, ribbons, buttons, in this area.  I could have stayed there all day, but my husband, for some reason, didn't share the same enthusiasm!


One of Urban's customers, Brenda, recommended we check out the "Frick Gallery" which was breathtaking.  It is an art gallery in the "Frick Family"home that is the most beautiful mansion I have ever seen.  Thank you, Brenda for recommending it!  If you haven't been to this gallery when in New York, I would definitely make the trip.
Other than eating, eating, and more eating (the food is so good) and shopping, we walked along the "High Line" park, which is made from an abandoned rail line above the street level.  I'm not sure how many blocks it goes for, but they were just opening the next section a week after we were there.  It is such a cool idea, instead of demolishing the rail line, to turn it into a walking trail park, with shrubs, flowers and grasses where the tracks are.


The weather wasn't great, we only had two nice sunny days, so our trip to Central Park was short and sweet.


And here's a view of Union Square from inside the biggest and busiest DSW shoe store I have ever seen.


So that's a little bit of my trip and a few photos.(I didn't take as many this time, it was raining quite a bit)  I think I'm still tired from all that walking!
Now, back to scrapbooking!  I do have a couple of projects to share.
First, from May's kit for The Little Black Dress Kit club, I made this little book using the Glitz chipboard book covers that were included.  I have lots of photos from Fort Edmonton and I put some of my favorites in here:


I used my Tim Holtz woodgrain embossing folder on the cover and cut out the center with a Tim Holtz die, then inked and distressed stained it.
This next layout is for Little Black Dresse's June kit.  It seems like I just get their monthly kit finished, and then the next one is here!
We have an old birdhouse in one of our trees that is practically falling apart, but every year there are birds nesting in it one after the other.  I love it when I can catch those little babies feeding!  A close-up of the flower that I made using a Martha Stewart "All over the Page" pinking circle punch, Graphic45 metal flower, and the little center spikes are exclamation marks from the American Crafts letters included in the kit.  That's all I have finished so far for their June kit, still working on the rest.
Next is my monthly layout for Urban's June page kit.  The kit included papers from  Pink Paislee's Hometown collection.  This paper line is designed by the owner/designer of Collage Press (was one of my favorite companies) who is now just designing for Pink Paislee.  It is all about borders in this kit:
Check out what the other Urban designers have come up with, they are all fantastic!
And if I didn't have enough to do, I joined up with a few of the other girls at work and Nicole in a tag exchange!  Actually, I think we are all enjoying making these tags, there's only five of us, so there's not many to do.  These are my May and June tags:
May's tag had to be monochromatic and include a quote.  June's tag had to be masculine and include a zipper.


And now I have left the best news for last!  I was asked to do a layout for Canadian Scrapbooker and it made the cover!  I was given this photo and had to come up with an 8 1/2 x 11 page.  I've never done a layout in this size, it was a bit of a challenge.  You know me, I put a lot on my pages.  It felt kind of weird scrapbooking a photo of people you have no idea who they are, but I was so inspired by their clothing in this beautiful photo.   There's still some magazines left at the store, but they sell out fast!
This ended up being a very long post, didn't it?!  A whole month's worth of news, I guess.  I had better start that laundry, though!  Take care and have a great week!
1

A quick post...

with a layout from The Little Black Dress May kit.  For those of you who love October Afternoon, there's some of their latest release in this month's kit! Lots of goodies in this one!  This layout is of my daughter's first time she rode a two-wheeler.  It was the day of her playschool graduation and she was anxiously waiting for the afternoon, so she decided to try and ride her bike.  She was so excited when she finally got it!  I was too, but also relieved that there was no wipe-out and scrapes and bruises!  There will be more projects coming later.


For those of you with boys, who have a hard time finding inspiration for layouts, there's a great blog called
Scrap the Boys.  Check it out, they have challenges too!
Have a great week!
3

Happy National Scrapbook Day!

Mother's Day and National Scrapbook Day all in one weekend!  I hope everyone has a chance to do a little scrapbooking this weekend.  I have a few projects I need to finish in the next couple of days, so hopefully I can get those done.
It's been awhile since my last post, I've been in a creative funk lately.  I don't know if it's the weather, lots on my mind, or just everyday life that's been getting to me, but hopefully it comes back soon!
My husband and I are taking a trip to New York to visit our daughter, whom we haven't seen for over a year, so I am looking forward to that!  Maybe that's what I need, just to get away!  After being stuck at home last year with my cancer, I think a change of scenery will do my good.
 Last month we got one of those phone calls every parent dreads.... my daughter's friend was phoning from an ambulance that was taking my daughter to the hospital.  She had been crossing the street and was hit by car. A lady was turning left, wasn't paying attention, and hit her.  Thankfully she wasn't seriously hurt, just badly bruised and scraped up,  her back and neck are a little out of whack from being thrown & hitting pavement, and she was pretty shaken up by the whole experience.
It was the worst feeling, being so far away and not able to rush to the hospital immediately.  We both felt sick just waiting to hear what the doctors said after all her tests.  We were ready to book a flight immediately!  I think that's been on my mind lately, just wanting to give her a big hug and seeing her, making sure she's o.k.   It doesn't matter how old your children are, you still worry about them all the time, don't you?  That's what us mothers do best, worry!
Here's my projects from April's "Little Black Dress Kit Club".


This little book was in my Grandmother's sewing basket that I got when she passed away (30years ago) and I've always treasured it.  She was a beautiful seamstress and would make us outfits just from pictures she had clipped out from magazines.  In the book are all her granddaughter's measurements over the years, & little notes and clippings from magazines.
In the kit there was some corrugated cardboard, which I cut out a dressform using my new Tim Holtz die.  I then cut out another one from paper, glued it on top of the cardboard, ripped a bit off on the edge so the cardboard shows through, and then stained the edges with Tim Holtz honey distress stain.  The flowers were made with my Slice, and most of the papers & embellishments here are all from Glitz.


I seem to have a lot of photos of my kids looking or pretending to read books!  Must have thought they looked cute!  By the looks of these photos, they were tired of me watching them, and just decided they might as well pose and get it over with!  There was some vintage book papers in the kit, which I cut one out with the Tim Holtz clock die. The 7Gypsies paper under the photos was machine stitched, wet, and gathered on the bottom.
This is where I just couldn't figure out what to do next with the kit.  I think it was because, as much as I love all this new paper line from Glitz, after putting together Urban Scrapbook's April kit with the same papers, kitting all of the design teams kits, and customer kits, I was tired of it!  So, I finally came up with a garland.
I cut out the banners with chipboard, from an AccuCut die that Urban Scrapbook has.  I then covered them with the different papers and embellishments in the kit.
The letters were cut out from paper using my Slice.  I tore a strip of cotton fabric to hang the banners on and cut small strips to knot in between each banner.  I did staple underneath on the inside, the fabric and banner so each banner wouldn't slip.  That's all I managed to get done.  Unfortunately, it takes usually a month for my kit to get here from the States and by the time I get it, everyone else on the design team is working on their next month's kit!  I think  the gal from France gets hers faster than me!  I'm sure it sits in Customs for weeks.  Anyone else have that problem with our postal service? 


This layout was one I did awhile ago for "The Color Room".  I laugh when I look at this photo of my older sister and I.  "Now I Know" ... why we both hate wearing hats.  I wonder if we liked these ones?
The papers used were from Graphic45, Lily Bee, and Echo Park.  The embellishments were Echo Park, Basic Grey, and Pink Paislee.
That's all I've got for you today, I think I'll go and scrapbook for awhile!  Hopefully I'll accomplish something instead of just staring at my stuff on the table!
Have a great Mother's Day tomorrow!
1

The sky is blue!

Yesterday a customer told me that her daughter looked out the window the day before and yelled out, "Mom, the sky is blue!"  That's pretty much how we have all felt around here for the past few months.  Even though our winters are long and cold, we usually have sunny skies quite a bit(sunny Alberta!).  But this winter has been gloomy, which I find harder to take.  Last week, I think, the weather was getting to everybody, we were all grouchy!  For me, I just bought more scrapbook supplies, to get over the weather blues!  It's not good for the wallet, to work in a scrapbook store, especially when all the new product from CHA is coming in every week.  My favorite two, Pink Paislee and Glitz Designs arrived, and they did not disappoint!
I did another layout for Little Black Dress March kit:


Their March kits are sold out, but most of the papers and embellishments used were from Glitz's new collection, "Love Games".  Love their  packages of "Paper Layers", which are like small book pages.  This is one of them, the paper with the banner.  I extended the banner by drawing on my background paper with felt pen, coloring in with diluted distress ink, and cutting out a few triangles from pieces of paper.  There was a string of pearl beaded ribbon in the kit, which I pulled through cut out flowers from the patterned paper.  To adhere the end swirled part, I just stitched  it in a couple of places instead of glueing it.  This photo is of my husband's grandmother and her cousin in the early 1900's, ready to play tennis!  Not exactly the same attire, women wear now!

Well, it's already April and time for Urban Scrapbook's April Challenge kit of the month.  This month we were given the challenge of using stamps on our layouts.  The paper and stamps are from Glitz's new line,"Laced with Grace."  I love the colors in this line, the oranges and greens are gorgeous!
I was in a dilemma, (does this sound familiar?) I loved the green striped paper, but I really wanted to use the other side; distressed cream with a bit of words on the edges.  So I decided to make my own distressed cream background with the plain cream cardstock in the kit.  I inked the edges with forest moss, honey, and a bit of photo distress ink.  The best way, I find, to get that soft look, is to use my Tim Holtz blending tool, and non-stick craft sheet.  Place your paper on the sheet and with your inked blending tool start swirling on the craft sheet, close to the paper, and lightly work your way onto the paper.  This way, you don't get starting lines from your tool, and it looks softer.  Next, I inked the words stamp from the Glitz stamp package (included in the kit), dab a bit off parts of the stamp with a piece of paper towel, and lightly stamp on a piece of scrap paper.  Then stamp your cardstock.  Your stamped image is lighter this way.  The top stamped image in the right corner was stamped and embossed(with Ranger's antique gold), then I ironed the paper(place paper between brown paper) which removes the embossed powder, leaving an interesting texture on your paper.  It's hard to explain, but the color of the embossing powder is still there, it's just not raised anymore.  My layout is in the store, if you want to check out how it looks.  I also stamped on my collection card with clear ink and clear embossing powder, and covered the card with forest moss distress stain.  The embossed part works like a relief.    When I saw the card "collection", in my kit, I thought perfect for me, I'm a collector!  I have collected over the years, a few birdhouses; but last week I started a new collection, birds!  I saw these Jim Mullan birds a couple of years ago, while visiting my daughter in New York and fell in love.   I was ready to bring one home for myself and my sister Pat, but when I saw the price, those birds stayed there!  My favorite store, Wellington Gardens, opened back up last week and what did they have, but those birds!  I have been hoarding a gift certificate for over a year that my husband gave me, and this was the perfect time to use it!  I love my bird!  I don't know if I'll ever get another one like this, but I'm on the lookout for birds now.  Oh, and Pat, you'll have to buy your own bird, sorry!
The Design Team layouts are on display at the store (and eventually on Urban's website), check them out to see what everyone has come up with! We were late getting our product in this month so most of the girls just got their kits on Wednesday, so not all of them have finished yet. I'm always amazed at the different ideas and layouts we all end up with from the same kit!
Have a great weekend!
3

It's been....

a quiet week.  After the last two weeks, I really needed it!  It's funny how you can function at a fast pace, accomplishing lots, (especially when you are on a deadline) and then as soon as it stops; it hits you!  Do you ever ask yourself, how did I get all that done?  Because this week, nothing was done!
 I did finally receive my March "Little Black Dress Kit" on Tuesday.  It was mailed February 12th, more than a month ago!  I wonder where it's been all this time?  See, nothing or nobody wants to come here, with this miserable weather!  For those of you that don't live here in Alberta, it's been snowing all week and still cold.  I have never seen so much snow in all my life.  I think we are all starting to wonder when it will ever melt and if  we will see the grass again.
March's kit is called,"Black Tie Love Affair".  Love this kit, lots of new Glitz!

I've just got one layout done, so far.
Here it is:

I used my new Martha Stewart all around the page punch, Wild Flowers.
Love this punch! On the left side, I stamped Tim Holtz's new book plate stamp on patterned paper and embossed with clear powder, so I got that embossed resist look.  I then inked over it, wiped away the ink from the embossed part, and then just the parts in between are left inked.
I'm still working on the rest of my projects, hopefully those will be done this weekend!
Take care and have a great weekend!
0

Just a quick post...

and my last one for February!  It's hard to believe that it's March 1st on Tuesday and still cold and snowing!!  It's been snowing for two days and the temperature has dropped again.  I'm so glad that I have this hobby to keep me busy.  I've been scrapbooking with summer, garden and flower photos to get my mind off this awful weather.  Here's another layout I've done with The Little Black Dress February kit.
The photos are of my mother-in-law's garden.  She can make anything grow!
I was going to make some rosette flowers, but instead used the folded paper around my circle.  I stitched around the circle first before I adhered the accordion folded paper behind it.
I also made a birthday card with leftover paper. I used a Martha Stewart punch on the purple paper and my Slice for the happy birthday, scalloped ovals and flower.

Here's my layout for the March Urban Scrapbook  kit.  Our technique this month is all about punches.  The layouts will be up at the store on Tuesday, so come and check them out!  The paper and embellishments in the kit are from Little Yellow Bicycle.


I punched out the edge of my paper before I made my rosette flower with the Martha Stewart Crown punch.  The blue border was punched out with a border punch on both sides.  It ended up being about an inch wide.  There were two rows of small holes so I placed the thin ribbon in the middle and laced the twine across.  This photo is from when we lived on Vancouver Island.  There were lots of trails around so on hot days, I would call my friend and tell her to pack a lunch and we would head off with our kids to hike in the cool shade of the huge trees.  The kids had such a great time, as you can see by this photo, and have great memories!


That's all for now, have a great week!  And for all of you here in Edmonton, keep warm!
0

This month...

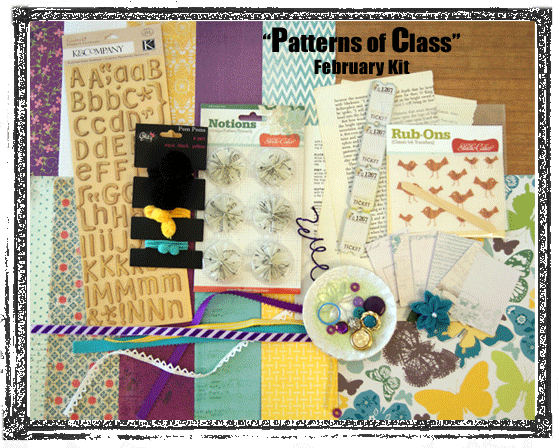
seems to be flying by for me! (that's my excuse for not posting in awhile!)  I have managed to get a few projects done from the February kit for The Little Black Dress Kit Club.  It's called Patterns of Class and here's a photo of everything in the kit.


The butterfly paper from GCD was one of my favorites, and this is what I did with some of it:


I thought of making a paper flower bouquet, but after looking at all the butterflies, I decided to do this.  For the box I used an empty japanese tea box, which I had saved because it was a nice heavy cardboard.  It already had a nice yellow rim on top so this paper from Crate was perfect for covering it.  I used the turquoise ribbon and felt flower from my kit to decorate it.  I then cut a block of florist foam for the inside.  I attached wire to my cut out butterflies with a hot glue gun and stuck them in the foam.  I cut up some white tissue with my Martha Stewart fringe scissors and crumpled it for the filling on top.  Right now it's sitting on my desk, so when I look at it, I forget about this cold and all the snow we have here.


How can you tell, I'm anxious for spring and summer!  A photo of an Allium from my mother-in-law's garden.  I cut out some of the tags and the title using my Slice and the lock and key is cut from a Tim Holtz die. With the lock and key, I cut out several using book pages and layered them with the patterned paper on top.  I then wet the edges, curling them up and then inked.  This close-up photo isn't that great but you can see what I mean.  My hand stitching was done using my We R Memory Keepers stitching tool.  This tool is so easy to use!  I know there are a lot of scrapbookers waiting for it to come in at the store, but unfortunately it won't be until the end of March.  They are releasing some new pattern attachments, which I am looking forward to using.

I found these old photo booth photos in a box the other day,  so I had to scrapbook them.  I don't even remember when the kids posed for these!  I wish we had done this more, they are so funny to look at, now that the kids are grown up.  It's funny to see what faces they made, when given a limited time to pose.  I wasn't sure how I was going to use the pompoms on a string (Glitz) that were in the kit.  One fell of the end, so I used it as the center of my pinwheel flower(cut from my Slice), and I tied the string around the photo and paper.  The cards were cut out from a piece of Crate paper, the little brown birds are Studio Calico rub-ons.

That's all I've managed to get done, I'm in the middle of another layout, so hopefully I can finish that tonight.  I really want to get these projects done, I have some wonderful new Prima product that came home with me today and I can hardly wait to use it.  Urban also got in some really cool vintage pocket watch pieces and watch parts in today.  I feel another configuration box idea coming!!  At least this cold weather is great scrapbooking weather!
Take care and have a great weekend!
0
Back to Top